A solid backpacking plan really comes down to four big pieces: picking a destination that's actually doable, nailing down the logistics like permits and money, packing the right stuff, and getting yourself ready for whatever the trail might throw at you. Get these right, and you’re not just hoping for a good time—you're making it happen.
From Dream to Destination: Selecting Your First Trail
Every great adventure starts with the same question: "Where am I going?" It's easy to get lost in a daydream of epic, multi-week thru-hikes you’ve seen on Instagram, but the real key is to match your ambition with your actual experience level. The goal here is to find a trip that sets you up for a win, not a miserable slog.
For most people dipping their toes into backpacking, the smartest move is to start local. A simple weekend trip close to home is the perfect low-stakes training ground. You get to test your gear, learn what your body can handle with a pack on, and figure out your hiking pace without the stress of being days from the nearest road.
Before you get too deep, it's also worth clarifying what you're even doing. Understanding the fundamental differences in Backpacking Vs Camping is a crucial first step that shapes your entire approach to gear and planning.
Realistically Assessing Trail Difficulty
Okay, so you've got a general idea of where and for how long. Now it's time to get into the nitty-gritty of the trails themselves. Trail difficulty is way more than just the total mileage—it's a mix of factors that will test you both physically and mentally.
Here’s what I always look at:
- Total Elevation Gain and Loss: This is the big one. It tells you exactly how much uphill and downhill you're in for. A flat 10-mile trail is a world apart from a 10-mile trail with 4,000 feet of climbing.
- Daily Mileage: Be brutally honest with yourself here. How many miles can you really cover in a day with a 30-pound pack on your back? Most people overestimate this, forgetting that trail miles are much slower than sidewalk miles.
- Logistical Challenges: Think about the practical stuff. Are there reliable water sources, or will you need to carry a ton? Are there tricky river crossings or scrambles that require more technical skill? These details can make or break a trip.
This flowchart really simplifies how you should think about balancing what you want to do with what you can do.
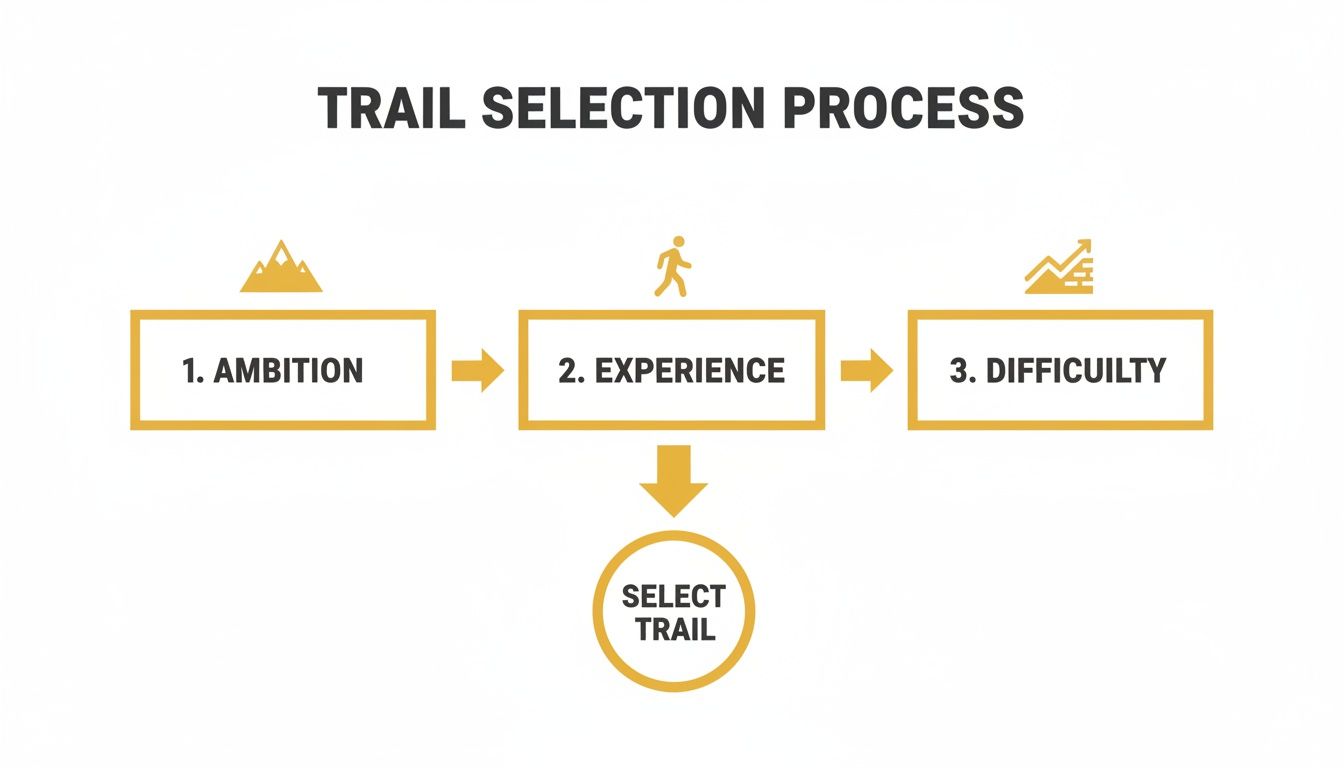
It’s all about making a strategic choice, not just an emotional one. This ensures your first big trip is inspiring and achievable.
A Scenario in Action
Let's look at two different hikers. The first dreams of tackling the entire 211-mile John Muir Trail but has only ever done day hikes. A much better starting point would be a 20-mile weekend loop in a nearby national forest. It lets them get a feel for carrying a pack and sleeping outside, building critical skills without overwhelming them.
Our second hiker is a seasoned day-hiker who eats steep climbs for breakfast. For them, a challenging 3-4 day trip in a rugged range like Colorado's San Juans could be the perfect step up. It pushes their boundaries without the massive commitment of a multi-week expedition.
Key Takeaway: The perfect first trail isn't about bragging rights. It's about building a foundation of good memories and solid skills. Pick a place that gets you excited but also respects where you're at right now. The epic challenges will still be there when you're ready.
Thinking through these details transforms a vague idea into a concrete plan. This is easily the most important part of the process, because the destination you choose dictates everything that follows.
Navigating Permits, Budgets, and Logistics
Okay, you’ve picked a destination. The daydreams are running wild. Now comes the part that shifts your trip from a "what if" idea to a real, tangible adventure: the logistics.
This is where you dive into the nitty-gritty of permits, budgeting, and your daily itinerary. Getting these details dialed in is the foundation of a smooth, stress-free trip. It’s the behind-the-scenes work that makes all the difference once your boots are on the ground.
Don't even think about skipping the permit research. Many of the most breathtaking backpacking routes, especially in national parks and protected wilderness areas, require them. This isn't just bureaucracy; it's a critical tool for managing crowds and protecting fragile ecosystems. Trust me, rangers are out there, and getting caught without one means a hefty fine and an unceremonious escort back to your car.
The permit process itself can be a real grab bag. Some are straightforward—you just book a spot online, first-come, first-served. Others, for iconic trails like Yosemite's Half Dome or The Enchantments in Washington, are run on highly competitive lotteries.
Securing Your Backcountry Permit
Your first stop should always be the official website for the park or forest service managing your trail. Search for terms like “backcountry permits,” “wilderness permits,” or “overnight travel.” This is where you'll find the official rules, key dates, and application instructions.
For those lottery-based systems, mark your calendar for the application window. It often opens months before the hiking season even starts. It’s always a good idea to have a few backup dates in mind to boost your odds. If you don't score a permit in the initial lottery, don't give up. Many parks release a small number of permits for walk-ups or last-minute online bookings, usually 24-48 hours in advance.
Pro Tip: If your heart is set on a popular area but you missed the permit window, try for the "shoulder season" (right before or after peak season). There’s way less competition, and you might snag a permit without the hassle.
Building a Realistic Trip Budget
A backpacking budget is about so much more than the cost of gear. In my experience, a huge chunk of your spending happens on the trip itself. With around 45 million backpacking trips happening globally each year, we have some solid data on spending habits. Younger backpackers on major international trips, for example, often spend just under €3,000, and a whopping 69% of that is spent at their destination.
As a solid rule of thumb, budgeting €40-50 per day for on-the-ground costs is a smart starting point. If you want to dive deeper, you can discover more insights about backpacking tourism statistics and see how they can shape your own financial planning.
Here's a quick checklist of what you need to account for:
- Transportation: This is your gas money or flight to the trailhead, plus any shuttle services you might need.
- Permit Fees: Don't forget application fees and any per-person, per-night costs. They add up.
- Food & Resupply: Budget for all your trail food, plus any town meals before or after.
- Lodging: Will you need a motel room the night before you start or the night you finish? Plan for it.
- Contingency Fund: I can't stress this enough. Always have extra cash for an unexpected gear repair, a celebratory burger, or an unplanned night in a hotel because of bad weather.
Crafting a Flexible Itinerary
With your permit dates locked in, it’s time to sketch out a rough day-by-day plan. Notice I said rough. This isn't a rigid, minute-by-minute schedule. It’s a flexible guide to help you manage your mileage and elevation without boxing you in.
Start by breaking the total trail distance into manageable daily chunks. If you're new to this, aiming for 5-8 miles per day in hilly country is a great goal. More seasoned hikers might feel comfortable pushing 10-15 miles. Pull out a good topographic map and start identifying potential campsites for each night, paying close attention to water sources.
Most importantly, build some buffer time into your itinerary. Maybe you'll find a stunning alpine lake you want to linger at for an extra hour. Or maybe a steep, rocky section just takes longer than you thought. A flexible plan lets you adapt to the trail without feeling rushed, which is exactly why we head out there in the first place.
Choosing and Packing Your Essential Backpacking Gear
Your gear is your lifeline out there—a mobile home and life-support system all rolled into one. Making smart, intentional choices about what to carry is one of the most critical parts of planning a backpacking trip. It directly impacts your comfort, safety, and ultimately, how much you enjoy yourself on the trail. The real art is striking that delicate balance between being prepared for anything and not hauling a ridiculously heavy pack.
It's easy to get overwhelmed by the sheer volume of equipment available. The backpacker gear market is constantly evolving, and it's a huge industry—projected to be worth over USD 1.1 billion in 2025 and expected to grow to nearly USD 2.2 billion by 2035. This steady 7.0% annual growth means hikers today have access to lighter, stronger, and more efficient gear than ever before. If you're curious, you can learn more about the latest trends in backpacking equipment to see how these advancements can help your trip planning.
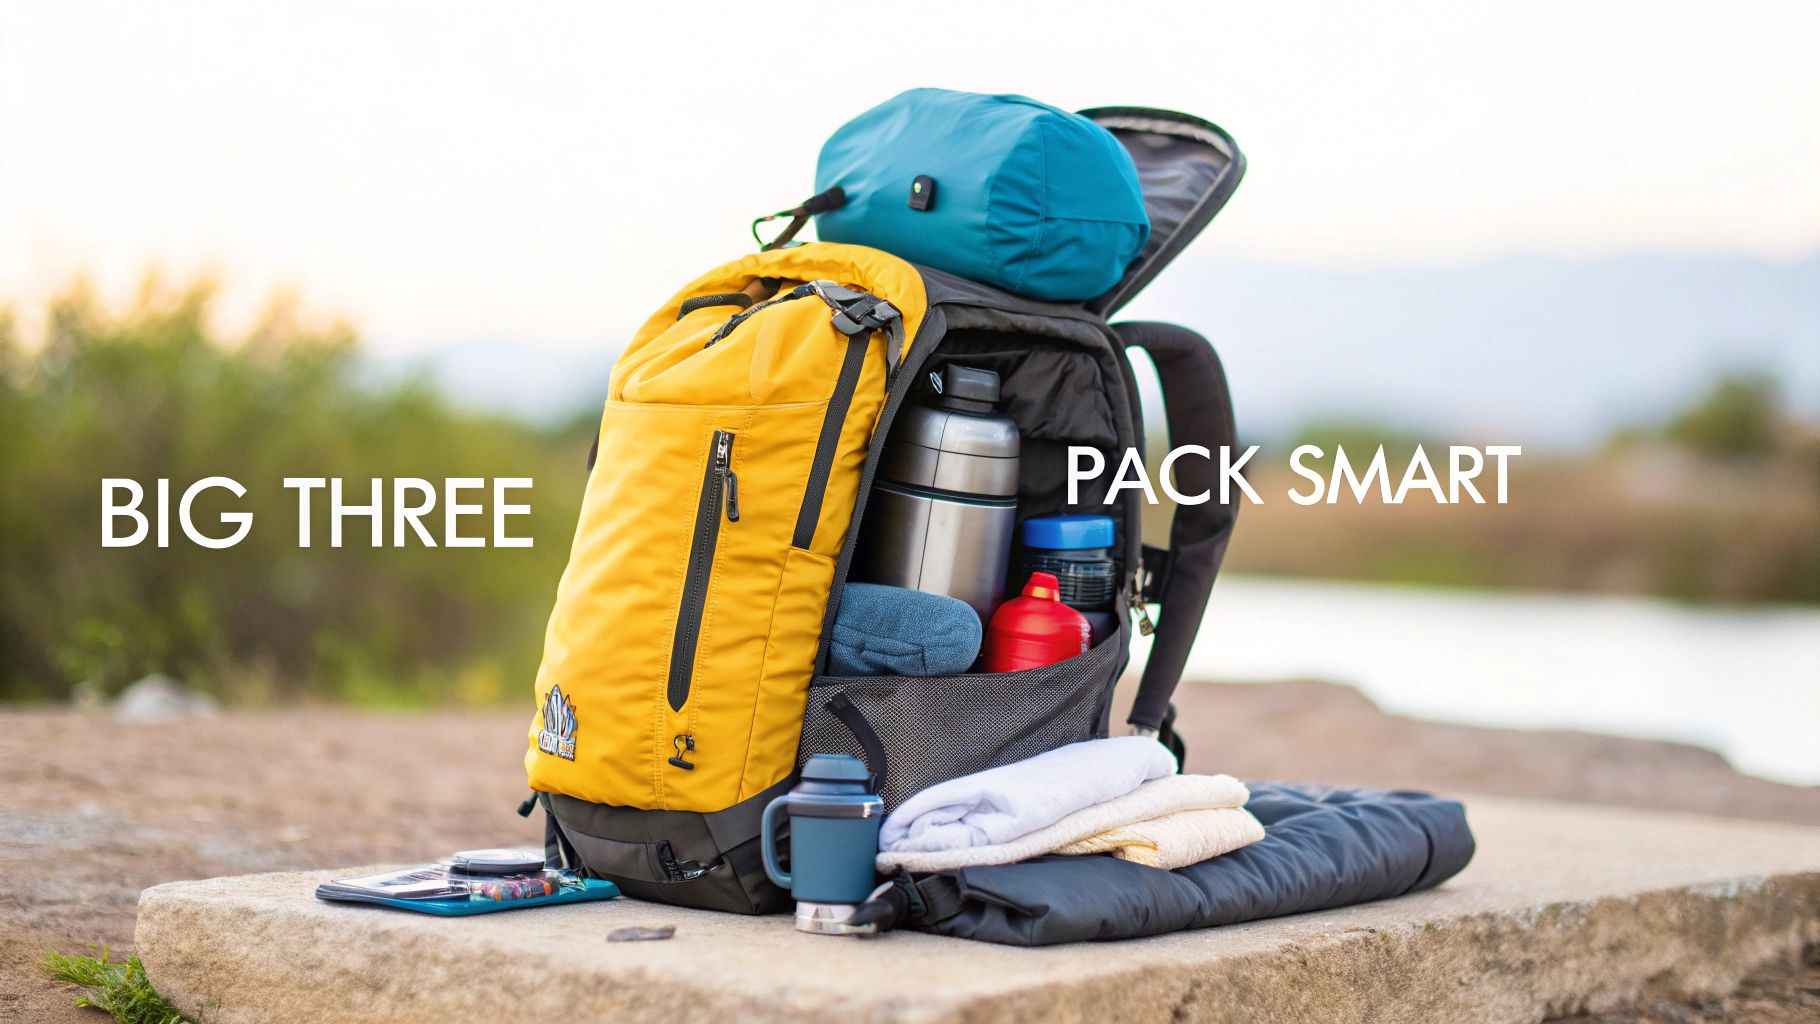
Dialing in Your Big Three
When you start pulling your kit together, always begin with the "Big Three." This refers to your backpack, your shelter, and your sleep system. These are almost always the heaviest and most expensive items you'll carry, and their combined weight sets the foundation for your entire setup.
First up is your backpack. Think of it as the cornerstone of your gear. Its size, measured in liters, should match your trip's length and the bulk of your other items. A weekend warrior can probably get by with a 40-50 liter pack. But if you're planning a week-long trek in colder weather, you'll likely need something in the 65-liter range or even larger. The absolute most important factor, though, is the fit. A poorly fitted pack, no matter how light, will make your life miserable.
Next is your shelter. For most people, this is a tent. Modern backpacking tents are incredibly lightweight, with many two-person models weighing well under three pounds. When you're picking one out, consider the season (a 3-season tent is perfect for most trips) and whether you prefer a freestanding design (which is easier to set up anywhere) or a non-freestanding one (which is lighter but needs to be staked out).
Finally, there's your sleep system, which includes your sleeping bag and sleeping pad. The bag's temperature rating should be based on the coldest temperatures you expect to encounter—trust me, it's always better to be a little too warm than dangerously cold. Your sleeping pad is just as critical. It's not just for comfort; it provides crucial insulation from the cold ground, which can suck the heat right out of you.
Building an Effective Clothing System
Your trail wardrobe isn't about looking good; it's about pure function. The secret is a versatile layering system that lets you adapt to changing weather conditions on the fly without carrying a closet's worth of clothes.
This system is built on three core layers:
- Base Layer: This is what’s right against your skin, and its job is to wick moisture away from your body. Look for materials like merino wool or synthetics like polyester. Absolutely never wear cotton—it soaks up moisture like a sponge and can lead to hypothermia.
- Mid Layer: This is your insulation. A fleece jacket or a puffy down/synthetic jacket provides the warmth. It's the layer you'll throw on when you stop for a break or as the temperature drops in the evening.
- Shell Layer: This is your shield against wind and rain. A waterproof and breathable jacket and pants are non-negotiable. They keep you dry from the outside while letting sweat escape from the inside.
By mixing and matching these layers, you can stay comfortable through a huge range of conditions, from a sunny, breezy ridgeline to a cold, rainy mountain pass.
Your Backcountry Kitchen and Luxuries
Trail food has come a long way from the days of simple gorp and jerky. Your cook system can be as simple as a small stove, a pot, and a long-handled spoon. Integrated stove systems are incredibly popular because they're fast and efficient, especially if all you're doing is boiling water for dehydrated meals.
Water is everything, which means a reliable filtration or purification system is a must-have. Squeeze filters are a fan favorite because they're light and easy to use, while UV purifiers offer a great chemical-free option. Whatever you choose, always carry a backup, like chemical purification tablets, just in case something goes wrong.
To help you get organized, here is a quick-glance checklist of what you'll need to start thinking about.
Essential Backpacking Gear Checklist
| Category | Essential Items | Optional Comfort Items |
|---|---|---|
| The Big Three | Backpack (40-65L), Tent/Shelter, Sleeping Bag, Sleeping Pad | Pack Rain Cover, Tent Footprint, Pillow |
| Clothing | Base Layers (wool/synthetic), Mid Layer (fleece/puffy), Rain Jacket & Pants, Hiking Socks, Hat, Gloves | Camp Shoes, Extra Socks, Sun Shirt |
| Kitchen | Stove & Fuel, Pot/Mug, Utensil, Lighter/Matches, Food Bag/Bear Canister | Coffee Press/Filter, Small Cutting Board, Spice Kit |
| Hydration | Water Bottles/Reservoir (2-3L capacity), Water Filter/Purifier | Electrolyte Tablets, Water Bladder Cleaning Kit |
| Safety & Nav | Map & Compass, GPS/Satellite Messenger, Headlamp & Batteries, First-Aid Kit, Knife/Multi-tool | Whistle, Emergency Bivvy, Power Bank |
| Health | Sunscreen, Bug Repellent, Lip Balm, Toothbrush & Paste, Trowel & Toilet Paper | Hand Sanitizer, Blister Treatment, Wipes |
This list isn't exhaustive, but it covers the core components you need to build a reliable and safe kit for most backpacking adventures.
Key Takeaway: You don't have to sacrifice every single comfort just to save a few grams. Sometimes, a small luxury provides a massive morale boost that's well worth the extra ounce or two.
A perfect example is your morning coffee. For many of us, a good cup of coffee is a non-negotiable ritual to start the day. Instead of packing bulky brewing gear, ultralight solutions like single-origin instant coffee packets from Cartograph Coffee deliver exceptional flavor without the weight penalty. For the minimalists out there, you can even find clever ways for making coffee without a dedicated coffee maker. It just goes to show that a little smart planning can let you enjoy the comforts of home, even when you're deep in the backcountry.
Fueling Your Adventure With Food, Water, and Coffee
Think of your body on the trail as a high-performance engine that's constantly burning fuel. We're talking thousands of calories a day. Keeping that engine running smoothly isn't just about staving off hunger; it's about maintaining your energy, keeping your spirits up, and making smart decisions when you're tired. Nailing your backcountry nutrition is one of the most important parts of planning a successful trip. It’s what gives you the power to crest that final ridge.
You might hear the old rule of thumb to pack 2 pounds of food per person per day, but honestly, that's a wild guess. A much better way to think about it is in calories. Most of us will burn anywhere from 3,000 to 5,000 calories a day out there, depending on how tough the trail is and our own body weight. Your mission is to find foods that are packed with calories but don't weigh a ton or take up much space.
The name of the game is caloric density—getting the most calories per ounce. Foods like nuts, olive oil, and hard cheeses are your new best friends.
Planning Your Trail Menu
Especially when you're starting out, keep it simple. You don't need to be a backcountry gourmet chef. Focus on meals that are a breeze to make, don't create a mess, and—most importantly—are something you'll actually look forward to after a long, hard day of hiking.
Here’s what a typical day of eating on the trail might look like:
- Breakfast: Speed and efficiency are what matter here. Think instant oatmeal packets jazzed up with nuts and dried fruit, or a couple of high-calorie bars you can munch on while breaking down camp.
- Lunch: No-cook lunches are a total game-changer. You save time and fuel. My go-tos are tortillas with peanut butter, summer sausage and cheese, or those handy foil packets of tuna.
- Dinner: This is your big recovery meal. Freeze-dried or dehydrated meals are the easiest path to a hot, satisfying dinner. If you want to go the DIY route, things like ramen noodles with a big scoop of peanut butter or instant mashed potatoes are cheap, light, and get the job done.
- Snacks: Get in the habit of snacking every 60-90 minutes. This is how you avoid the dreaded energy crash. Trail mix, jerky, fruit leather, and your favorite candy bars are perfect for keeping a steady stream of fuel going.
My Favorite Pro Tip: Ditch the bulky store packaging. Repackage everything into smaller, labeled Ziploc bags. You’ll be shocked at how much space and weight this saves, and it makes packing out your trash a whole lot easier.
Hydration and Water Treatment
Staying hydrated is even more important than staying fed. Dehydration will hit you with fatigue, headaches, and brain fog, which is the last thing you want when you're navigating. You'll need to drink way more water than you do at home, probably between 3 to 5 liters a day, especially if it's hot or you're working hard.
And no, you can't just drink straight from that picturesque mountain stream. Even the clearest-looking water can be full of nasty bugs like Giardia that will ruin your trip. A reliable water treatment system is absolutely non-negotiable.
- Squeeze Filters: These are incredibly popular for a reason. Filters like the Sawyer Squeeze are lightweight, fast, and physically screen out bacteria and protozoa without making your water taste weird.
- UV Purifiers: A device like the SteriPen uses UV light to zap viruses, bacteria, and protozoa. It’s super quick but does rely on batteries and works best with clear water.
- Chemical Treatment: Iodine or chlorine dioxide tablets are a foolproof, ultralight backup. They're effective but can take a while to work (sometimes up to four hours) and some people don't love the slight chemical taste.
The Morale Boost of a Good Trail Coffee
Sometimes, it’s the little things that make the biggest difference. There's almost nothing better than a warm cup of coffee on a chilly morning in the mountains. It's the ultimate morale booster and the perfect motivation to finally crawl out of your cozy sleeping bag.
Of course, a bulky French press isn't exactly practical for backpacking. But that doesn't mean you have to suffer through gritty, terrible instant coffee. Thankfully, there are amazing options now, like Cartograph Coffee’s single-origin instant coffee packets. They give you a genuinely rich, flavorful brew without any of the weight or mess. All you need is hot water for a true craft coffee experience. It’s a tiny luxury that delivers a huge payoff in trail happiness.
For a few more ideas, check out our guide on the best coffee for backpacking.
Tying Up Loose Ends: Your Final Pre-Trip Checklist
The real success of your trip is locked in long before you hit the trail. These last few steps are about shifting from logistics to readiness. This is where you get your body in shape, sharpen your backcountry know-how, and put your safety nets in place.
Think of it this way: a well-planned trip isn't just about having the right gear. It's about having the physical and mental grit to handle whatever the trail throws at you.
Getting Your Body Trail-Ready
Let's be real: backpacking is tough. Hauling a 25-40 pound pack over mountains is no joke, and it requires some serious strength and endurance. If you start training a few months out, you’ll be the one enjoying the views instead of just gutting it out to the next campsite.
Here’s a simple training plan to build a solid foundation:
- Build Your Engine: Get your heart pumping with activities like running, cycling, or hitting the stair climber. This builds the lung capacity you'll crave on those long, uphill stretches. Aim for 3-4 sessions a week.
- Strengthen Your Chassis: Don't skip leg day! Squats, lunges, and core work are your best friends. These are the powerhouse muscles that will stabilize you and carry that heavy pack.
- Do the Real Thing: The best way to train for hiking is... to hike. Load up your pack with the actual weight you plan to carry and find some local trails with some hills. This gets your body—and your shoulders and feet—used to the specific demands of backpacking.
Sharpening Your Wilderness Skills
Knowledge weighs nothing. It's also the most valuable tool you'll carry. Before you go, make sure you're confident in a few key areas that are non-negotiable for safety and being a good steward of the outdoors.
First, know the local wildlife. Research what animals live in the area and learn the right way to handle an encounter. This includes knowing how to store your food properly to keep bears and other critters out of your camp. And please, live and breathe the seven Leave No Trace principles. It's our collective responsibility to leave these wild places just as we found them.
A Quick Word of Advice: Your most crucial skill is self-reliance. Knowing how to navigate without a phone, treat a blister before it gets ugly, and make smart decisions when the weather turns is what truly separates a prepared backpacker from a person in trouble.
Why Redundant Navigation Is a Must
Your phone's GPS is an amazing tool, but it should never be your only one. Batteries die. Screens crack. And good luck getting a signal in a deep canyon. Every smart backpacker I know carries at least two navigation systems.
Your phone or a dedicated GPS device is great for a quick look at the map. But you absolutely must have a physical map and a compass as a backup. More importantly, you have to know how to use them together. Practice orienting your map and taking a bearing in a local park before you're in a situation where your safety depends on it.
Your Most Important Safety Net
No matter how many miles you have under your belt, the single most critical safety measure is leaving a detailed trip plan with someone you trust. This is the document search and rescue will use to find you if things go sideways.
Make sure your plan includes:
- Your full itinerary: Note your exact route, including trailheads, planned daily mileage, and where you expect to camp each night.
- Key personal info: Include your name, age, medical conditions, and a description of your gear (e.g., "I'm carrying a blue Osprey pack and using an orange tent").
- Your "panic" time: Agree on a specific date and time. If your contact hasn't heard from you by then, they know it's time to call for help.
This final check-in gives everyone peace of mind. It allows you to unplug and truly immerse yourself in the experience, knowing you've done everything you can to ensure a safe return.
Answering Those Lingering "What Ifs"
Even with the most detailed spreadsheet and a perfectly packed bag, a few nagging questions always seem to surface just before a trip. That's completely normal. Tackling these common "what-if" scenarios is the final step in building real, on-the-ground confidence. It’s about moving past the plan on paper and getting your head ready for the dynamic nature of the backcountry.
For instance, a lot of people wonder about heading out alone. Is it safe? It absolutely can be, but it requires a different level of preparation. Going solo is an incredibly empowering experience, but it also means you're your own backup. You have to be meticulous about sharing your itinerary, carrying a satellite messenger or personal locator beacon, and being brutally honest with yourself about your skill level.
How Much Wiggle Room Should I Build In?
One of the biggest mistakes I see beginners make is creating an itinerary that’s packed too tightly. You need a solid plan, especially for things like permits and resupply points, but the trail has a way of throwing curveballs.
A good rule of thumb is to build at least one "zero day"—a full day with no hiking—into any trip that lasts longer than a week. For shorter trips, just be conservative with your daily mileage goals. This creates a natural buffer for everything from a surprisingly tough climb to the simple desire to linger at a beautiful waterfall.
Expert Tip: Your itinerary is a guide, not a contract. It should give you the framework to make smart choices in the moment, not become a source of stress when reality doesn't match the plan.
What’s the Plan for Bad Weather?
In the mountains, the weather forecast is often more of a suggestion than a guarantee. Your safety hinges on being ready for a sudden shift. Before you even leave, look up historical weather patterns for the area and time of year you'll be there. And no matter what the forecast says, always pack your best rain gear.
Once you’re out there, become a student of the sky. If you see dark clouds gathering, especially in the afternoon, it's time to act. Are you on an exposed ridge? Get to a lower, more sheltered elevation before a thunderstorm hits. The trick is to make these decisions proactively, long before you’re in the middle of a serious downpour or electrical storm.
Is It Okay to Go Over Budget?
It’s smart to plan your spending, but it's even smarter to plan for unplanned spending. A contingency fund isn't a luxury; it's a critical piece of gear. You never know when you might need to replace a broken trekking pole in a trail town or hunker down in a motel for a night to wait out a storm.
Costs can vary wildly, and every trip is different. Whether you’re on your first trip or you’re a seasoned student backpacker trying to make every dollar count, having a safety net is non-negotiable. Setting aside an emergency fund of $100-$200 can be the difference between a minor inconvenience and a trip-ending disaster. Think of it as buying peace of mind—it gives you the freedom to prioritize your safety and comfort when the unexpected happens.
At Cartograph Coffee, we believe that a great adventure deserves a great start. Our single-origin instant coffee packets are designed for the trail, delivering exceptional flavor without the weight, so you can savor every sunrise. Fuel your next journey with us.