When it comes to the best coffee for backpacking, there’s a clear winner: a high-quality, freeze-dried instant coffee. It packs all the flavor you crave without the weight, bulk, or messy cleanup of traditional gear, making it the undisputed champion for hikers who care about both taste and trail efficiency.
Why Your Morning Brew Matters in the Backcountry
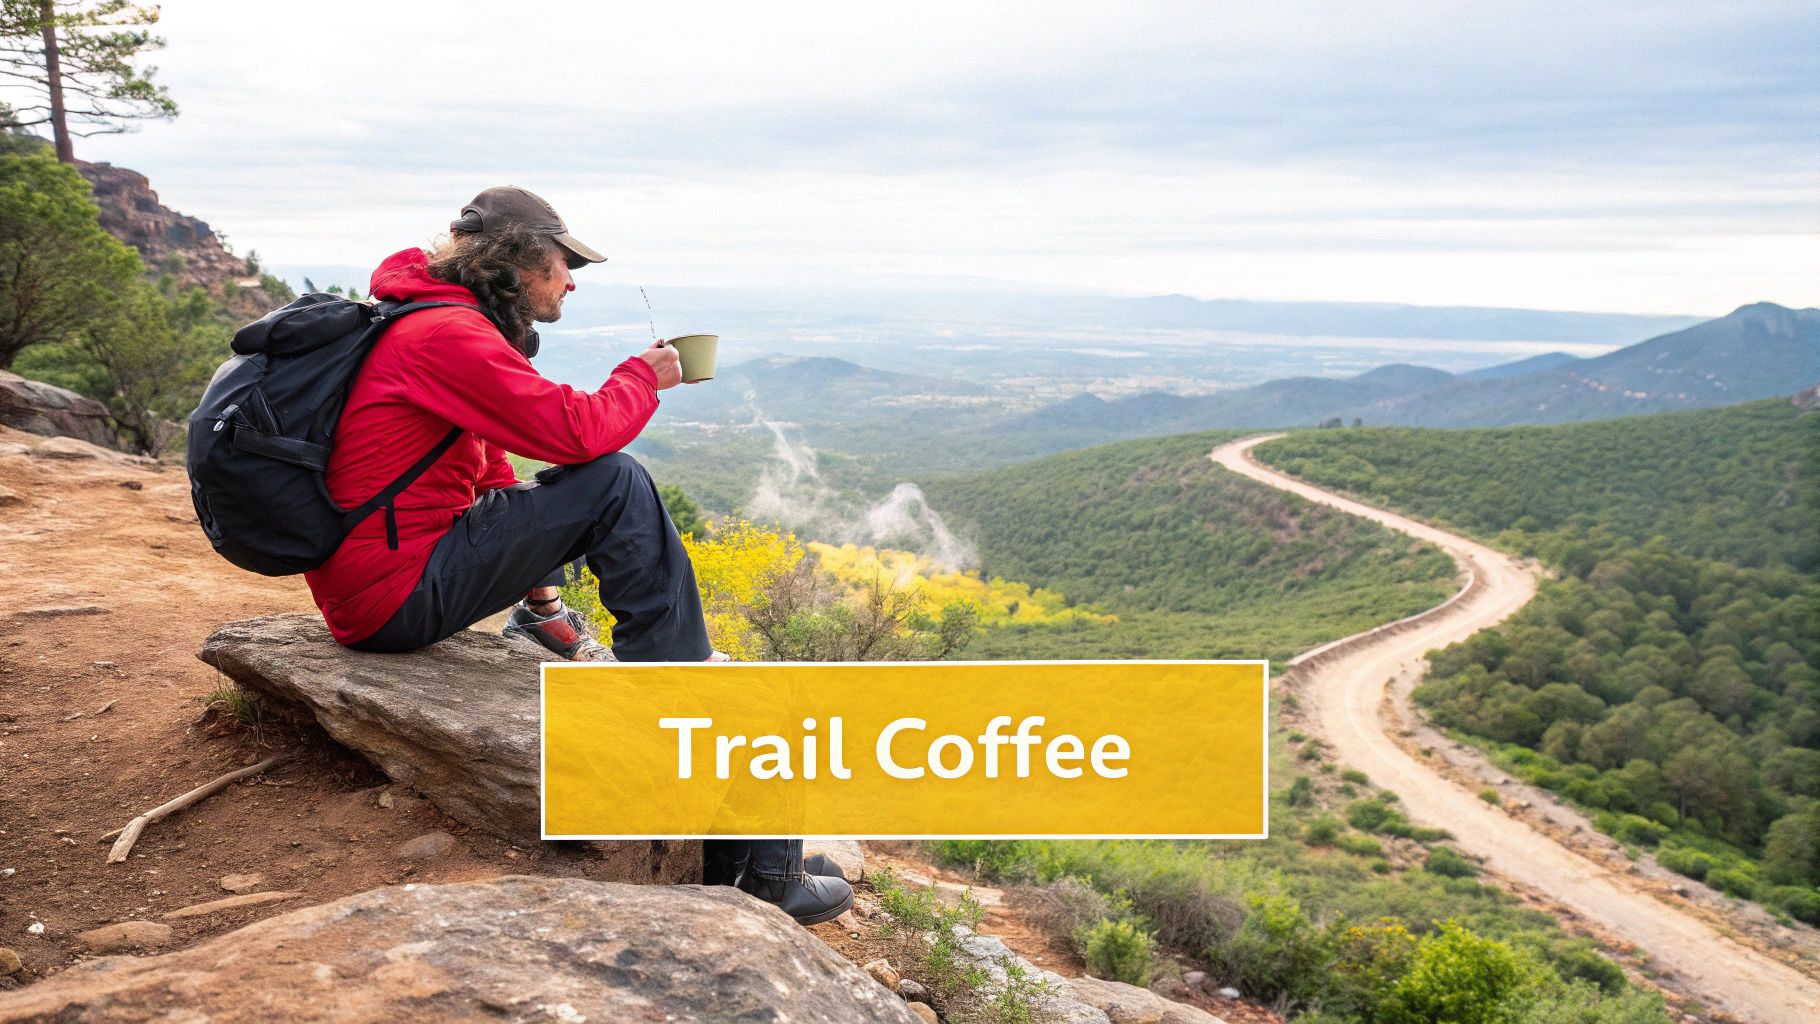
There’s nothing quite like sipping a warm, rich cup of coffee while watching the sun spill over a distant ridgeline. It's more than just a shot of caffeine; it’s a small, grounding ritual that connects you to a sense of comfort before a long day of hiking.
But for a long time, backpackers have been stuck between a rock and a hard place. The choice was either to choke down gritty, bitter instant coffee for the sake of convenience or lug heavy, clunky brewing gear deep into the wilderness.
It felt like a forced compromise. You could either have good coffee or a light pack. You could either enjoy a flavorful brew or easily follow Leave No Trace principles by not having to pack out wet, messy grounds. You couldn't have it all.
A New Era of Trail Coffee
Thankfully, those days are over. The coffee industry has come a long way, and modern techniques like freeze-drying have completely changed the game. This process locks in the delicate, complex notes of specialty coffee beans, finally bridging the gap between "instant" and "delicious."
This guide is built on one simple idea: you no longer have to compromise. You can brew a genuinely fantastic cup of coffee miles from the nearest coffee shop, all without adding unnecessary weight to your pack.
We’ll dig into why premium instant coffee is now the go-to for everyone, from casual weekend wanderers to hardcore thru-hikers. It's part of a much bigger trend, too. With over 2.25 billion cups of coffee consumed daily around the globe, people want that same great taste wherever they are, including the backcountry. This demand has pushed the industry to create better portable options that deliver a truly satisfying experience.
For many hikers, a great cup of coffee isn't a luxury; it's essential gear. It boosts morale, provides warmth on a cold morning, and fuels the miles ahead. The right coffee system simplifies your routine so you can focus on the sunrise, not the cleanup.
This guide will walk you through everything you need to perfect your backcountry brew. We’ll cover:
- Different brewing methods and how they compare on weight, waste, and convenience.
- What makes premium instant coffee the smartest choice for the trail.
- How to choose a flavor profile that matches what you love to drink back home.
- Simple techniques for brewing a perfect cup, even when you're completely off-grid.
By the time you're done reading, you'll know exactly how to make every trailside morning a great one. For more tips on the basics, you can also check out our guide on how to make coffee without electricity.
Comparing Backpacking Coffee Methods
When you’re counting every single gram in your pack, your morning coffee is no exception. Picking the best coffee for backpacking isn't just about what tastes good—it's a tough calculation of weight, convenience, and cleanup. Let's break down the most common trail options to see how they really stack up when you're miles from anywhere.
We'll look at each method through the critical lens of a backpacker, focusing on what actually matters out there: weight, pack space, ease of use (especially when it's cold and windy), and respecting Leave No Trace principles. Think of it like choosing the perfect piece of gear; the right coffee setup makes your whole trip smoother and way more enjoyable.
The Rise of Premium Instant Coffee
For years, "instant coffee" was practically a dirty word among anyone who genuinely enjoyed coffee. It conjured up images of a bitter, gritty powder that was only good for a desperate caffeine fix. But that's not the world we live in anymore. Modern, high-quality instant coffee has completely flipped the script.
Using sophisticated freeze-drying techniques, brands like Cartograph can now capture the complex, nuanced flavors of specialty beans in an incredibly lightweight, effortless format. It delivers a surprisingly rich and aromatic cup in under a minute, with absolutely zero messy grounds to pack out.
Coffee Bags: The Tea Bag Approach
Next up are coffee bags, which work exactly like you’d think—just like a tea bag. You simply steep the pre-portioned bag of grounds in hot water. This method is wonderfully straightforward and keeps the grounds contained, making cleanup pretty simple. Just pack out the used bag.
The problem? Coffee bags often produce a weak, under-extracted brew. The water just can't circulate through the tightly packed grounds effectively enough to pull out the full flavor. They also create more waste than a simple instant coffee packet and can be surprisingly hard to find in small trail towns.
Pour-Over Packets for the Trail Barista
For those who really love the ritual of brewing a good cup, single-use pour-over packets are a popular choice. These clever little packets have ground coffee inside a small filter that unfolds and sits right on your mug. You slowly pour hot water over the grounds, just like you would with a fancy pour-over setup at home.
This method can definitely produce a fantastic cup of coffee, but it has its downsides on the trail. It demands patience, a steady hand, and good protection from the wind. It's also the bulkiest and most waste-producing option in the "just add water" category, leaving you with both the outer wrapper and a wet filter full of grounds to pack out.
This infographic breaks down the trade-offs in weight and time for each method.
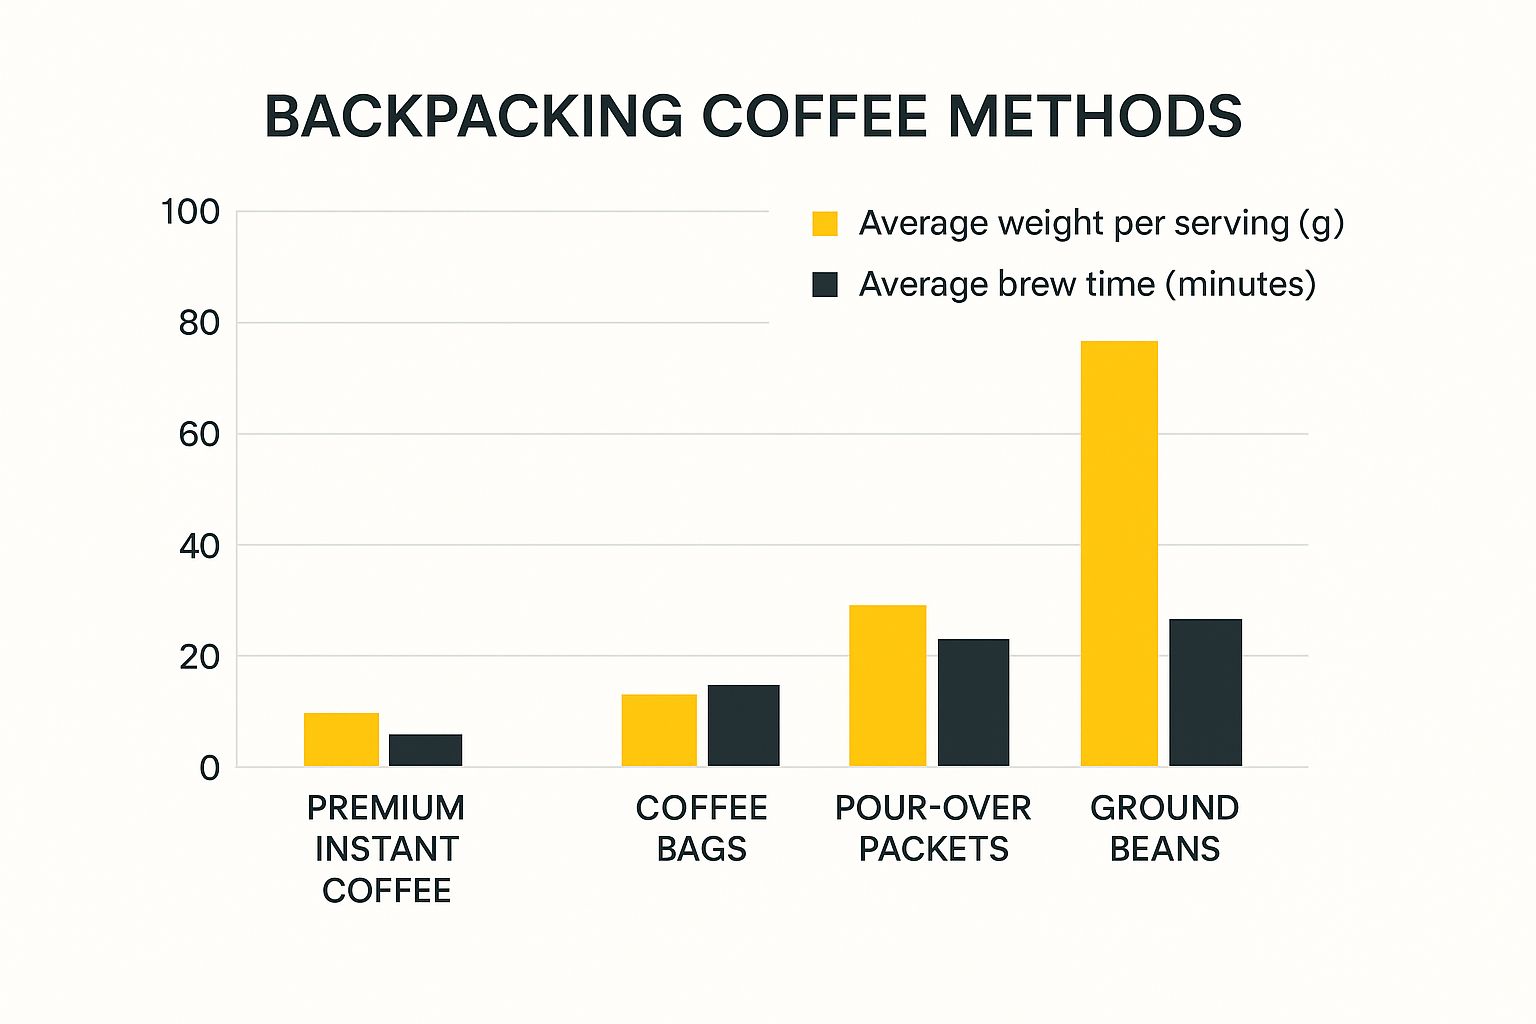
As you can see, premium instant coffee is in a league of its own when it comes to speed and weight savings, making it an obvious choice for efficient backpacking.
Traditional Grounds: The Heavyweight Contender
Finally, we have the classic approach: bringing loose coffee grounds and a brewing device like a French press attachment or an AeroPress. This method absolutely offers the highest potential for a customized, top-tier brew. You get to control every variable, from the grind to the brew time.
But all that quality comes at a serious cost in weight, space, and hassle. Brewing with grounds means carrying extra gear, using more fuel to boil water, and facing the biggest cleanup challenge of all.
According to Leave No Trace principles, all coffee grounds must be packed out. They don’t belong in the wilderness and shouldn't be scattered or buried. This makes hauling out wet, heavy grounds a major pain for any backpacker.
So, how do all these options truly compare side-by-side? Here’s a quick breakdown to make it clear.
Backpacking Coffee Methods Compared
This table gives a clear, at-a-glance look at the pros and cons of each method based on what really matters to a backpacker on the trail.
| Method | Average Weight (per serving) | Convenience Score (1-5) | Waste Produced | Flavor Potential |
|---|---|---|---|---|
| Premium Instant | 2-4 grams | 5 (Highest) | Minimal (small packet) | Very High |
| Coffee Bags | 8-12 grams | 4 | Moderate (bag & wrapper) | Medium |
| Pour-Over Packets | 10-15 grams | 3 | High (packet, filter, grounds) | High |
| Ground Beans | 15-20 grams + gear | 2 (Lowest) | High (wet grounds) | Highest |
While every method has its fans, the data points to a clear winner for most of us. The best coffee for backpacking is the one that delivers amazing taste with the least amount of weight, fuss, and environmental impact. And for that, premium instant coffee hits the sweet spot every time.
Why Premium Instant Coffee Is the Smart Choice
For anyone who's spent serious time on the trail, you know every decision comes down to a simple trade-off: weight versus reward. When it comes to that all-important morning cup, premium instant coffee has become the undisputed champ, delivering maximum reward for almost zero pack weight. It’s the smart, efficient choice that doesn’t make you sacrifice a great trailside moment.
But let's be honest, "instant" used to be a dirty word among coffee lovers. So what changed? The technology behind it, that's what. The old-school stuff was made using a harsh spray-drying process that basically blasted liquid coffee with hot air. It was fast and cheap, but it scorched all the delicate flavor compounds, leaving you with that bitter, burnt taste we all remember.
Modern premium instant coffee, like what we make here at Cartograph, uses a far more elegant method called freeze-drying.
The Science of Superior Flavor
Freeze-drying is a gentle, multi-step process that’s all about preserving the true soul of the coffee bean. First, we brew high-quality coffee to absolute perfection. Then, it's flash-frozen solid. This frozen coffee is then placed into a low-pressure vacuum chamber, where the ice crystals are turned directly from a solid into a vapor—a process called sublimation.
Think of it this way: spray-drying is like leaving a slice of bread in a hot oven until it’s a piece of charcoal. Freeze-drying, on the other hand, is like carefully pressing a delicate flower in a book. The original structure—and most importantly, the complex aromatic oils and flavor molecules—remain almost perfectly intact.
The result is an instant coffee that actually captures the bright acidity of an Ethiopian bean or the rich, chocolatey notes of a Colombian. It dissolves in a flash and tastes remarkably close to a freshly brewed cup from your favorite cafe, something that was unthinkable just a decade ago.
This painstaking process ensures that when you add hot water on a cold mountain morning, you’re rehydrating real, delicious coffee—not just a cheap caffeine delivery system.
Unmatched Practicality for the Trail
Beyond the impressive flavor, premium instant coffee truly shines in its practicality. It solves every single headache backpackers face when trying to make coffee in the backcountry. Let’s look at the three biggest wins that make it the ultimate trail companion.
- Maximum Caffeine for Minimum Weight: A single serving of premium instant coffee weighs just a few grams but packs the full punch you need. You can bring two weeks' worth of coffee for less weight than an empty Nalgene bottle.
- Zero Mess and No Waste: This is a huge deal for anyone following Leave No Trace principles. There are no messy, wet grounds to pack out. You just empty a small packet, add water, and pack out a tiny, feather-light wrapper.
- Unbeatable Speed and Simplicity: Picture waking up to a cold, windy morning at 10,000 feet. Your hands are numb, and all you want is something warm. With premium instant coffee, you can have a steaming, delicious cup in less than 60 seconds. Just boil water and stir.
That last point is impossible to overstate. When conditions are tough, the last thing you want to do is fuss with grinders, filters, or presses. The sheer simplicity of instant coffee means you spend less time working on your morning ritual and more time actually enjoying it.
The Sunrise Scenario
Imagine it: the alpine glow is just starting to hit the peaks. Instead of spending ten minutes grinding beans, setting up a pour-over, and carefully pouring water, you just heat your water and stir. Within a minute, you’re leaning back against your pack with your hands wrapped around a warm mug, fully present and soaking in the view.
That is the true advantage of the best coffee for backpacking. It isn’t just about the coffee itself; it's about what the coffee enables. It gives you back precious time and energy, simplifying your morning so you can focus on the very reason you’re out there—to connect with the wild. Premium instant coffee offers that perfect blend of quality, convenience, and trail-ready efficiency.
How to Choose Your Perfect Trail Brew
Trying to find the right premium instant coffee can feel a bit like navigating a new trail system without a map. There are so many options popping up, and knowing what to look for is the only way you’ll find a brew that truly makes those backcountry mornings special.
The best coffee for backpacking isn't just about grabbing something quick. It’s about finding a way to enjoy the rich flavors you love at home with the ultralight efficiency you need on the trail. It’s more possible than you think.
Believe it or not, picking the right instant coffee is a lot like choosing whole beans from your favorite local roaster. All the things that make a great cup—the bean's origin, the roast level, and the specific flavor notes—are carefully preserved in high-quality, freeze-dried coffee. If you know what to look for, you can find the perfect match for your taste.
Decoding the Flavor Profile
First things first, let's talk about the coffee's origin. Where the beans are grown has a massive impact on how they taste. Coffee beans from different regions have their own unique personalities.
An Ethiopian coffee, for instance, will often be bright, citrusy, and floral—it can feel almost tea-like. On the other hand, a Colombian coffee usually gives you that classic, rich cup with familiar notes of chocolate and nuts. Knowing what region you typically enjoy is a huge head start.
Next up is the roast level, which is probably the most straightforward clue to a coffee's flavor.
- Light Roasts: These are all about preserving the bean's original character. Expect higher acidity with vibrant, fruity, or floral notes. If you like a delicate, nuanced cup, this is your zone.
- Medium Roasts: The perfect middle ground. Medium roasts are smoother and more balanced, blending the bean's natural flavors with the deeper, sweeter notes that come from the roasting process.
- Dark Roasts: Go here for a bold, smoky, and powerful cup. Dark roasts have very low acidity and a heavy body. If you’re after that classic, strong coffee kick, look no further.
Finally, look at the tasting notes on the package. Words like "caramel," "citrus," or "cocoa" are your map to what's inside. Don't let them intimidate you! Just find a few that sound good and give them a try. Discovering what you like is half the fun.
Why Trail-Ready Packaging Matters
Once you have a flavor profile in mind, the last piece of the puzzle is the packaging. This might seem like a small detail, but for a backpacker, it's a game-changer. The best instant coffees come in individually sealed, moisture-proof packets.
This design is brilliant for two reasons.
First, it guarantees absolute freshness. Each serving is locked away from air and humidity, the two biggest enemies of good coffee. A bulk jar might seem like a good deal, but every time you open it, you’re letting the elements degrade the flavor. By the end of your trip, you're left with a stale, sad brew.
Second, it’s just plain simple. Single-serve packets are perfectly pre-portioned, so there's no fumbling with a spoon on a cold morning. You can toss the exact number you need for your trip into your food bag, saving precious space and weight.
Choosing your trail coffee shouldn't be an afterthought. By understanding the bean's origin, roast, and tasting notes, you can confidently select a premium instant coffee that transforms a simple morning ritual into a highlight of your backcountry experience.
This shift toward quality is happening all over the outdoor world. As more of us get outside, the demand for better gear—and better coffee—has exploded. Just look at the market for portable camping coffee makers, which has grown like crazy in recent years. It’s a clear sign that adventurers are done compromising on their morning cup.
With just a little bit of know-how, you can easily find the best freeze-dried coffee brands that are just right for your next adventure.
Brewing the Perfect Cup of Coffee Anywhere
Having the best coffee for backpacking is only half the battle. The real magic happens in the brewing, and thankfully, you don't need a barista license to master it. A few simple skills are all it takes to turn a good cup into a great one, no matter how far off the grid you are.
Think of it like any camp recipe—it's all about getting the balance right between your coffee, water, and heat. It's way easier than you might think, even miles from the nearest coffee shop.
Getting the Water Temperature Just Right
One of the most common mistakes I see is using water that’s way too hot. A hard, rolling boil will literally scorch your coffee grounds, leaving you with a bitter, burnt-tasting brew. Nobody wants that. The sweet spot for coffee brewing is between 195°F and 205°F.
So, how do you hit that target in the wild without a thermometer? Easy.
- Bring your water to a full boil on your camp stove.
- Once it's bubbling, just kill the heat.
- Let it stand for about 30 to 45 seconds before you pour it over your coffee.
That short pause is all it takes to let the water cool down into the perfect brewing range. This one little trick makes a massive difference, letting the real flavor of the coffee come through instead of scalding it.
Mastering Your Ratios and Mug Choice
How strong do you like your coffee? The beauty of single-serving instant coffee packets is that they take the guesswork out of it. For a solid, full-bodied cup, I usually mix one packet with about 8 to 10 ounces of hot water. If I need a stronger kick, I'll just use a little less water—maybe around 6 ounces.
Your mug choice also matters more than you’d think. Sure, any cup will hold coffee, but an insulated, double-walled mug is a backpacker's best friend. It keeps your drink hot for so much longer, which is a lifesaver on a chilly morning when you just want to sip slowly and enjoy the view.
A great mug isn't just about keeping your coffee warm; it's about the experience. It lets you wrap your cold hands around it and actually savor the moment instead of chugging your drink before it gets cold.
Trail Barista Tricks to Elevate Your Brew
Want to really step up your trail coffee game? A few ultralight additions can turn a standard cup into something special.
- Make a Backcountry Latte: A spoonful of full-fat powdered milk (Nido is a classic) before you add the water creates a surprisingly creamy, rich texture.
- Add a Pinch of Salt: It sounds weird, but a tiny pinch of salt actually cuts bitterness and brings out the coffee’s natural sweetness.
- Spice It Up: On a particularly frosty morning, a dash of cinnamon or even a small scoop of hot cocoa mix adds a wonderful warmth and complexity.
These little adjustments are total game-changers. For even more ideas, check out our guide on how to make instant coffee taste better. With these skills in your back pocket, you're set for a perfect cup to match every sunrise.
Your Backpacking Coffee Questions, Answered
Even the most seasoned backpacker has questions when dialing in their setup. Getting your coffee system sorted before you hit the trail can be the difference between a groggy start and a perfect backcountry morning. We get a lot of questions from fellow hikers, so we’ve put together some straightforward answers to the most common ones.
Think of this as your final pre-trip checklist. These are the little details that will help you brew with total confidence, no matter where your boots take you.
How Can I Make My Instant Coffee Taste Better on the Trail?
The fastest way to level up your trail coffee is to start with good water and nail the temperature. Always use filtered water if you can—any funky tastes from a pond or stream will come right through in your cup. But the real pro-tip is to avoid scorching the coffee with boiling water.
Bring your water to a boil, then pull it off the stove and let it hang out for about 30-45 seconds. This tiny pause drops the temperature just enough to keep from burning the delicate coffee crystals, which is what often causes that bitter, harsh flavor.
From there, a few ultralight additions can make a world of difference:
- A tiny pinch of salt: I know, it sounds weird. But a few grains of salt can actually cut bitterness and bring out the coffee's natural sweetness.
- Powdered milk or creamer: A small spoonful of full-fat powdered milk (Nido is a backpacker favorite) adds a rich, creamy texture you wouldn't expect in the wild.
- A dash of spice: On a chilly morning, a little cinnamon or cocoa powder adds a welcome touch of warmth and complexity.
These tricks add virtually zero weight to your pack but can easily turn a standard cup of instant into a genuine trailside luxury.
Is It Okay to Bring Coffee Grounds Backpacking?
You can, but you have to be ready for the trade-offs. Bringing loose grounds means you’re also carrying extra gear, like a pour-over or a French press, which adds both weight and bulk to your pack.
The real headache, though, is the cleanup.
According to Leave No Trace principles, used coffee grounds have to be packed out with you. They don’t decompose quickly and aren't a natural part of the environment, so scattering or burying them is a no-go. This means you’ll be carrying a bag of wet, heavy, and messy grounds in your pack every day.
Honestly, this is why most experienced backpackers I know have switched to a high-quality instant coffee. The incredible convenience and zero-mess cleanup just make more sense out there. It keeps your morning routine simple and helps you leave the wilderness exactly as you found it.
How Much Coffee Should I Pack for a Multi-Day Trip?
Running out of coffee mid-trip is a tragedy. Carrying too much is a waste of space and energy. My go-to formula is simple: pack 1.5 servings per person, per day.
This gives everyone their essential morning cup, plus a few extras for the group. That "extra half" comes in handy for a much-needed afternoon pick-me-up on a long day, for warming up after an unexpected downpour, or for sharing with a new trail friend.
Using individually sealed packets, like the ones from Cartograph Coffee, makes this ridiculously easy. You just count out the exact number you need, toss them in your food bag, and you’re set. No guesswork, no extra bulk, and way more efficient than scooping from a big bag of grounds.
What Is the Best Way to Brew Coffee at High Altitude?
Brewing coffee above 9,000 feet has a unique quirk: water boils at a lower temperature. While it boils at 212°F (100°C) at sea level, it can boil as low as 194°F (90°C) at 10,000 feet. For coffee grounds, that cooler water can result in a weak, under-extracted, and sour-tasting cup.
Since you can't get the water any hotter, the only fix is to increase your brew time. If you’re using something like a French press, you’ll need to let it steep for an extra minute or two to try and compensate.
This is another situation where a great instant coffee really proves its worth. Because the coffee has already been perfectly brewed before being freeze-dried, it dissolves beautifully even in the cooler boiling water you get at high elevations. You don’t have to change a thing about your routine. Just heat, pour, and stir. It’s a foolproof way to get a fantastic cup every time, which easily makes it the best coffee for backpacking in the mountains.
Ready to simplify your trail mornings without giving up an amazing cup of coffee? Cartograph Coffee makes premium, organic instant coffee in single-serve packets designed for people who refuse to compromise. See for yourself why a great brew can be the highlight of your day in the backcountry.