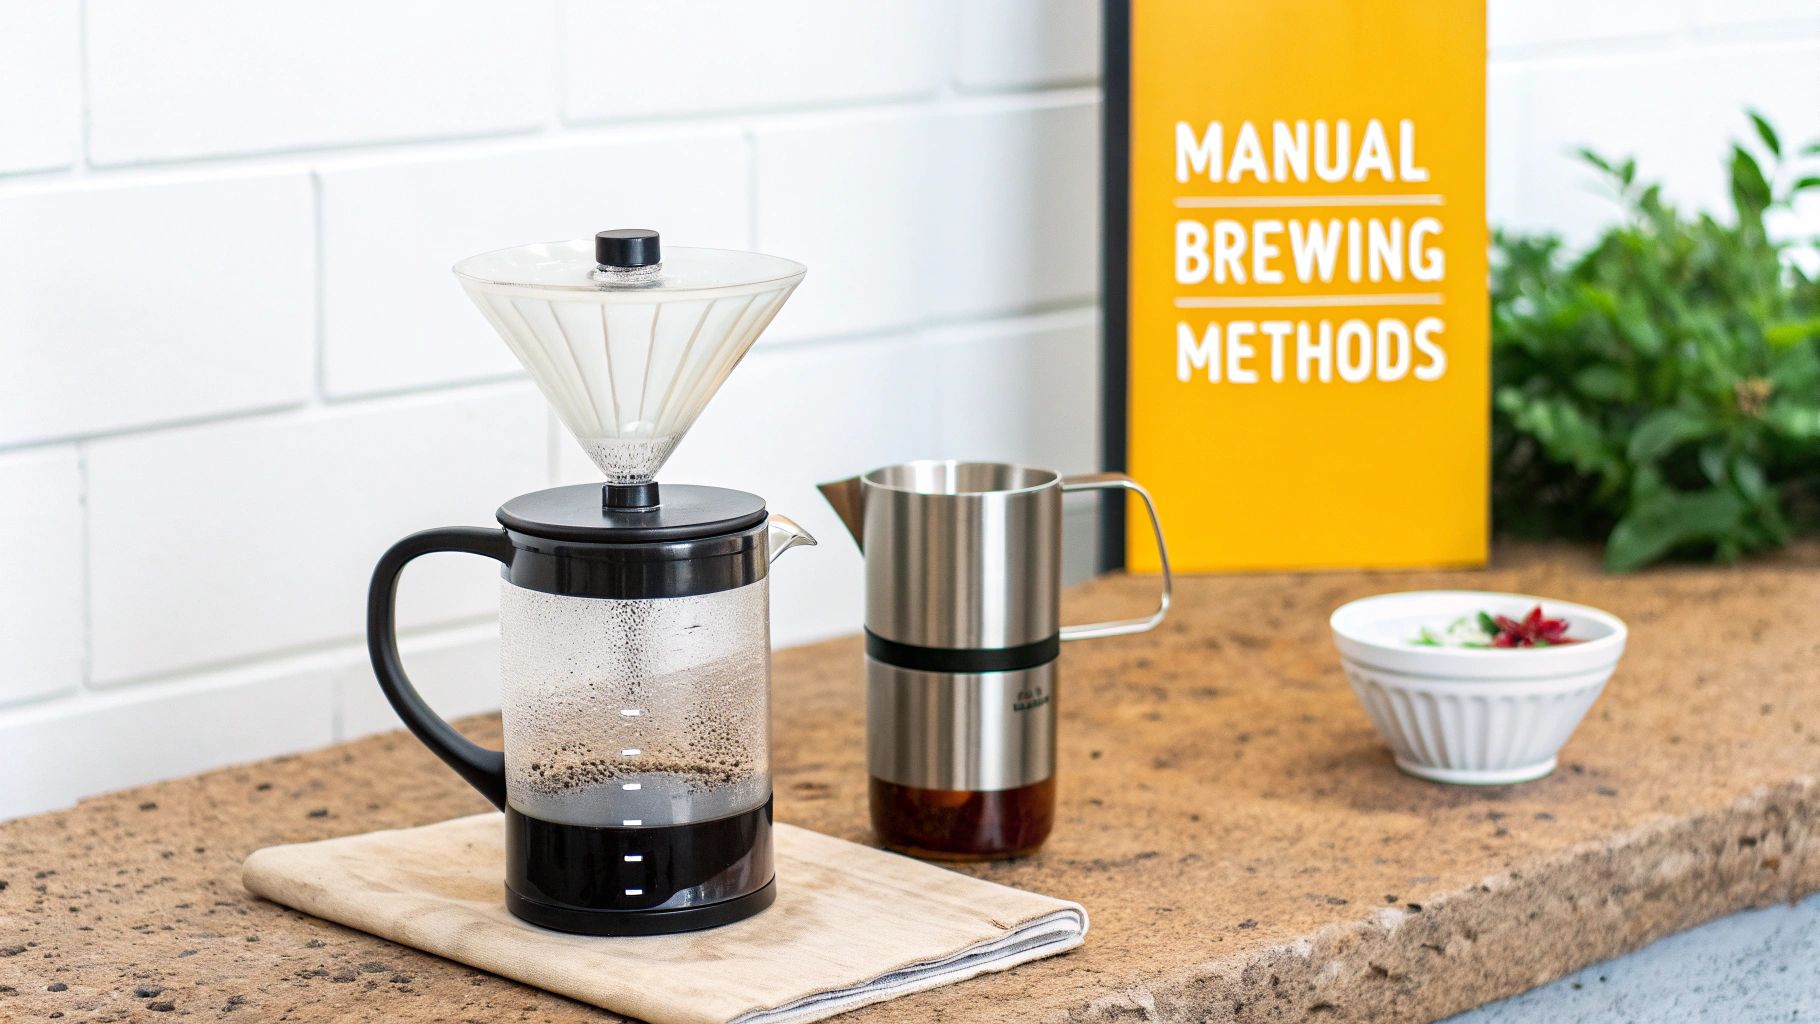
So, you need to make coffee without any electricity. It’s a lot easier than you might think, provided you have a couple of key things on hand. The secret is pairing a manual brewing method—like a trusty French press or a simple pour-over cone—with a way to heat your water. A gas stove, a campfire, or even a small portable burner will do the trick.
Once you’ve got hot water, it’s just a matter of combining it with your coffee grounds to pull together a fantastic brew.
Why Your Coffee Ritual Doesn't Need a Plug
When the power goes out or you're deep in the backcountry, that daily cup of coffee suddenly feels less like a routine and more like a warm, comforting necessity. Knowing how to brew without electricity isn't just a neat party trick; it's about taking complete, hands-on control over your coffee, no matter where you are.
This guide is about more than just surviving without your coffee machine. It’s about learning to thrive, making a memorable cup of coffee with nothing more than the basics.
The whole process really boils down to three fundamentals of manual brewing. Get these right, and you're golden.
- Grind Consistency: This is a big one. A manual burr grinder is your best friend here, giving you uniform grounds. That consistency is the key to an even extraction, helping you dodge a brew that's either too bitter or disappointingly weak.
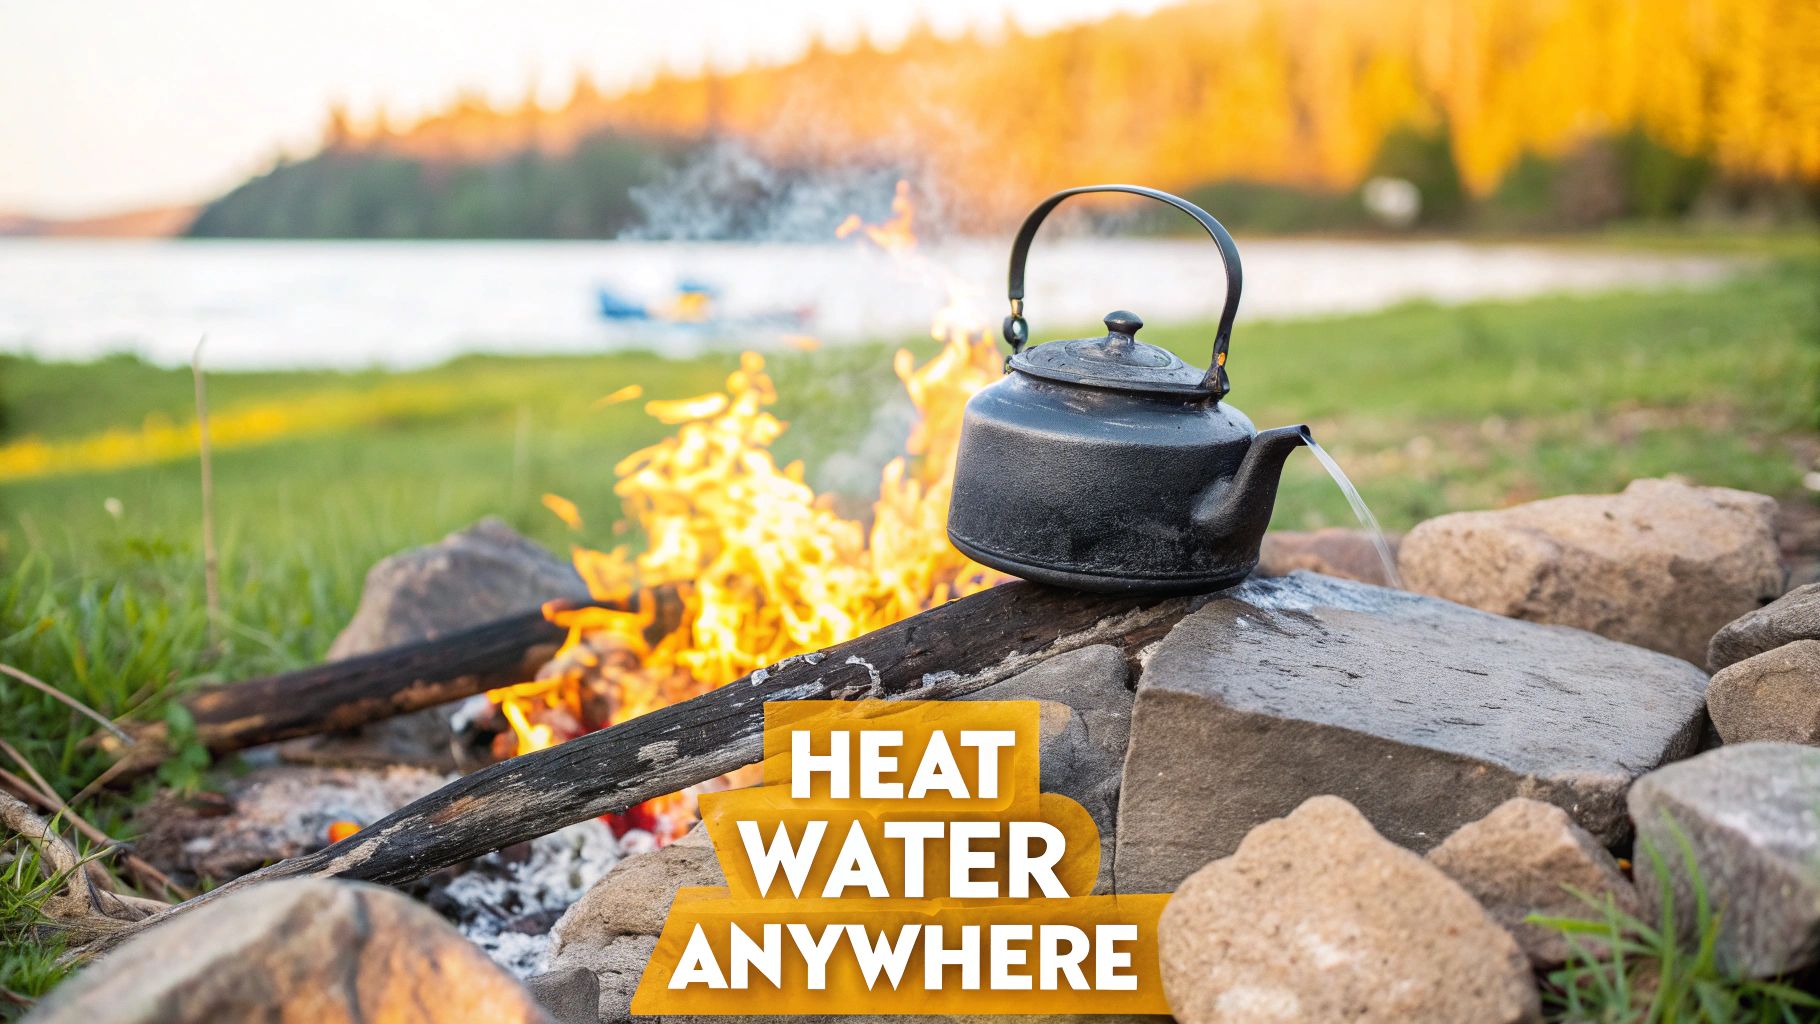
- Water Temperature: No electric kettle? No problem. Just heat your water over a flame until you see the first small bubbles and a bit of steam. You're aiming for a light simmer, not a full, rolling boil.
- Extraction Time: This is where you get to be the boss. Whether you’re letting grounds steep in a French press for a perfect four minutes or carefully managing your pour rate with a V60, the timing is completely in your hands.
Manual Methods Are More Common Than You Think
Sure, electric coffee makers are everywhere, but manual brewers are hardly a niche product. Across the globe, countless people rely on non-electric methods every single day, especially in places where electricity isn't always a guarantee.
Even as the global coffee machine market is expected to hit USD 15.1 billion by 2029, classic brewers like the French press and AeroPress are holding their own. They prove you don't need to be plugged in, and they cut down on energy use, too. This enduring popularity shows that a great cup of coffee has always been about technique, not technology.
While many campers reach for convenience, our guide on choosing the best instant coffee for camping can be a real lifesaver when you're short on time or gear.
At the end of the day, whether you're dealing with a power outage at home or just want a more connected, hands-on coffee experience, unplugged brewing delivers reliability and, frankly, a better-tasting cup.
To help you decide which method might be right for you, here’s a quick rundown of some popular options.
Manual Coffee Brewing Methods at a Glance
| Method | Best For | Flavor Profile | Ease of Use |
|---|---|---|---|
| French Press | A rich, full-bodied cup with minimal fuss. Great for brewing multiple servings. | Bold, robust, and heavy-bodied with a slight sediment. | Beginner-friendly |
| Pour-Over | Coffee lovers who enjoy a clean, nuanced brew and don't mind a hands-on process. | Bright, clean, and highlights the coffee's subtle flavor notes. | Intermediate |
| AeroPress | Travelers and campers needing a durable, portable, and fast brewing solution. | Smooth, low-acidity, and versatile—can make espresso-style or Americano. | Beginner-friendly |
| Moka Pot | Making strong, espresso-like coffee on a stovetop or campfire. | Intense, concentrated, and rich, similar to stovetop espresso. | Intermediate |
Each of these methods offers a unique way to enjoy coffee without relying on electricity. Your choice really comes down to your taste preferences and the situation you're in.
Mastering Full-Bodied Immersion Brews
When the power's out and you need a truly satisfying cup, immersion brewing is your best friend. This is the classic way of making coffee: just let the grounds steep directly in hot water. It’s a straightforward path to a deep, full-bodied extraction of flavor. Let’s walk through two of the most reliable workhorses in the no-electricity coffee world: the French Press and the AeroPress.
Honestly, you can toss the instructions that came in the box. Learning to make great coffee without electricity is all about mastering the little details that elevate a good cup to a great one.
The Classic French Press
The French Press is a legend for good reason. It’s forgiving, simple to use, and consistently delivers a robust brew with that heavy, rich mouthfeel many of us crave. The trick is getting a handle on a few key variables.
Your journey to a perfect French Press brew begins way before any water gets involved. It all starts with the beans and the grind—the foundation of any manual brewing method.
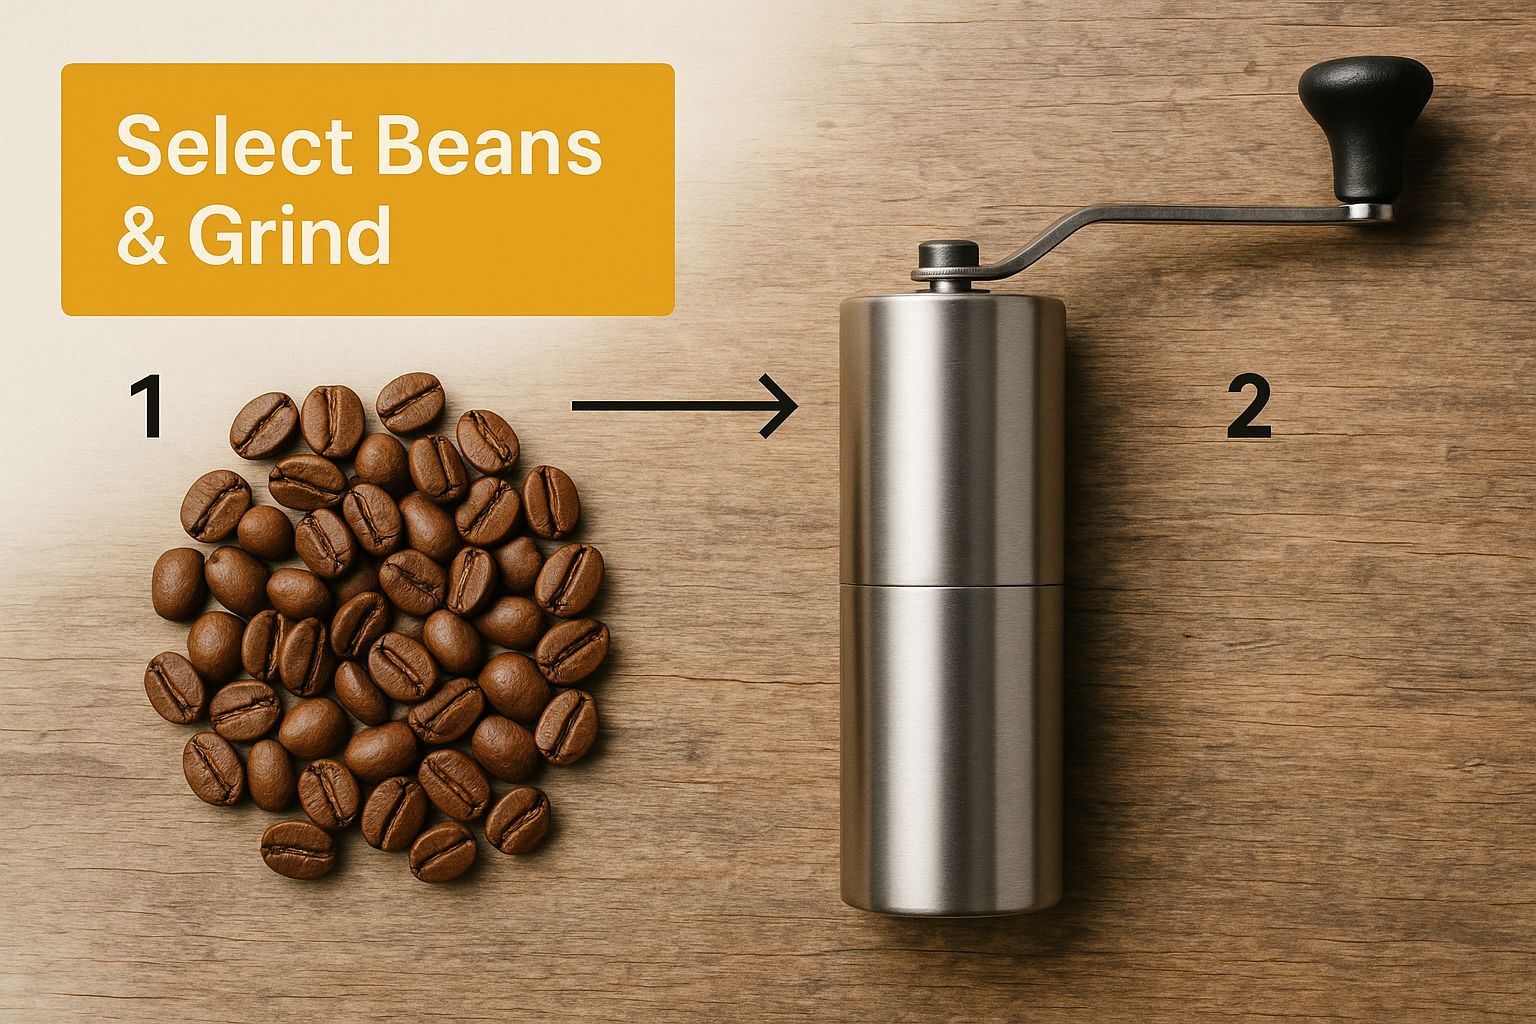
For a French Press, a coarse grind is absolutely essential. You’re aiming for something that looks and feels like breadcrumbs or coarse sea salt. Using a grind this large is crucial because it keeps the mesh filter from getting clogged up. More importantly, it dramatically cuts down on the amount of fine sediment—that "silt"—that makes its way into your cup. A proper grind is your number one defense against a muddy, bitter brew.
Pro Tip: Once you've pressed the plunger down, pour all of the coffee out immediately. Don't let it hang out in the press. Any coffee left sitting on the grounds will keep extracting and turn unpleasantly bitter.
Fine-Tuning Your AeroPress Brew
If the French Press is the master of simplicity, the AeroPress is the champion of versatility. Its tough, compact plastic design makes it my go-to for camping and travel. It uses air pressure to force water through the grounds, which creates a cup that is surprisingly clean and smooth.
The real beauty of the AeroPress is that it lets you experiment with two main approaches:
- The Standard Method: This is the quick and easy way. You just set the AeroPress on top of your mug, add your coffee and water, and press. It's fast, clean, and gives you a cup that’s a lot like a high-quality drip coffee.
- The Inverted Method: Here's where you get more control. You flip the brewer upside down, add your coffee and water, and let it steep for as long as you want. When you're ready, you flip it back onto your mug and plunge. This gives you the full immersion of a French Press but with a much cleaner result.
By playing with how long you let it steep and how much pressure you apply, you can craft anything from a light, almost tea-like brew to a super-potent, espresso-style shot. That strong shot is perfect for making an Americano or a latte, even when you're miles from a coffee shop. If you enjoy creating these powerful brews, it's worth learning how to make a versatile coffee concentrate that you can dilute later.
In the end, both brewers are fantastic for making coffee without power. Your choice really boils down to what you prefer: the French Press for its bold, heavy body and ability to make multiple cups at once, or the AeroPress for its clean taste, speed, and unbeatable portability.
The Art of Clean and Bright Pour-Over Coffee
Where immersion brewing gives you that bold, full-bodied cup, pour-over is its more artistic cousin. It’s all about creating a clean, vibrant brew that lets a coffee’s most delicate and unique flavors really sing. This is the ultimate hands-on approach to making coffee without electricity, transforming a simple daily task into a genuinely rewarding ritual.
Unlike just dunking grounds in a French Press, pour-over is what we call an infusion method. Hot water flows through the coffee grounds and a filter, pulling out all those amazing flavor compounds as it goes. What you get in the cup is stunningly clear coffee, free of any grit, which is perfect for showcasing the bright, fruity, or floral notes you find in great specialty beans.
This hands-on method isn't just a niche thing anymore. Manual drip coffee makers are having a serious moment as more people look to bring a bit of mindfulness into their daily routines. The global market for these brewers was valued at a whopping USD 2.39 billion in 2023 and is expected to hit USD 3.03 billion by 2030. It’s a clear shift toward more intentional, sensory experiences. If you're interested in the numbers, you can dig into the market analysis from Grand View Research.
Nailing the Pour-Over Fundamentals
The real magic of pour-over is in the details. You'll see different drippers out there, like the popular Hario V60 or the Kalita Wave, and each has a unique design that affects the flow rate. But no matter which one you use, the core principles stay the same. Getting these right is your ticket to a fantastic unplugged brew.
First up, let's talk grind. For pour-over, you’re aiming for a medium-fine grind, something with the texture of table salt. This consistency creates just the right amount of resistance, allowing the water to extract flavor evenly without taking so long that your coffee turns bitter.
Next, and this is a big one, is your water temperature.
If your water is too cool, you'll under-extract the coffee, leaving it tasting sour and weak. If it's too hot, you'll scorch the grounds and end up with a bitter, harsh flavor. The sweet spot is right between 195-205°F (90-96°C).
When you’re off-grid without a fancy kettle, don’t worry. Just bring your water to a full boil over your camp stove or fire. Then, pull it off the heat and let it sit for about 30 to 45 seconds. This little pause is usually all it takes to bring the temperature down into that perfect brewing zone. We go into a lot more detail on why this matters in our guide to the correct temperature for brewing coffee.
Your Step-by-Step Pouring Technique
With your water and coffee grounds ready, the real performance begins. A slow, controlled pour is what separates a pretty good cup from a truly exceptional one. A gooseneck kettle gives you the best control by far, but you can make it work with any kettle if you have a steady hand.
Here’s the process I follow:
- Rinse the Filter: First things first, pop the paper filter into your dripper and give it a good rinse with hot water. This does two things: it washes away any papery taste and preheats your dripper and mug. Just be sure to toss out that rinse water.
- Add Your Grounds: Now, add your medium-fine grounds to the filter. Give the dripper a gentle shake to settle them into a flat, even bed. This helps ensure the water flows through everything uniformly.
- Start the Bloom: Hit start on your timer and pour in just enough water to wet all the grounds—about twice the weight of the coffee itself. You’ll see the grounds puff up and bubble. This is the "bloom," and it’s releasing trapped CO2 gas. Let it do its thing for about 30-45 seconds.
- Continue the Pour: Once the bloom settles, start pouring the rest of your water. Use a slow, steady, circular motion, starting from the center and spiraling your way out. Try to avoid pouring directly onto the sides of the filter.
- Finish and Enjoy: Your goal is to have all the water poured and dripped through within 2 to 3 minutes. As soon as it's done, remove the dripper and take a moment to enjoy that clean, incredibly flavorful cup of coffee you just made.
Pulling Espresso Shots Without an Outlet
Let's be honest, a rich, crema-topped espresso shot feels like it should come from a big, loud machine that hogs half your kitchen counter. But you can absolutely get that intense, syrupy coffee experience even when you're completely off-grid. All it takes is the right manual tool and a little practice.
We're moving beyond a standard brew here and into the world of concentrated, high-pressure coffee. The two best ways to get there without an outlet are the classic Moka Pot and the newer, impressively powerful hand-pumped espresso makers.
The Stovetop Moka Pot Method
The Moka Pot is an icon for a reason. This stovetop brewer uses steam pressure to force water up through coffee grounds, and the result is a strong, espresso-like concentrate. Now, it's not true espresso—it doesn't hit the 9 bars of pressure required—but it produces a uniquely bold and satisfying brew that has a character all its own.
The secret to a great Moka Pot brew is all about managing your heat. The most common mistake is cranking the heat way too high, which scorches the coffee and leaves you with a bitter, metallic taste. Yuck. Instead, aim for a low to medium flame on your camp stove. The goal is to see the coffee emerge from the spout in a slow, steady stream, almost like thick, dark honey.
Here’s a pro tip that makes a huge difference: fill the bottom chamber with hot water before you put it on the stove. This simple move drastically cuts down the time the pot spends on the heat, stopping the metal from getting so hot that it cooks your grounds before they even start brewing.
Hand-Pumped Espresso Makers
If you're after genuine, bona fide espresso, portable hand-pumped devices are what you need. These are brilliant little gadgets that let you generate all the necessary pressure by hand, forcing hot water through finely ground coffee to pull a legitimate shot, crema and all.
This kind of hands-on brewing isn't just a niche hobby anymore; it's exploded. The global market for manual espresso machines was valued at around USD 1.45 billion in 2024 and is expected to nearly double by 2030. That growth shows a real shift, with coffee lovers wanting more control over every aspect of their brew. You can dig deeper into the latest manual espresso machine market insights to see the trend.
No matter which device you choose, a couple of things are non-negotiable for a decent shot:
- A Fine, Consistent Grind: You need an espresso-fine grind—think the texture of granulated sugar. A quality manual burr grinder is your best friend here, as its consistency is key for even water extraction.
- Proper Tamping Technique: Tamping is just compressing the coffee grounds into a tight, level puck. You want to apply firm, even pressure to get rid of any air pockets. A level puck is critical because it prevents water from finding weak spots and "channeling" through, which leads to a weak, watery shot.
Building Your Off-Grid Coffee Toolkit
https://www.youtube.com/embed/xT0sNiYCW6o
Having the right gear on hand can be the difference between a rough, gritty cup of "camp coffee" and a genuinely exceptional brew. When you're off the grid, whether by choice on a camping trip or by necessity during a power outage, your toolkit is everything. Let's walk through what you actually need to build a setup that delivers a great cup, every single time.
Start With a Great Grinder
If you're going to invest in one single piece of equipment, make it a quality manual burr grinder. I can't stress this enough. Blade grinders are coffee's worst enemy—they just smash and shatter beans into a chaotic mix of boulders and dust. This leads to a messy, uneven extraction that tastes both sour and bitter at the same time.
A burr grinder, on the other hand, works by milling the beans between two revolving abrasive surfaces. The result? Uniform grounds that lead to a balanced, clean, and flavorful cup. It's the foundation of good coffee, electric or not.
Heating Water Without an Outlet
Once your beans are perfectly ground, you need hot water. Thankfully, you've got plenty of solid options here, and the best one really just depends on where you are.
- Campfire Kettle: The classic, rustic choice. There's nothing quite like it, but be prepared for a bit of soot on your kettle and less-than-perfect temperature control. It gets the job done.
- Compact Butane Stove: For my money, these little portable stoves are the best all-around option. They're lightweight, and you get fantastic heat control, which means you can dial in the perfect water temperature without accidentally scorching it.
- Gas Stovetop: If the power's out at home but you have a gas range, you're in luck. This gives you the same level of control and convenience you're already used to.
The real secret to making consistently great coffee without electricity is repeatability. A simple, well-chosen toolkit doesn't just make the process possible; it makes it reliable, so you can nail that perfect cup no matter where you are.
Before we dive into the brewing methods themselves, let's put all the gear together in one place. A well-thought-out kit removes all the guesswork.
Your Off-Grid Coffee Toolkit
Here’s a look at the essential (and some highly recommended) items to have in your kit.
| Item | Why It's Essential | Pro Tip |
|---|---|---|
| Manual Burr Grinder | Provides consistent grounds, which is the key to a balanced extraction and avoiding bitter or sour coffee. | Look for one with a sturdy handle and a clear grind setting indicator. A grinder that fits inside an AeroPress is a huge space-saver for travel. |
| Heat Source | You need a way to get your water to the ideal brewing temperature (around 195-205°F). | A compact butane or propane stove offers the best balance of portability and temperature control. |
| Kettle | For heating and pouring water. A standard kettle works, but a gooseneck is better for precision. | A gooseneck kettle is a game-changer for pour-over methods, giving you total control over the water flow for a more even saturation of the coffee grounds. |
| Brewer | Your chosen device for making the coffee (e.g., French Press, AeroPress, Moka Pot, Pour-Over Dripper). | Choose a brewer made of durable materials like stainless steel or BPA-free plastic for longevity, especially when camping. |
| Durable Mug/Thermos | You need something to drink from! An insulated thermos can also keep your water hot or store brewed coffee. | Pre-heating your mug or thermos with a splash of hot water before you brew will keep your coffee warmer for much longer. |
| Digital Scale (Optional) | The secret weapon for consistency. Weighing your beans and water ensures a perfect ratio every time. | Many compact coffee scales are available that are battery-powered and small enough to pack easily. 1 gram of coffee to 16 grams of water is a great starting ratio. |
Having these items ready to go means you're just a few minutes away from a fantastic cup of coffee, no matter what's going on with the power grid. It's about being prepared with the right tools for the job.
A Few Common Questions About Off-Grid Coffee
When you're figuring out how to make coffee without electricity, the same few questions always seem to come up. Whether you're getting ready for a power outage or just planning a weekend camping trip, you need answers that work in the real world. Let's tackle some of the most common ones.
What’s the Absolute Easiest Method?
For pure simplicity and a consistently great cup, I almost always point people to the French Press. It's incredibly forgiving. You don't need to master any fancy pouring techniques—just add coarse coffee grounds and hot water. The result is a rich, full-bodied brew that just feels right.
Sure, you could make cowboy coffee with just a pot over a fire, and that's technically simpler. But for a tiny bit more effort, the French Press gives you a massive upgrade in taste and texture. It's the perfect entry point if you're new to brewing unplugged.
How Do I Get My Water Hot With No Power?
Heating the water is usually the biggest challenge, but you've got plenty of options. If you're at home, a gas stovetop is your best friend. For camping or emergencies, a small propane or butane stove is fantastic for its speed and heat control.
And of course, there's always the classic campfire. Putting a kettle over an open fire works just fine, but be ready for a little soot on the bottom. It's all part of the experience.
Here's a pro tip for short-term power outages: if you know a storm is on the way, fill a quality insulated thermos with boiling water. It'll stay hot enough to brew with for hours, saving you a major headache later.
Can I Get Away With Using Pre-Ground Coffee?
Yes, you definitely can, but just know it’s a trade-off. The coffee you buy pre-ground in a bag is almost always a medium grind meant for standard automatic drip machines.
This can cause a couple of issues when you're brewing manually:
- For a French Press, that grind is usually too fine. You'll likely end up with a gritty, silty cup and a filter that’s a real pain to press down.
- For a Moka Pot, it’s often too coarse. This can lead to a weak, under-extracted brew that just doesn't hit the spot.
In a pinch, it'll do the job—some coffee is always better than no coffee! But if you're serious about getting great flavor when you're off-grid, a manual burr grinder is the single best investment you can make. It's a game-changer.
AeroPress vs. French Press: Which Is Better for Brewing Unplugged?
Ah, the classic debate. The right answer really comes down to what you're doing.
The French Press is brilliant for making larger batches, which is perfect if you’ve got a few people to caffeinate. The process is dead simple. The main downside? Most are made of glass, which isn't exactly ideal for tossing in a backpack.
The AeroPress, however, is made of tough, lightweight plastic. It's the hands-down winner for camping, backpacking, or any kind of travel. It’s also incredibly versatile—you can brew a super clean, drip-style cup or a strong, espresso-like shot.
So, here’s the bottom line: Go with the AeroPress for its durability and flexibility. Choose the French Press for its simplicity and capacity.
Ready to enjoy exceptional coffee wherever your adventures take you? Cartograph Coffee offers premium organic instant coffee that delivers rich flavor without the fuss. Perfect for camping, travel, or any time you need a high-quality brew on the go. Explore our selection.