Let's get one thing straight: you absolutely can make fantastic coffee without a fancy machine. Forget the counter-hogging gadgets and expensive pods. This guide is all about brewing rich, flavorful coffee using simple tools you probably already have in your kitchen.
Whether you're out camping, the power's out, or you're just trying to simplify your life, a great cup of coffee is still within reach. This is especially true now that high-quality instant options, like Cartograph Coffee, have completely changed the game.
Your Guide to Great Coffee Without a Machine
Ditching the automatic brewer is actually a fantastic way to gain more control over your final cup. It’s a return to the fundamentals, reminding us that great coffee comes down to good beans and solid technique, not expensive hardware. It's a skill worth having, especially when you consider that global coffee consumption is projected to hit a record 173.9 million bags by 2025/26. That's a lot of coffee, and it highlights a growing need for brewing methods that fit every lifestyle, from the office to the backcountry. You can explore more about these global coffee trends and how they impact your daily brew at https://cartographcoffee.com/blogs/news/best-coffee-brewing-methods.
Adopting these manual methods does more than just save you from a caffeine-free morning; it often creates a more intentional and enjoyable ritual. If you're someone who loves finding resourceful ways to make coffee, you'll probably also appreciate learning how to maximize your kitchen's potential with smart space-saving kitchen gadgets.
No matter how you brew, the core principles of good coffee never change:
- Quality Beans: It all starts here. Your final cup can only be as good as the coffee you begin with.
- The Right Grind: Coarse, medium, or fine—each method has its preference.
- Water Temperature: You want it hot, but not boiling. The magic happens between 195-205°F.
- The Golden Ratio: The balance of coffee to water is what dictates the strength and flavor.
This handy decision tree can help you pick the perfect machine-free method based on what matters most to you: speed, richness, or simplicity.
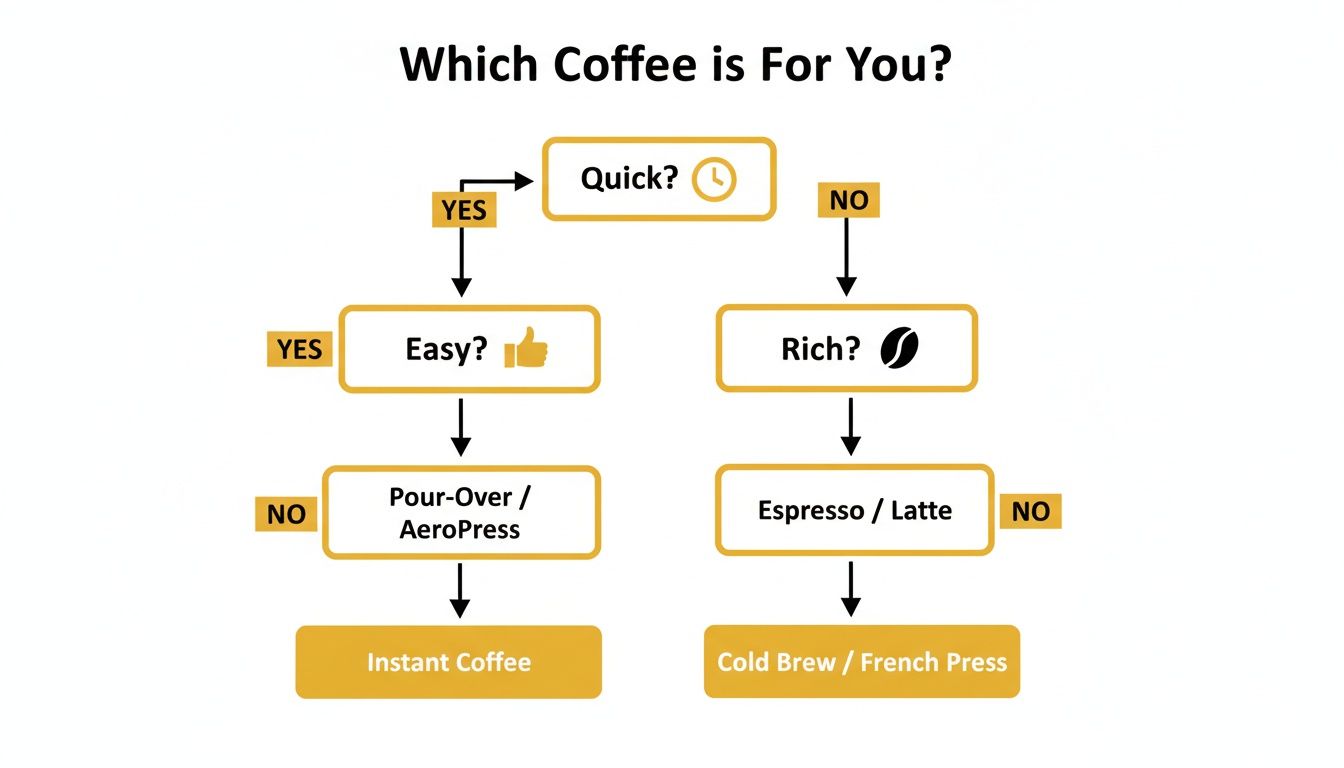
As you can see, something like instant coffee is your best friend when you're short on time. But if you’re after a super smooth, rich flavor and don't mind a little planning, cold brew is the clear winner. Getting a feel for these trade-offs is the first step toward becoming a master of manual brewing.
No-Machine Coffee Methods at a Glance
To make it even easier, here's a quick breakdown of the methods we'll cover. This table gives you a snapshot of what to expect from each one, helping you choose the perfect technique for any situation.
| Method | Best For | Difficulty | Key Equipment | Taste Profile |
|---|---|---|---|---|
| Cowboy/Stovetop | Camping, power outages, large batches | Easy | Pot, heat source, water, coffee | Bold, full-bodied, can be gritty |
| Improvised Pour-Over | Home or office when you have filters | Medium | Mug, filter/cloth, hot water | Clean, bright, nuanced flavor |
| Cold Brew in a Jar | Planning ahead for smooth, low-acid coffee | Easy | Jar, filter/cloth, cold water | Mellow, chocolatey, naturally sweet |
| Turkish-Style | A rich, intense, traditional experience | Medium | Small pot (cezve/ibrik), fine grounds | Strong, syrupy, unfiltered |
| High-Quality Instant | Ultimate speed and convenience anywhere | Easiest | Mug, hot water, instant coffee | Surprisingly rich, balanced, clean |
Each of these methods offers a unique experience and flavor profile. By understanding their strengths, you'll be ready to brew a delicious cup no matter where you are or what gear you have on hand.
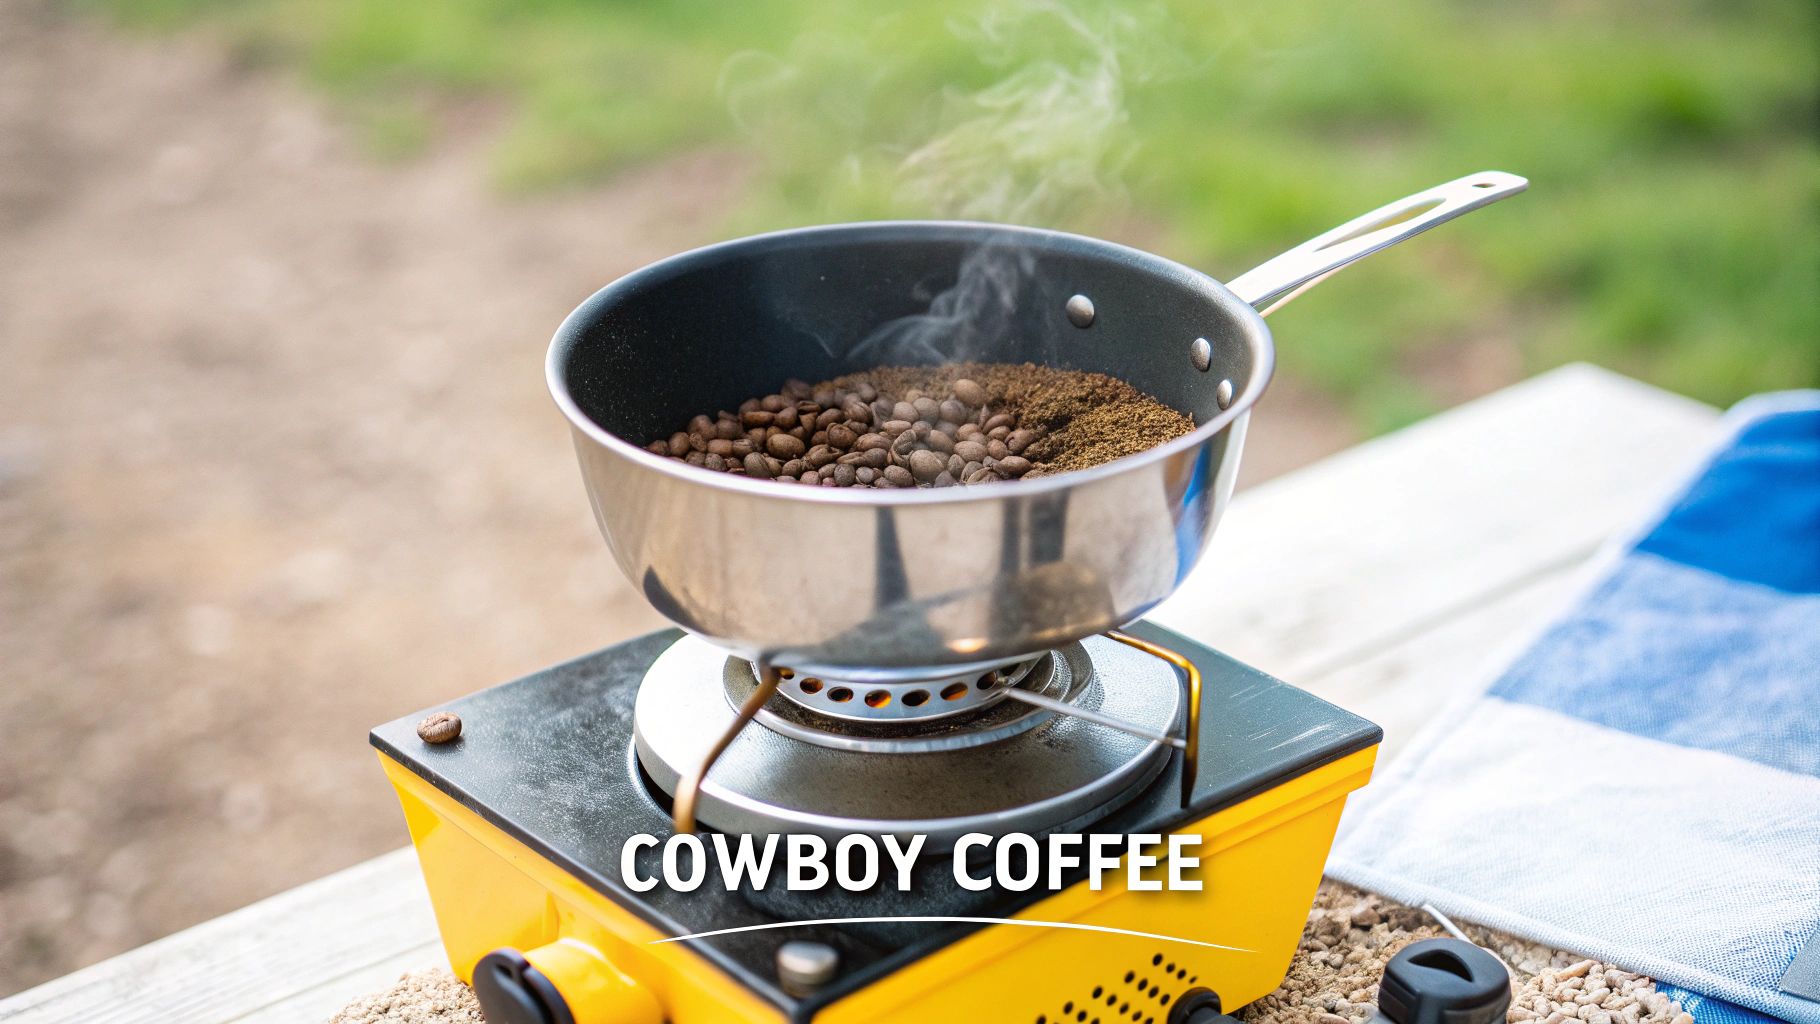
Mastering the Stovetop Cowboy Coffee Method
When all you've got is a pot and a heat source, the stovetop method—what many of us call cowboy coffee—becomes your best friend. This is the original, rugged answer to the question, can you make coffee without a coffee maker. It's perfect for camping, power outages, or honestly, any time you crave a simple, deeply satisfying cup. The result is bold, full-bodied, and has a certain charm you just don't get from a machine.
The whole thing hinges on a few simple details: the right grind, the right water temperature, and a bit of patience. It might seem primitive, but I've had some surprisingly smooth cups of coffee this way. It's all about managing the extraction right there in the pot.
Getting the Grind and Ratio Right
For cowboy coffee, you absolutely need a coarse grind. I’m talking about the texture of rough sea salt or breadcrumbs. If you go any finer, you'll end up with a muddy, bitter brew because the grounds will float around forever and over-extract.
Your coffee-to-water ratio is just as critical for getting that flavor right. I always start with the classic golden ratio and suggest you do, too:
- Aim for two tablespoons of coarsely ground coffee for every eight ounces of water.
- This gives you a strong, but not overwhelming, brew. Of course, feel free to tweak it a bit once you get the hang of it.
This ratio is your reliable foundation for a robust cup, whether you're brewing a single mug for yourself or a big pot for everyone around the campfire.
The Brewing Process Perfected
First, get your water heated up in a saucepan or kettle. You're not looking for a roaring boil—that's a classic mistake that burns the coffee. Instead, watch for it to start steaming heavily with tiny bubbles forming, which is right around 200°F (93°C).
Once the water is there, pull the pot off the heat for about 30 seconds. This small step is crucial to avoid shocking the grounds. Now, go ahead and add your coffee, giving it a quick, gentle stir to make sure all the grounds get wet.
Put the pot back on a very low heat and let it steep for two to four minutes. The key here is a gentle simmer, never a boil. The longer you let it go, the stronger your coffee will be.
When the time is up, take it off the heat and just let it sit for another minute or two. This is when the magic happens—most of the grounds will start to settle to the bottom.
My favorite trick: To get those grounds to settle faster, splash about two tablespoons of cold water into the pot. It sounds weird, but the temperature change really helps the grounds sink quickly, giving you a much cleaner pour.
Now for the final step: pour slowly and carefully into your mug. The goal is to leave that layer of sludge behind in the pot. A patient pour is what separates a great cup of cowboy coffee from a gritty one.
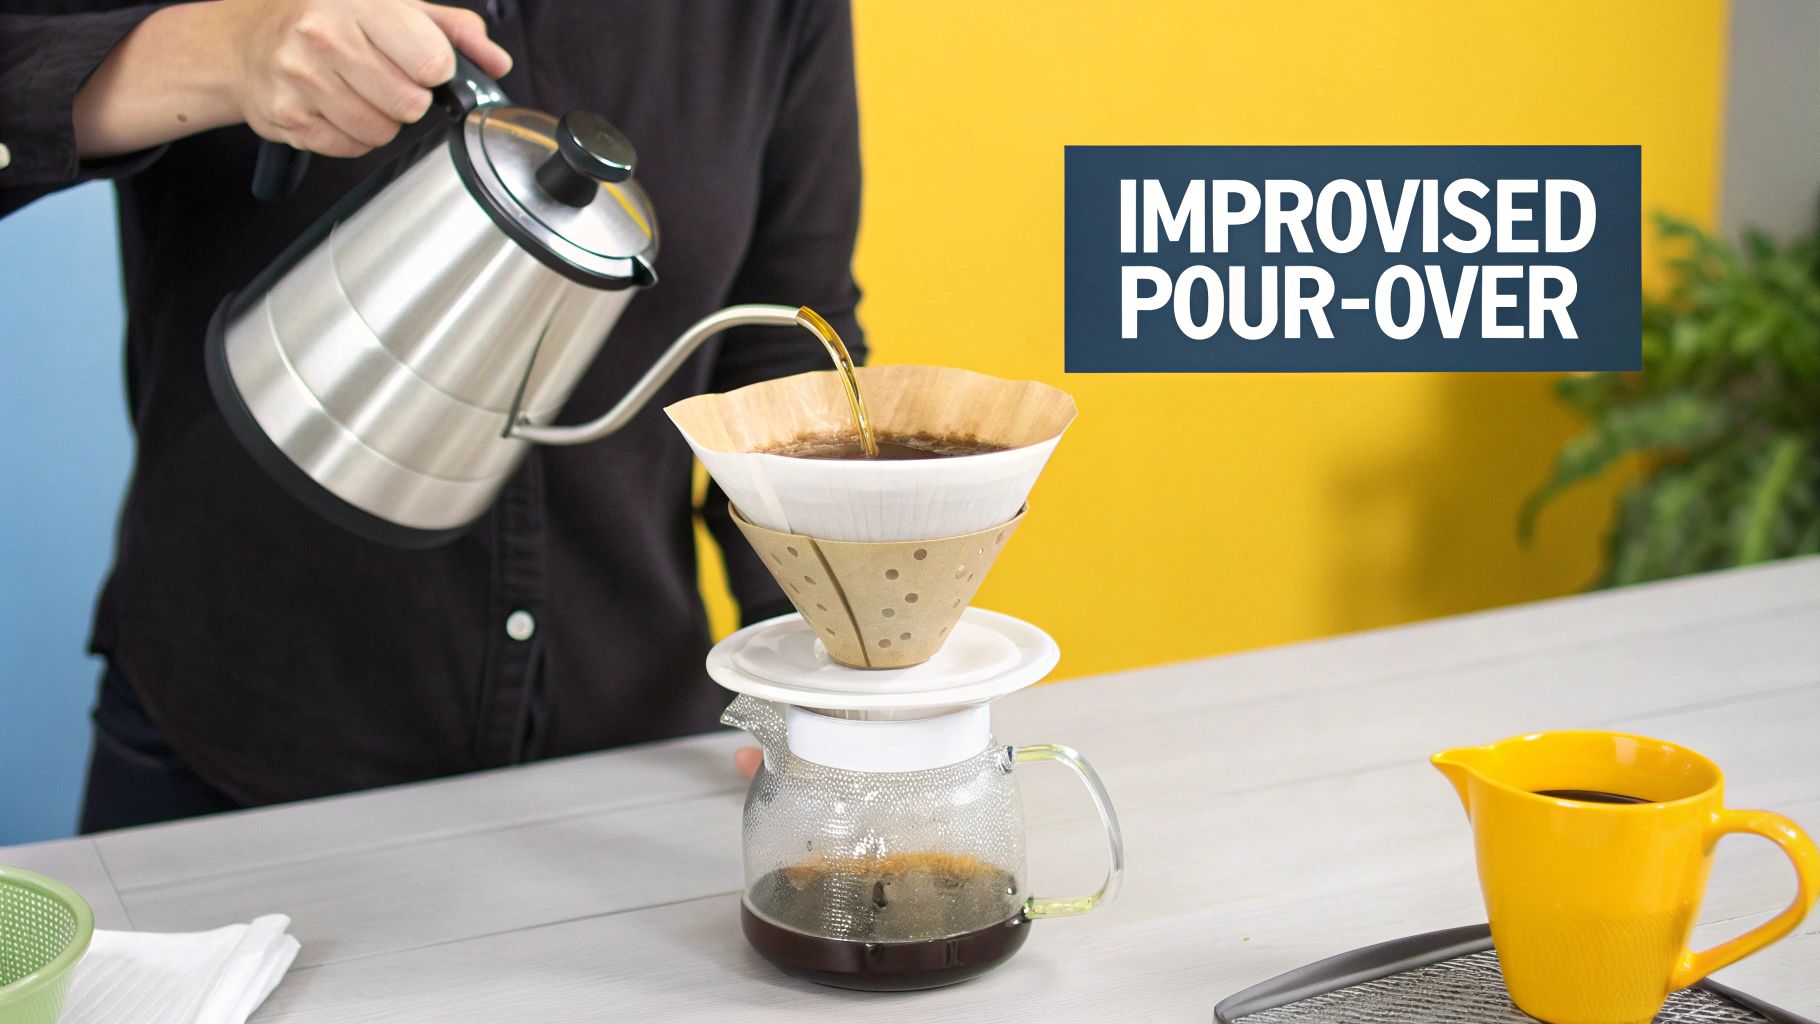
Making Your Own Pour-Over Coffee (Without the Gear)
So, your coffee maker is on the fritz, but you still need that clean, bright cup you're used to. Don't panic. You can easily rig up a pour-over setup with things you already have around the house. This is my go-to method when I want a high-quality brew without any fancy equipment.
The basic idea is simple: you suspend a filter over your mug, add your coffee grounds, and slowly pour hot water over them. It’s a hands-on approach that gives you a surprisingly flavorful cup, miles away from the gritty sludge you might get with other makeshift methods.
Building Your DIY Dripper
First thing's first: you need something to hold the filter. Look around your kitchen, and you’ll probably find a few good options.
- A Fine-Mesh Sieve: This is the easiest solution. Just place a small sieve directly over your mug—it’s the perfect shape and size.
- A Tea Infuser: If you have a larger, basket-style tea infuser, that’ll work great, too. It’s sturdy and will keep the grounds contained.
- The Rubber Band Trick: No sieve? No problem. Drape the filter over your mug, push down in the center to create a little pocket for the grounds, and secure the edges to the mug's rim with a rubber band.
A standard paper coffee filter is your best bet for the filter itself. If you're fresh out, a clean, lint-free cloth (like a napkin or cheesecloth) or even a sturdy, folded paper towel can save the day. For tips on using cloth, check out our guide on how to brew coffee without a filter.
The Pouring Technique for Great Flavor
With your setup ready, it’s all about the pour. Before you add the coffee, place the filter in your holder and give it a quick rinse with hot water. This small step washes away any paper taste and warms up your mug at the same time.
Now, add your coffee. You’re looking for a medium-fine grind, something with the texture of table salt. A good starting point for your ratio is one to two tablespoons of coffee for every six ounces of water.
Pour just enough hot water—aim for around 200°F or just off the boil—to saturate the grounds. Let them sit for about 30 seconds. This is called the "bloom," and it releases trapped gases for a better extraction.
After the bloom, resume pouring slowly and steadily in a spiral pattern, working from the center outwards and back again. Avoid pouring directly on the sides of the filter. This even, controlled pour is the secret to extracting all the delicate flavors from the coffee, giving you a cup that can honestly compete with one from an expensive machine.
It’s no secret we love our coffee. Global production is on track to hit 178.7 million bags in 2025/26, with US consumption alone projected to reach 23.4 million bags. That's a lot of coffee drinkers! Having skills like this in your back pocket means you're never far from a great cup, machine or not.
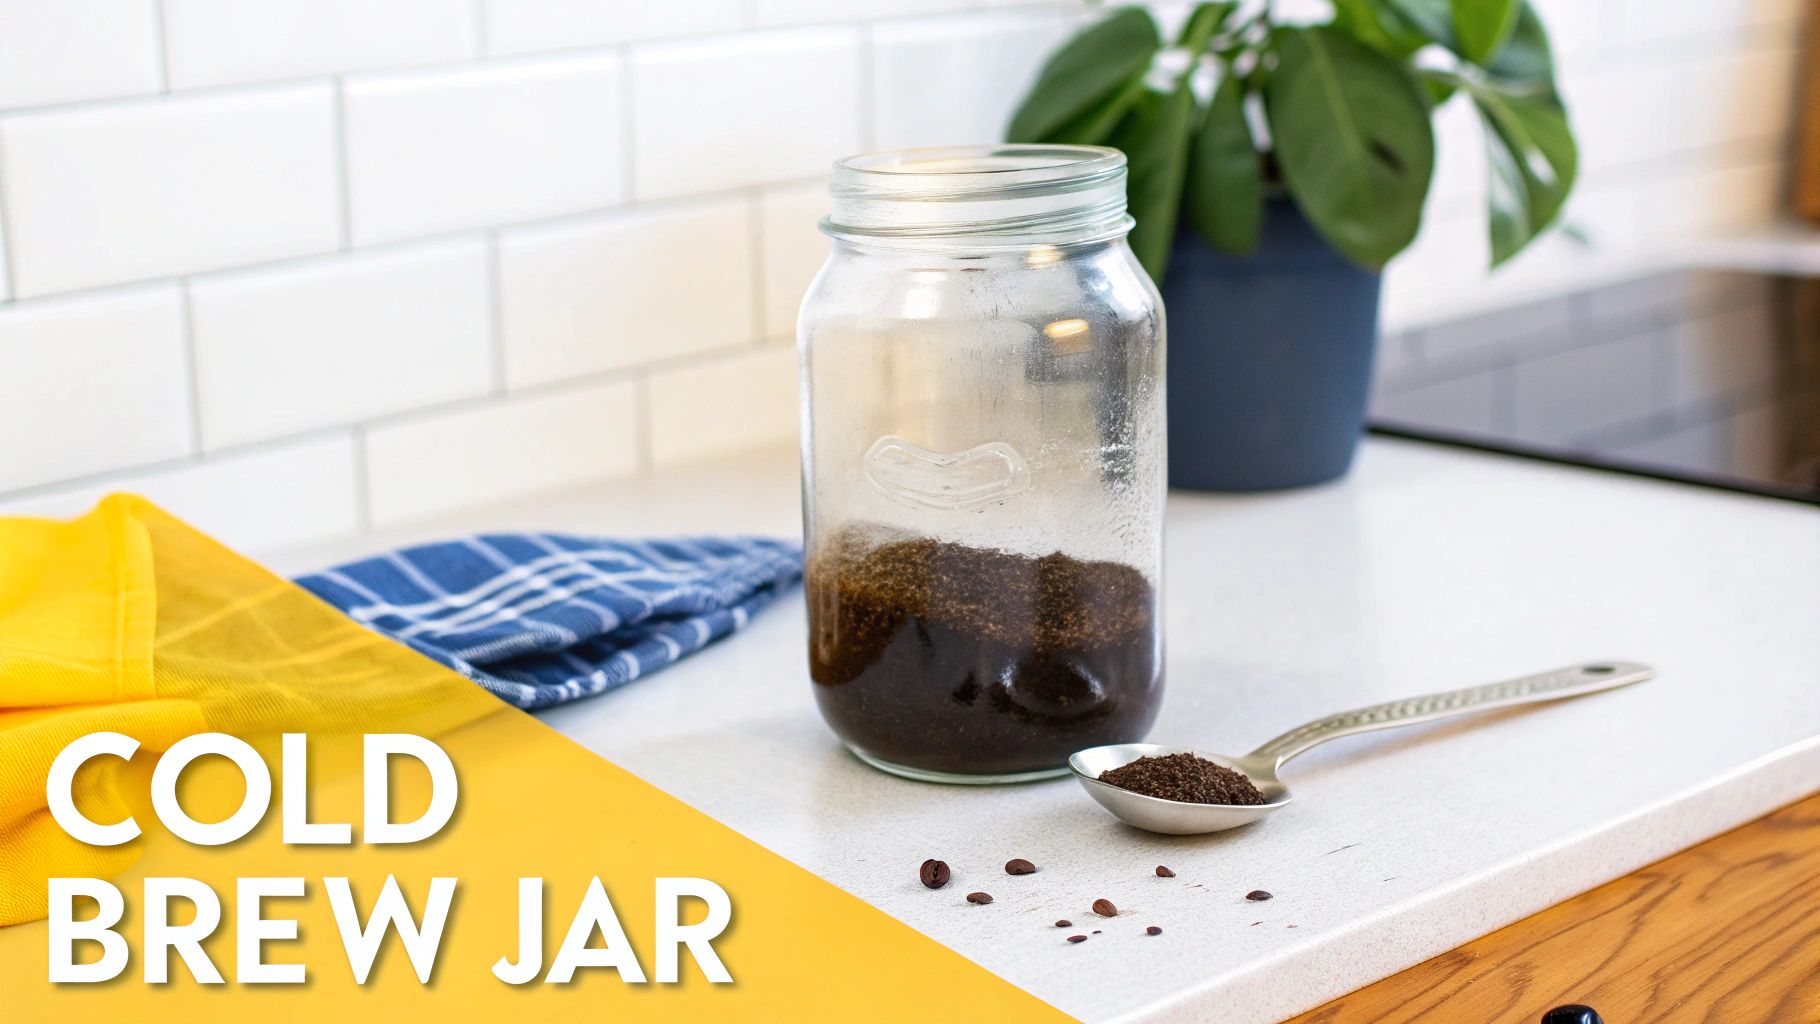
Brewing Effortless Cold Brew in a Jar
If you're a fan of smooth, low-acid coffee, this is your method. Making cold brew in a jar has to be the simplest way to get a fantastic coffee concentrate without any fancy gear. It’s the ultimate "set it and forget it" technique, proving you can make coffee without a coffee maker and still get something that rivals your favorite cafe.
The real magic of cold brew is its gentle, slow extraction. Instead of hot water, you’re using time—and a lot of it—to pull all those rich, chocolatey flavors from the beans. This process leaves most of the bitter compounds and harsh acids behind, giving you a brew that's naturally sweet and incredibly easy on the stomach.
The Cold Brew Concentrate Ratio
Getting a great cold brew concentrate all comes down to the ratio. A solid starting point is a 1:8 ratio—that’s one part coffee to eight parts water. If you’re using a standard 32-ounce Mason jar, the math is simple:
- 1 cup of coarsely ground coffee
- 4 cups of cold, filtered water
You absolutely need a coarse grind for cold brew. Think of the texture of rough sea salt. Anything finer will create a muddy, silty concentrate that’s a nightmare to filter. Just dump your coarse grounds and cold water into any lidded glass jar, give it a good stir to make sure every ground is wet, and seal it up.
The Magic of Steeping and Filtering
Now for the easy part: you wait. Just set your jar on the counter or pop it in the fridge and let it steep for anywhere from 12 to 24 hours. A shorter steep of around 12-16 hours gives you a lighter, brighter concentrate. If you push it to 18-24 hours, you’ll get a bolder, more robust flavor.
I’ve found the sweet spot is right around 18 hours at room temperature. It gives the coffee enough time to develop that deep, complex flavor without getting bitter. But you should definitely play around with it and see what you like best.
Once the steeping is done, it's time to filter out the grounds. You don't need special equipment here. Start by pouring the concentrate through a fine-mesh sieve to get rid of the big stuff.
For an even cleaner cup, you can line that sieve with a couple of layers of cheesecloth or even just a regular paper coffee filter. Pour slowly and let gravity do its thing. Whatever you do, don't press down on the grounds—that will just squeeze bitter oils into your finished brew.
What you're left with is a killer coffee concentrate that will keep in the fridge for up to two weeks. To serve, just dilute it with an equal amount of cold water or milk and pour it over ice for a perfect iced coffee. You can even add hot water if you want a surprisingly smooth and mellow hot coffee.
Reimagining Instant Coffee for Modern Tastes
Let’s be honest, instant coffee has a bit of a reputation. But it's time to forget everything you think you know about it. The gritty, bitter stuff that used to sit in the back of the cupboard is a thing of the past. Today's high-quality instant coffee is a game-changer, especially when you're wondering can you make coffee without a coffee maker and still get a genuinely great cup.
Brands like Cartograph Coffee have completely changed the landscape with their organic instant coffee, proving that you don’t have to sacrifice flavor for speed. This stuff is crafted for people who actually love coffee. For busy mornings, travel days, or that afternoon slump at the office, it’s an unbeatable solution that delivers a delicious brew in less than a minute.
Elevating Your Instant Coffee Game
Making a great cup of instant is about more than just scooping and stirring. The single most important thing you can do is watch your water temperature. Never use boiling water! It scorches the delicate coffee crystals, leaving you with a harsh, bitter drink.
- The Sweet Spot for Water Temp: Aim for water heated to around 200°F (93°C). That’s just off the boil. If you don't have a fancy kettle or thermometer, no problem—just bring your water to a boil, then let it sit for about 30 to 45 seconds before you pour.
This one small tweak makes a massive difference, allowing the coffee's real flavors to come through. For even more pro tips, we've put together a full guide on how to make instant coffee taste better.
The global coffee market is huge—projected to hit $138.37 billion in 2025 and grow to $174.25 billion by 2030. That tells you just how much people want great coffee at home, and premium instant is perfectly positioned to meet that demand. You can read more about these coffee market forecasts from the USDA if you're curious.
Here's a trick I swear by: Before you add any hot water, dissolve the instant coffee crystals in a small splash of cold water to form a smooth paste. This little step prevents any clumps and gives you a perfectly silky cup every time.
Creative Ways to Use Instant Coffee
A great instant coffee isn't just for a quick black coffee. It's an incredibly versatile ingredient for all sorts of drinks. Because it dissolves so easily, you can get creative without any extra equipment.
For example, you can whip up an "instant espresso" by mixing one teaspoon of instant coffee with just an ounce of hot water. This creates a strong, concentrated base perfect for a quick latte or cappuccino—just add frothed milk. On a hot day, dissolve the coffee in a little cold water, pour it over ice, and top it with your favorite milk or creamer for an amazing iced coffee in seconds.
Common Questions About No-Machine Coffee Brewing
Diving into the world of brewing coffee without a machine always brings up a few good questions. Getting these details right is what separates a decent cup from a great one, no matter what gear you have (or don't have).
Let's walk through some of the most common hurdles people run into. A little troubleshooting knowledge goes a long way and makes the whole process smoother and a lot more fun.
What’s the Best Coffee Grind Size if I Don’t Have a Grinder?
If you're buying beans from a local shop or a grocery store with a grinder, you're in luck. Just ask them to grind it for you. What you ask for, though, depends entirely on how you plan to brew it.
- Cowboy Coffee & Cold Brew: For these methods, you need a coarse grind. Think of the texture of coarse sea salt or even breadcrumbs. This larger grind size is crucial for preventing a bitter, over-brewed taste and makes filtering out the grounds way easier.
- Improvised Pour-Over: Here, a medium grind is your sweet spot. It should look and feel a lot like regular table salt. This gives you the ideal surface area for a quick, balanced extraction that isn't too weak or too strong.
Now, what if you're stuck with whole beans and no grinder? You can put them in a sturdy zip-top bag and carefully crush them with a rolling pin or the flat bottom of a heavy pan. Just be warned: it’s nearly impossible to get a consistent grind this way. You'll end up with a mix of dust and chunks, which often leads to a pretty unpredictable brew.
How Can I Heat Water Without a Kettle?
You definitely don't need a fancy gooseneck kettle. Any clean pot or saucepan on the stovetop will get the job done perfectly.
Just heat the water until it's steaming heavily and you start to see tiny bubbles forming on the bottom. That point, right before it hits a full, rolling boil, is the ideal temperature range of 195-205°F (90-96°C).
In a real pinch, you can even use a microwave. Heat water in a microwave-safe mug in 60-second bursts until it’s steaming hot, but be careful not to let it boil over. And if you're camping, a pot over the fire or on a portable stove is the time-tested way to go.
The most important thing to remember is to avoid pouring boiling water directly onto your grounds. A full boil will literally scorch the coffee, resulting in a harsh, bitter flavor, no matter which method you're using. If you do accidentally boil it, just let it sit for about 30 seconds to cool down.
Can I Use Just Any Cloth as a Makeshift Filter?
While a little MacGyver-ing is part of the fun, not all fabrics are created equal when it comes to filtering coffee. Your choice of material will absolutely change how your coffee tastes.
You're looking for a clean, tightly woven, and lint-free cloth. Something like cheesecloth, a clean cotton napkin, or even a new bandana can work wonders. Stay away from anything too porous, like medical gauze, because it will let too much sediment slip through into your cup.
Also, and this is a big one, make sure the cloth wasn't washed with any scented detergents or fabric softeners. Those aromas will transfer straight into your coffee. Trust me, you don't want that.
Whatever you choose, give it a good rinse with hot water first. This gets rid of any loose fibers or dust and helps prevent any funky, "off" flavors from ruining your brew. A heavy-duty paper towel can work in a true emergency, but it might tear and often imparts a noticeable papery taste.
Why Does My Coffee Taste So Bitter?
Bitterness is easily the most common complaint with manual brewing, and nine times out of ten, it’s a clear sign of over-extraction. This simply means the hot water has been in contact with the coffee grounds for too long, pulling out all the harsh, bitter compounds.
The good news? It’s usually an easy fix.
First, check your water temperature. As we just covered, water that’s too hot is the number one cause of bitterness. Let it cool down a bit off the boil.
Second, think about your timing. How long are you letting it steep? This is critical for methods like cowboy coffee or even cold brew. If you let your stovetop coffee simmer for more than four minutes, it's going to get bitter. The same goes for cold brew left to steep for much longer than 24 hours.
Finally, your grind might be too fine for the job. Fine grounds have a ton of surface area and release their flavor very quickly. If you use an espresso-fine grind in an immersion brew like cowboy coffee, you’re pretty much guaranteed a bitter, unpleasant cup.
Ready to simplify your coffee routine without sacrificing quality? Cartograph Coffee offers premium, organic instant coffee that delivers a rich, satisfying cup in seconds—no machine, no hassle. Explore our collection and discover how easy great coffee can be at https://cartographcoffee.com.