You're halfway out the door, coffee in one hand and a jar of milk in the other, wishing your instant coffee had the soft, creamy cap you get at a café. You don't need a full café setup to improve that cup. With a steam wand, handheld frother, French press, or a jar, you can add air, warmth, and a smoother texture to ordinary coffee.
The key is understanding what the milk is doing. Good froth isn't just decoration. It changes how coffee feels on your tongue, softens bitterness, and helps a quick drink taste more deliberate. The method matters, but milk choice, temperature, and control matter more than expensive equipment.
Why Frothing Milk Transforms Your Coffee at Home
A rushed morning coffee often tastes thin for a simple reason. Instant coffee dissolves quickly, but it doesn't bring the creamy body that steamed or frothed milk adds to an espresso drink. Aerating the milk creates tiny bubbles that make each sip feel fuller, while gentle heat brings out milk's natural sweetness without requiring extra sugar.
That difference is especially noticeable with a strong coffee base. A spoonful of instant coffee mixed with hot water can be sharp and direct. Add warm, aerated milk and the edges become rounder. The coffee still has character, but the foam gives it a layered texture instead of making it taste like milk poured into a mug.
Practical rule: Foam should support the coffee, not sit on top as a stiff cloud that disappears after the first sip.
The useful part is that different tools create different kinds of foam. A steam wand can produce fine microfoam with a glossy finish. A handheld frother makes a light, airy topping quickly. A jar creates larger bubbles and a more rustic result, but it works surprisingly well when you're at a campsite or hotel desk.
What foam changes in the cup
Frothing introduces air into the milk and changes its structure. The milk feels lighter at first, then creamy as the bubbles integrate with the liquid. That texture can make instant coffee feel closer to a prepared milk drink, even when the coffee itself came from a small packet.
The same idea works with cocoa, chai, and matcha, but coffee shows the contrast clearly because its bitterness benefits from milk's softness. You can use less milk than you would for a plain café au lait and still get a noticeable texture change.
You don't need a dedicated coffee bar
A clean jar, a small saucepan, and a heat source are enough to get started. At home, a battery-powered frother is easier for repeated use. If you already own an espresso machine, learning to steam properly gives you the greatest control, but it also requires the most attention.
Frothing milk for coffee is therefore less about copying café equipment and more about choosing a process you'll repeat. A reliable jar method used every morning beats an elaborate setup that stays in a cupboard.
Choosing the Right Milk and Temperature Targets
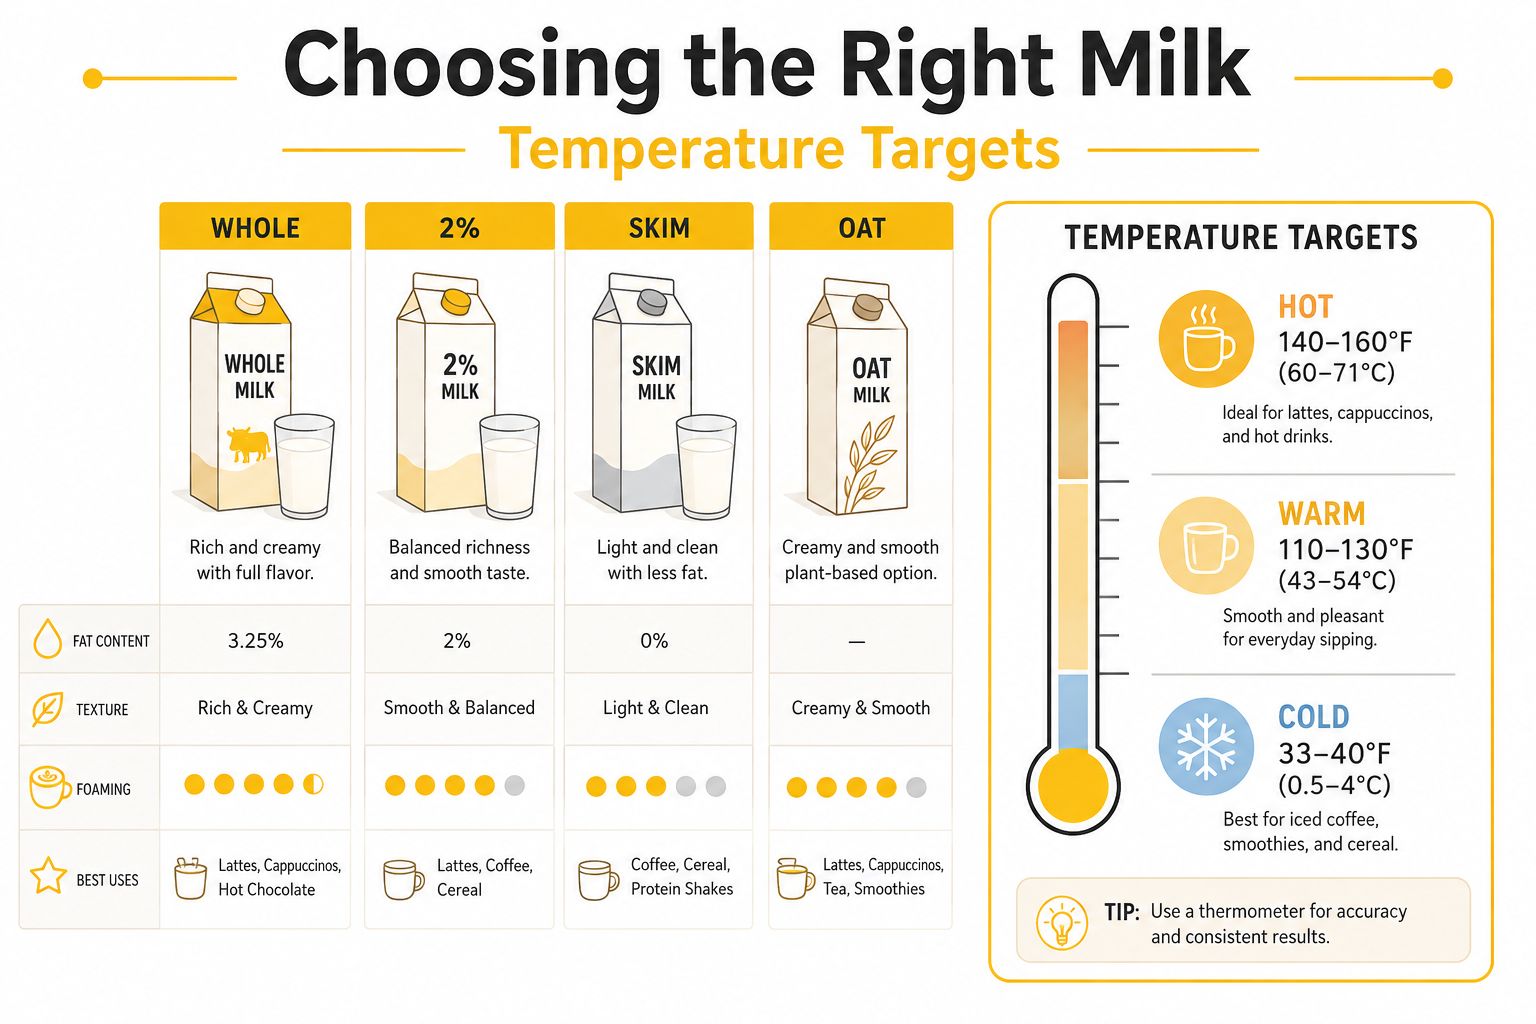
A jar of instant coffee can still feel café-made when the milk matches the method. Protein helps build the foam structure, while fat contributes richness but can reduce stability. Higher protein generally supports greater foam volume, while higher fat tends to weaken stability, as described in this research on milk foam formation and stability.
Whole milk is the easiest starting point for a creamy drink. It gives foam a rounded mouthfeel, provided you stop heating before the milk overheats. Skim and low-fat milk can produce a taller, drier foam, but the texture often feels lighter and less full in a cappuccino.
Plant-based milk needs more testing because brands differ in protein, oils, and stabilizers. Barista-style oat and soy milk usually foam more reliably than thin, low-protein alternatives, although neither behaves exactly like dairy. For soy in particular, this guide to soy milk in coffee explains how texture and flavor affect the finished cup.
The temperature window that protects texture
For steam-frothed milk, aim for a final temperature of 50–60 °C. Pasteurized whole milk near 60 °C produced the most uniform bubble distribution in the cited temperature and bubble-distribution research. Stop in that range. Excess heat denatures more of the proteins, weakens the foam, and can give the milk a cooked or scorched taste.
Good milk should look glossy, fine-textured, and stable through the drink's 10–15 minute window, reported in the same study. At a lower temperature, the drink can taste flat and feel underdeveloped. At a higher one, the bubbles become coarse and the milk loses sweetness.
Use a thermometer while learning, especially with a saucepan or camping stove where heat changes quickly. Without one, stop when the container feels distinctly hot but remains comfortable to hold briefly. Do not let the milk simmer or boil. Surface bubbles usually indicate excessive heating.
Prepare the milk before aerating
Begin with fresh, cold milk for a steam wand or stovetop method. Leave room in the pitcher or container for expansion and movement. A tall vessel is safer for a handheld frother or jar because it reduces splashing and gives the foam space to rise.
Warm milk before using a jar, French press, or whisk when you want a hot coffee. A handheld frother can aerate cold milk, but cold foam suits an iced or quick drink better than a traditional warm cup. With a microwave, heat in short intervals and stir between them so the edges do not overheat while the center stays cool.
These choices matter more than expensive equipment. A measured temperature and suitable milk will improve foam from an espresso machine, a kitchen jar, or a campsite container alike.
This demonstration shows the basic relationship between warming and aerating milk:
Mastering the Steam Wand for Café-Quality Microfoam
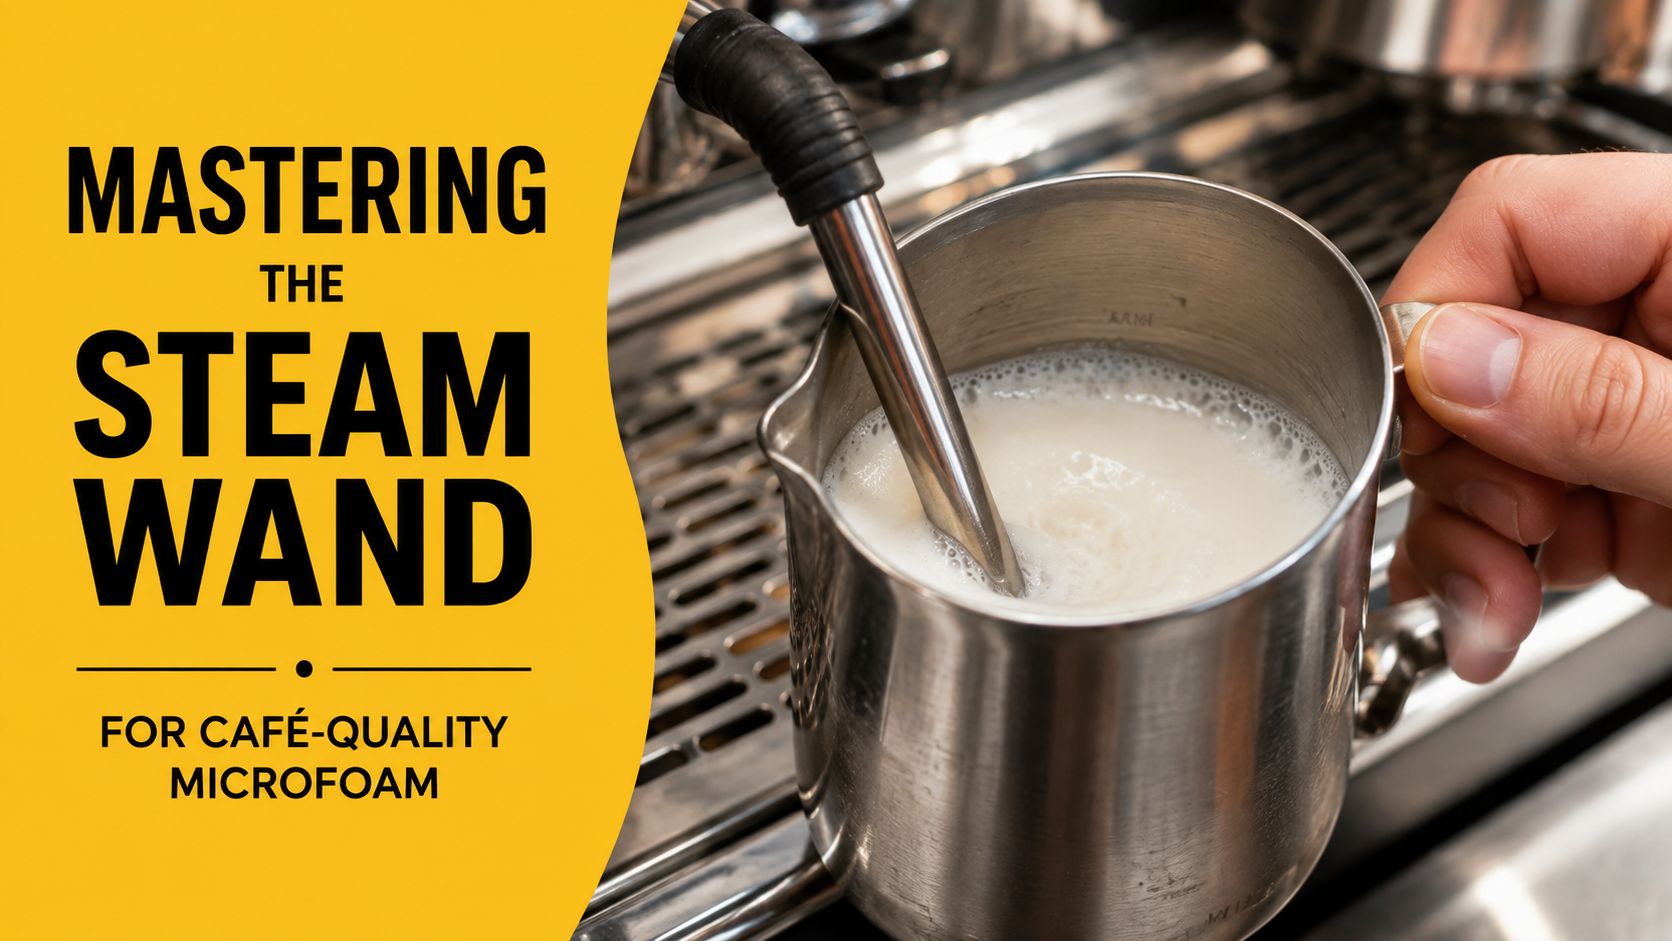
A steam wand is the best tool for fine, integrated foam, but it punishes careless positioning. The wand doesn't just whip milk. It injects steam, adds air, and creates movement that distributes the bubbles through the liquid.
The modern cappuccino depended on this technology. Luigi Bezzera's espresso machine patent in 1901 made the modern drink possible, and improved Italian espresso machines by the 1930s could generate stable steam pressure for fine milk foam. Traditional Italian proportions later settled into a 1:1:1 balance of espresso, steamed milk, and foam, often described as a 150 ml drink containing 30 ml espresso, 60 ml steamed milk, and 60 ml foam, according to this history of cappuccino ratios and espresso technology.
Start with clean steam and a small air intake
Pour cold milk into a chilled stainless-steel pitcher. Use enough to cover the steam tip, but leave expansion room. Purge the wand briefly before placing it in the milk, then wipe it immediately after steaming so dried milk doesn't block the tip.
Position the steam tip just under the surface, near the side of the pitcher rather than in the center. Open the steam valve and listen. The correct sound is a soft tearing or paper-ripping noise. Loud screeching usually means the tip is too deep or the air intake is too aggressive.
Introduce air only at the beginning. Keep the tip close enough to the surface that it draws in air without splashing, then lower it slightly once the milk has expanded. If you plunge too deep immediately, you'll heat the milk without creating enough foam. If you leave the tip at the surface for too long, you'll make large, unstable bubbles.
Build the vortex
Once the milk has gained enough air, submerge the tip just below the surface and angle the pitcher so the milk spins. This vortex breaks larger bubbles into smaller ones and folds the foam through the liquid. You want movement that looks smooth, not a violent whirlpool.
Keep the pitcher moving only as much as necessary. Experienced baristas use sound, sight, and touch together. The milk should become glossy, the bubbles should disappear into a smooth surface, and the pitcher should grow hot in your hand. Stop in the 50–60 °C range, following the temperature guidance cited earlier.
Tap the pitcher lightly on the counter if a few visible bubbles remain, then swirl the milk before pouring. The finished texture should flow like wet paint. Dry foam that sits in a separate layer usually means you added too much air or stopped the vortex too early.
For readers comparing machines, a curated espresso machine collection can help you evaluate steam-wand designs, boiler setups, and countertop formats before buying. The machine matters, but technique still determines whether the milk becomes silky or stiff.
If you prefer oat milk, remember that it responds differently from dairy. This guide to coffee with oat milk is useful when adjusting texture and flavor for a plant-based cup.
Frothing Without an Espresso Machine Using Everyday Tools
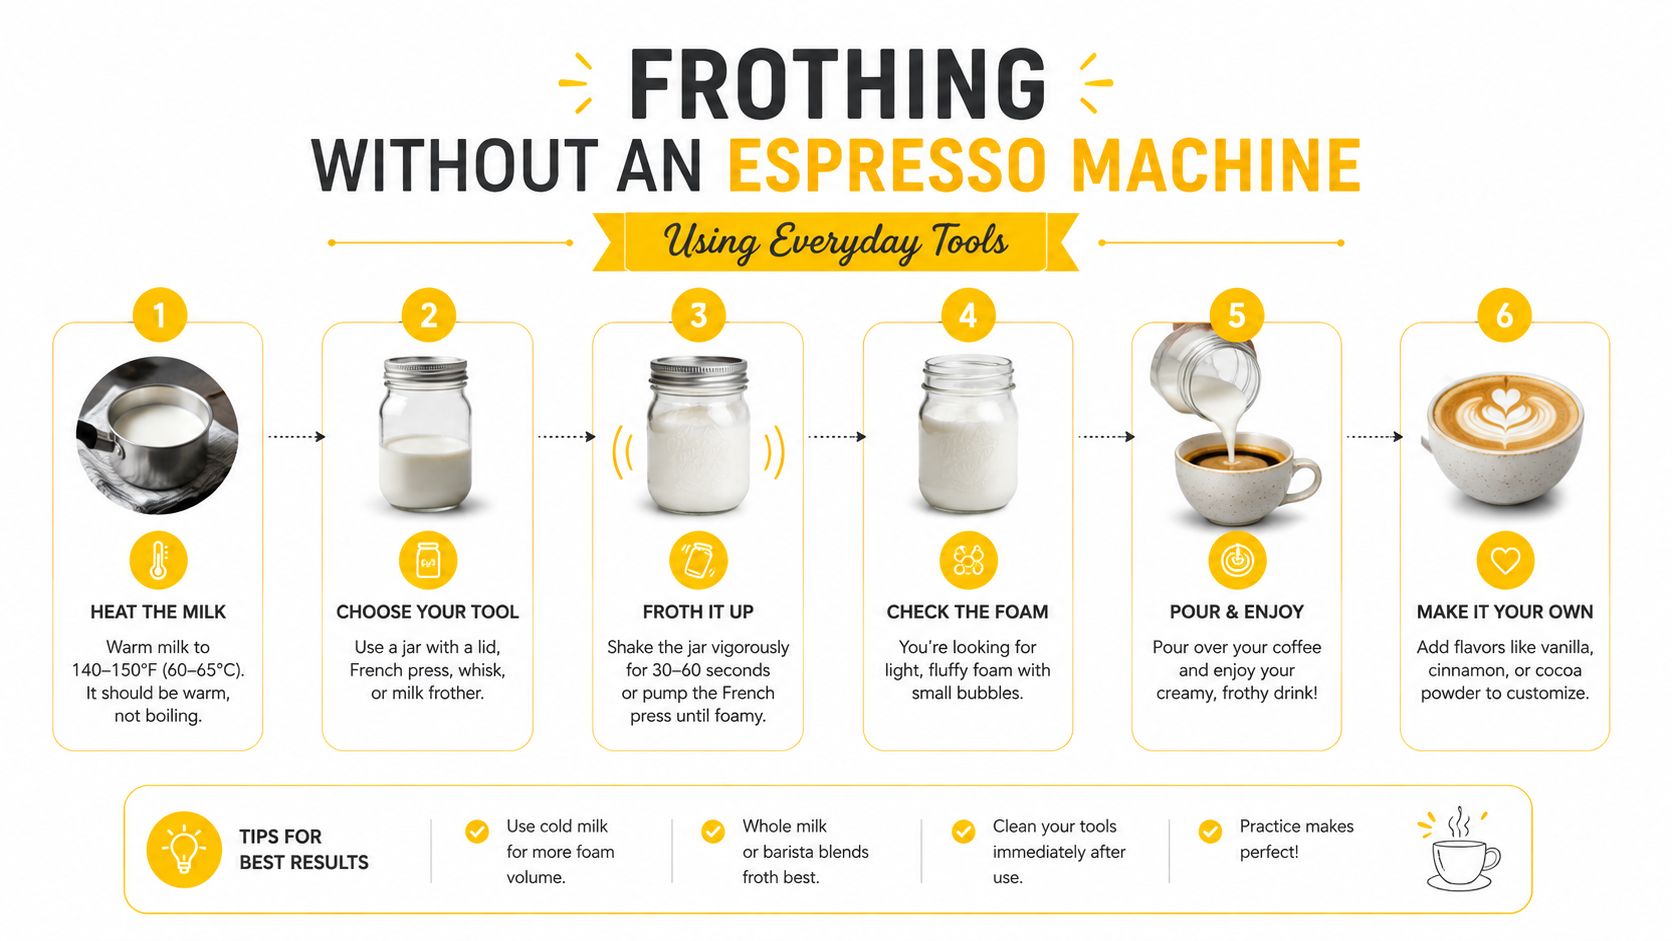
You can make good foam without pressurized steam. The texture won't be identical to wand-made microfoam, but the right tool can still produce a pleasant coffee topping. The historical progression from hand whisking and shaking to steam wands and electric frothers reflects the same practical trade-off. Manual approaches are accessible but less consistent, while electric tools make aeration faster and easier, as explained in this history of milk frothing methods.
Handheld electric frother
This is the most useful choice for instant coffee drinkers. Warm the milk separately, transfer it to a tall mug or jug, and place the whisk below the surface before switching it on. Start slowly to avoid splashing, then move the frother through the milk with small vertical movements.
A handheld frother creates light foam quickly, but it can also make a cap of large bubbles if you keep it running too long. Stop when the surface looks even, then tap the container gently and swirl. The result suits a quick latte-style drink, especially when you value speed over latte-art texture.
French press
A French press gives you more volume and doesn't require batteries. Warm the milk, pour it into the press, and use quick, short plunges to push air through the liquid. Keep the plunger below the surface rather than lifting it completely out, or you'll create unnecessary splashing.
This method can produce surprisingly cohesive foam, though it needs more cleanup and works less predictably with some plant-based milks. Pour the milk into your coffee promptly, because manually produced foam separates as it rests.
Jar shaking
A jar is the campsite classic. Add warm milk, secure the lid, and shake hard until the milk becomes visibly foamy. Leave plenty of headspace. A nearly full jar has nowhere for the milk to move, so it won't aerate efficiently.
Remove the lid before reheating. A sealed jar can build pressure, and that creates a safety problem. Warm the milk first, shake it afterward, or transfer the shaken milk to an open microwave-safe container before applying more heat.
| Method | Best use | Main trade-off |
|---|---|---|
| Handheld frother | Fast home or office drinks | Foam can be airy |
| French press | Several servings | More cleanup and control |
| Jar | Travel and camping | Larger bubbles and less consistency |
For a drink built around instant coffee, the jar and handheld options are usually enough. You can also use this practical guide to making a cappuccino without an espresso machine when you want a fuller drink without investing in a machine.
On-the-Go Frothing for Instant Coffee and Camping
A campsite changes the priorities. You may have hot water, a mug, a jar, and limited washing facilities, but no pitcher, thermometer, or steam wand. That doesn't prevent a satisfying coffee. It means you need a method that separates heating from aeration and keeps cleanup simple.
The jar method for a camp kitchen
Use a sturdy, leakproof jar with a lid that seals properly. Warm the milk with your available heat source, but don't fill the jar close to the top. Shake until the liquid expands into a visible foam, then remove the lid and pour it into your coffee.
If you're using a camp stove, heat the milk in a small pot rather than trying to warm a sealed jar. If you're in a hotel room, use an open microwave-safe container for heating, then transfer the milk to the jar. The workflow is simple: warm, aerate, pour, rinse.
A battery-powered handheld frother is easier when you travel frequently. Keep the whisk head in the milk before switching it on, and use a narrow mug or insulated cup to contain splashes. Portable tools are especially convenient at an office desk, where shaking a jar may attract more attention than you want.
Make instant coffee taste more composed
Prepare the coffee slightly concentrated if you plan to add a generous amount of milk. Stir the coffee completely before pouring in the foam, because undissolved granules can sit beneath the milk and create a harsh final sip. Pour slowly so the foam lands on the surface instead of collapsing immediately.
Shelf-stable milk can be useful when refrigeration is limited. Choose a version you already enjoy drinking, because no frothing method can hide a flavor you dislike. Clean the frother whisk as soon as possible with warm water. At a campsite, a small rinse container and a cloth prevent milk residue from drying onto the tool.
Travel coffee often shares space with other comfort equipment. If you're assembling a broader camp setup, resources on camping shower solutions can help you think through portable water and cleanup needs without treating coffee preparation as an isolated task.
Troubleshooting Flat Foam and Common Frothing Mistakes
Flat foam usually has a visible cause. Foam that vanishes quickly, bubbles that resemble soap suds, or milk with a cooked taste each points to a different adjustment. Change one variable at a time before replacing your tool.
When the foam collapses
Milk composition affects both volume and staying power. Research measures foam volume after 1 minute and stability after 16 minutes, while other tests track initial height, 1-minute height, and 5-minute dissipation, as described in this study of milk frothability and stability. At home, watch whether the foam holds while you prepare the cup or separates before pouring.
Higher protein generally helps build foam, while higher fat can reduce stability. The same frothability research attributes coarse, unstable foam to free fatty acids and lipolysis as well. If a familiar milk suddenly performs poorly, open a fresh carton and clean the frother whisk or steam tip thoroughly.
Diagnose the texture
- Large, dry bubbles: Too much air entered, or the milk never developed a proper vortex. Reduce air intake and continue swirling until the surface becomes smooth.
- Flat milk: The tool is adding too little air, or a steam tip sits too low. Start near the surface and listen for a gentle tearing sound, then lower the tip to circulate the milk.
- Burnt flavor: The milk overheated. Stop in the 50–60 °C range recommended earlier for steam-frothed milk. A thermometer helps, but touch and smell can also warn you before the flavor turns cooked.
- Foam separates immediately: Pour sooner, use gentler agitation with plant-based milk, and check freshness. Some milks gain volume quickly without holding a cohesive texture.
- Milk splashes everywhere: Choose a taller container, begin at low speed, and keep the frother head submerged. This matters even more with a jar or travel cup, where a narrow opening can force foam upward.
A useful test: A glossy surface usually signals finer foam. If it looks dull, keep the milk moving gently instead of adding more air.
Picking the Best Frothing Method for Your Routine
Choose the method you'll use when you're tired, late, or standing beside a camp stove. Equipment that offers perfect control but demands too much setup won't improve your daily coffee. A modest tool with a repeatable process will.
Match the tool to the drink
If you own an espresso machine and want integrated microfoam for cappuccinos or latte art, practice with the steam wand. It offers the greatest control over air intake, circulation, and pourable texture, but it also has the steepest learning curve.
For instant coffee at home or work, a handheld frother is the practical middle ground. It heats separately, aerates quickly, and stores easily. A jar is the better travel choice when you're camping, staying in a room with limited equipment, or trying to avoid carrying another device.
Use a simple decision test
Ask yourself three questions:
- Do you already have a steam wand? Use it and learn the temperature and vortex cues before buying anything else.
- Do you need speed at a kitchen or office desk? Pick a handheld frother and a tall container.
- Do you need a tool for a campsite or travel bag? Use a secure jar, or pack a battery-powered frother if you can clean it easily.
The best results come from small adjustments. Change the milk, stop heating earlier, introduce less air, or pour sooner. Once those habits become automatic, frothing milk for coffee stops feeling like a special project and becomes a reliable way to upgrade even the fastest cup.
Cartograph Coffee offers organic instant coffee designed for convenient brewing at home, work, and outdoors, making it a natural match for a jar-frothed or handheld-frothed milk drink. Visit Cartograph Coffee to explore the coffee options and build a faster routine with better texture in the cup.