Most advice about the best tasting black coffee starts in the wrong place. It tells you to buy a rarer origin, chase a lighter roast, or spend more on beans before you've proved your brew is doing those beans any favors.
That's backward.
A controlled consumer study of black coffee found that brew strength was the main driver of liking, while brewing-water temperature had no significant impact on liking for any consumer cluster. In that study, 118 consumers evaluated 27 coffees across 3,186 tastings, and the researchers reported that percent total dissolved solids, or TDS, had the largest effect on preference according to the Specialty Coffee Association summary of the dataset. If your cup tastes dull, harsh, or hollow, the first fix usually isn't a new bag. It's better control of strength and extraction.
That's good news, because it means the best tasting black coffee is often already in your kitchen. You just need to brew it on purpose.
Why Most Black Coffee Tastes Flat and How to Fix It
Flat black coffee usually comes from poor control, not poor beans.
I see the same mistake all the time. A brewer gets a cup that tastes weak, sour, or oddly empty, then blames the roast or origin before checking whether the brew was even strong enough to show flavor in the first place. That order wastes good coffee.
For home brewers, strength usually moves the cup more than temperature tweaks do. The black-coffee preference study cited above found that consumers responded more to brew strength than to brewing-water temperature, and the researchers also reported that many consumers in the study preferred weaker coffee over stronger coffee in the underlying dataset record.
That matters because weak coffee and under-extracted coffee are not the same problem. They can overlap, but the fix is different. If the cup is too dilute, grinding finer and pushing extraction harder can make it harsher without making it better. If the strength is already in range, then extraction becomes the useful lever.
My rule is simple.
Set strength first. Then decide whether extraction needs work.
Flat is a symptom, not a flavor
“Flat” gets used for several different failures, and each one points to a different adjustment:
- Watery and short: the cup is too weak
- Sour and empty in the middle: extraction is low or uneven
- Dense but muted: strength is there, but the brew lacks balance
- Bitter, dry, and dull: extraction ran too far, or the brew picked up too many fines
A lot of home brewing goes sideways. Random changes can occasionally improve a cup, but they do not teach you which variable did the work. Repeatable coffee starts when dose and water stay fixed enough to make the next adjustment mean something.
Fix the brew before you replace the beans
You do not need a refractometer to make black coffee taste better. A scale, a timer, and a consistent water amount will solve more flat cups than another bag of expensive beans.
Roasters and baristas often work around an extraction yield range of 18 to 22%, which is commonly associated with balanced black coffee as summarized by the National Coffee Association's brewing guidance. Lower extractions often taste thin, sharp, or incomplete. Higher extractions tend to taste bitter, woody, or drying.
That range is a starting zone, not a promise. Some coffees open up below it. Others hold together a little higher. The practical lesson is simpler than the theory. Get the cup strong enough to taste, then adjust extraction with intent instead of guessing.
The Four Brewing Variables That Actually Drive Flavor
Every brew method gives you different tools, but the same four variables keep showing up: dose, ratio, grind size, and water temperature. If you can control those, you can get much closer to the best tasting black coffee without changing beans.
Think in levers, not recipes
Understanding which lever changed the cup and why works better than searching for a single magic recipe.
| Variable | Practical Range | Effect on Flavor |
|---|---|---|
| Dose | Small single-cup brews often land around the mid-to-high teens in grams, with larger single cups reaching into the low twenties | More coffee increases potential strength and intensity |
| Ratio | 1:15 to 1:17 is a strong working range for black coffee, with 1:16 as a reliable default | Lower ratios taste stronger and heavier. Higher ratios taste lighter and clearer |
| Grind Size | Coarse to medium-fine depending on method | Finer grinds extract faster. Coarser grinds extract slower |
| Water Temperature | Use the hot-brew range most brewers work within, then adjust only after the other variables are stable | Hotter water speeds extraction. Cooler water slows it |
Dose and ratio set the cup's shape
Dose is how much dry coffee you use. Ratio is how much water you pair with it. Those two establish the cup before extraction quality even enters the picture.
A common miss is using too little coffee and trying to fix the result with hotter water or a longer brew. That usually creates a cup that is both thin and unpleasant. Start with a balanced ratio instead. For most black coffee, 1:16 is a dependable center point. From there, nudge stronger or lighter based on taste.
Grind size does the heavy lifting
If you only change one thing to move extraction quickly, change grind size. Finer grinds increase surface area and speed up extraction. Coarser grinds slow it down.
That's why the practical troubleshooting order is usually grind first, then other variables. It's the fastest and clearest lever.
Temperature matters, but less than people assume
Temperature still matters. It just isn't the first thing to chase when the cup is off. A lot of brewers over-credit temperature because it feels precise. In reality, once strength and extraction are roughly under control, temperature tweaks often make smaller sensory changes than grind or ratio.
If you want a useful primer on that variable without overcomplicating it, Cartograph's guide to the best water temp for coffee is a practical reference.
Don't change ratio, grind, and temperature all at once. You'll get a different cup, but you won't know why it changed.
Matching Your Brew Method to the Cup You Want
Different methods don't create different coffee laws. They create different trade-offs.
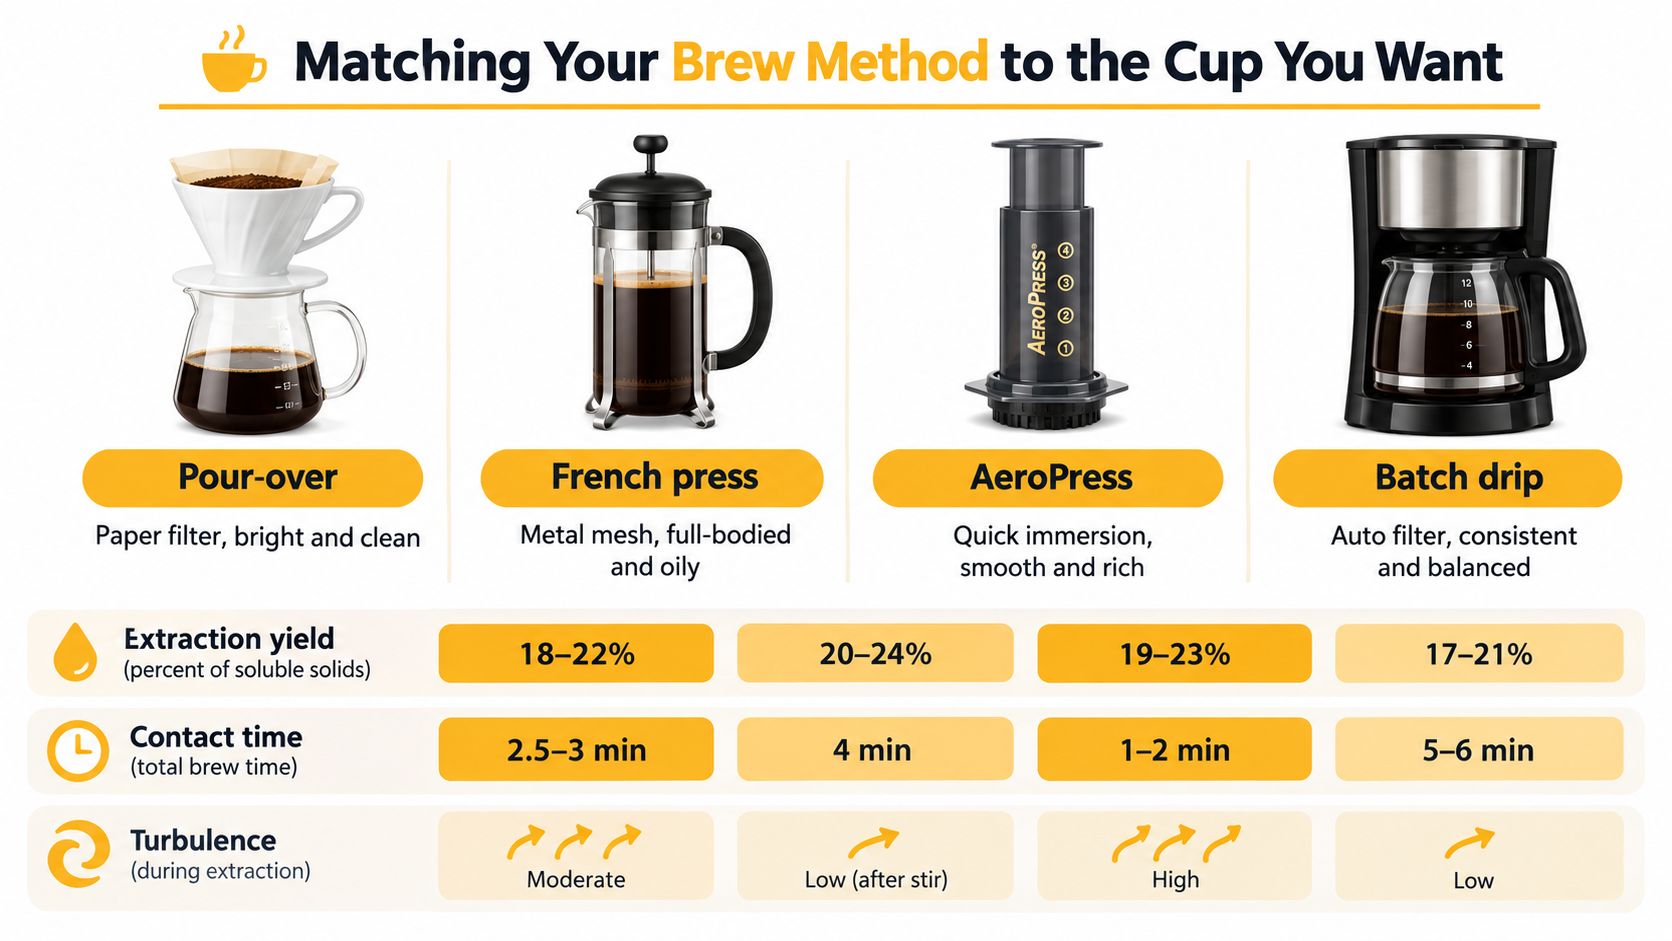
Pour-over for clarity
Pour-over is the method I reach for when I want to taste structure. Paper filtration strips out a lot of the heavier material, so acidity reads cleaner and flavor notes separate better. If your idea of the best tasting black coffee is a cup with definition, this is usually the right lane.
The downside is that pour-over is less forgiving. Pour speed, bed disturbance, and grind consistency matter more.
French press for body
French press makes a rounder cup. Metal filtration leaves more oils and fine particles in the brew, which can make the coffee feel broader and heavier.
That can be great with coffees that seem too sharp in paper-filter methods. It can also get muddy fast if your grinder throws a lot of fines or you leave the brew sitting on the grounds too long.
AeroPress for speed and flexibility
AeroPress is useful when you want a fast cup with room to adjust body and clarity. Filter choice, agitation, and dilution give you a lot of control without much fuss.
For travelers, office brewers, and people who want consistency with less ceremony, it's one of the easiest tools to dial in.
Batch drip for convenience that can still taste good
A decent drip machine won't match manual control, but it can still make balanced black coffee if you feed it the right grind and ratio. The biggest advantage is repeatability once you've found your settings.
If you're comparing methods and want a broad overview of how they differ in daily use, this guide to best coffee brewing methods is a helpful companion.
Pick the method for the cup you like drinking, not the method that looks most serious on a counter.
A Reliable Step by Step Recipe You Can Repeat Tomorrow
A repeatable pour-over recipe is still one of the best training tools for learning black coffee. It gives you enough control to taste what changed, but not so much complexity that every cup becomes a science project.
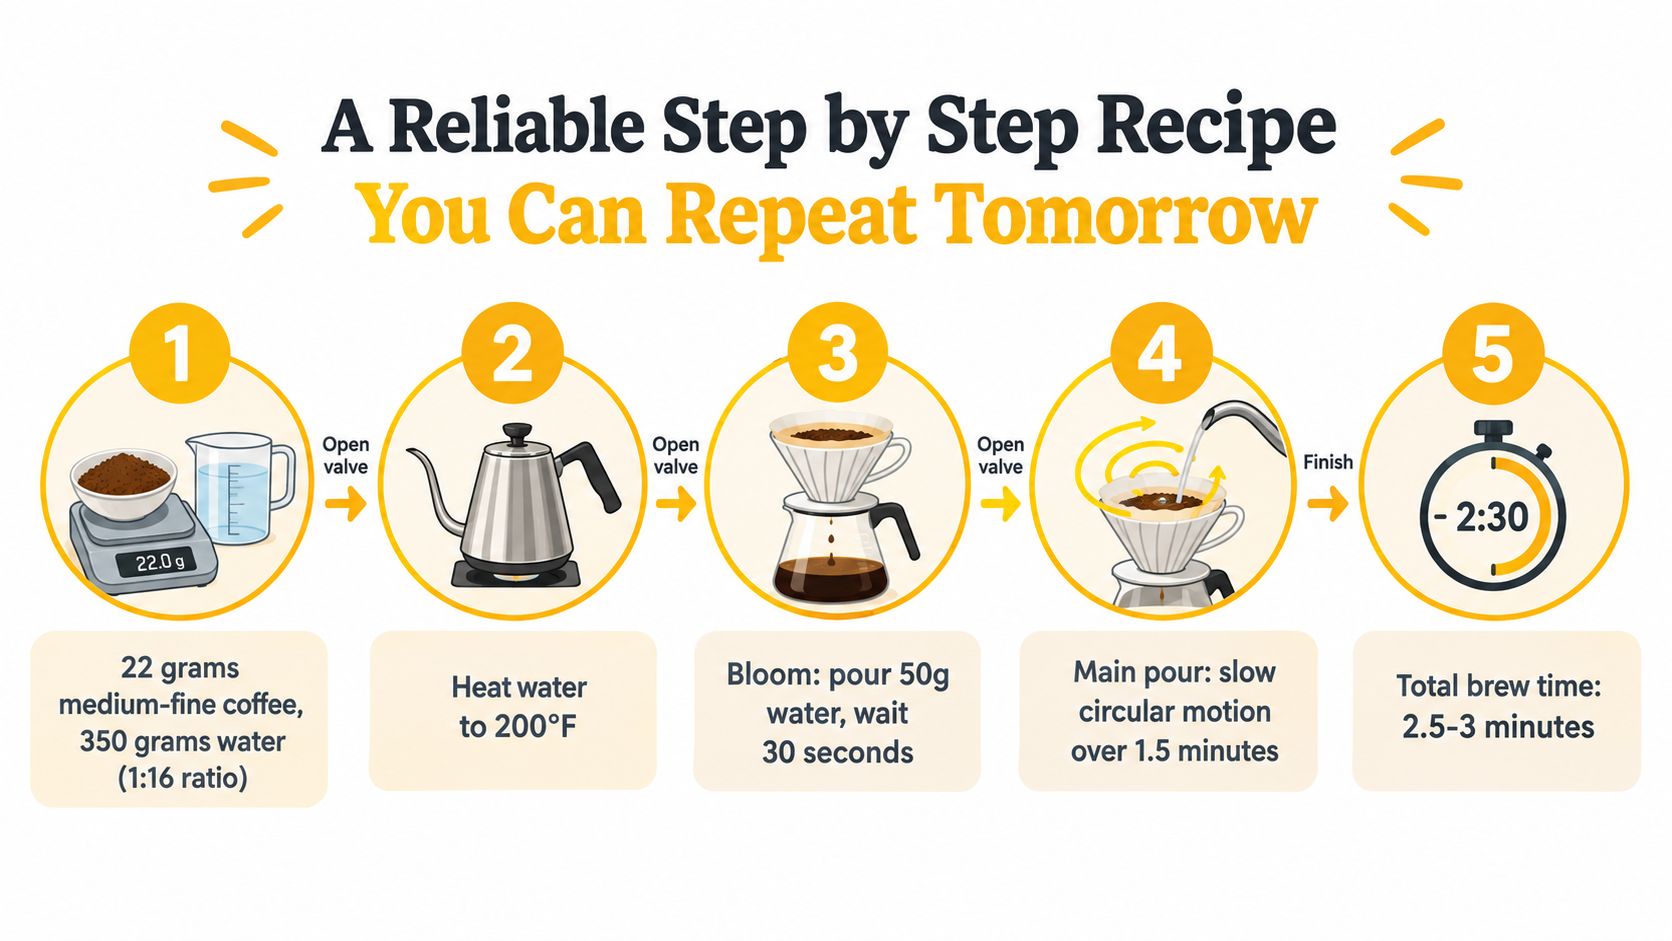
The recipe
Use this on a V60 or similar cone dripper:
- Coffee: 22 grams
- Water: 350 grams
- Ratio: 1:16
- Grind: medium-fine
- Water temperature: 200°F
- Target brew time: 2:45 to 3:15
The brew sequence
- Rinse the filter and warm the brewer. Dump the rinse water.
- Add the ground coffee and level the bed.
- Bloom with 50 grams of water and wait 30 seconds.
- Pour the rest in two pulses with a steady circular pour, keeping the bed evenly saturated.
- Let the drawdown finish inside the target time window.
The bloom tells you a lot. You should smell a clear release of aroma as trapped gas escapes. If the coffee barely reacts and smells muted, it may be stale or ground too far in advance.
Mid-pour, watch the slurry color. It should stay even and look active without violent channeling. If the water punches holes through the bed, your pour is probably too aggressive.
For a visual walkthrough, this brew video shows the flow and pacing more clearly than text alone:
What to taste for at the end
Once the cup cools slightly, ask three questions:
- Is it balanced? Not just strong or weak, but coherent
- Does it finish clean? Or does bitterness linger after the sip
- Can you tell what to change next? If not, the brew may be too inconsistent
If the cup is close, resist the urge to rewrite the whole recipe. Change one variable. Usually that means a small grind adjustment before anything else.
Why this recipe works
It starts from a sensible strength target and gives extraction enough room to land in a balanced zone. That makes it a good baseline. It also trains discipline. Weighing water, timing the brew, and logging the result sounds fussy until you taste how much more consistent your coffee gets.
If you like structured cooking-style instructions, step by step recipes from Mise are a good example of how repeatable process beats memory when you want the same result tomorrow.
Diagnosing Common Taste Problems and Adjusting One Thing at a Time
Most bad black coffee is not a bean problem. It is a diagnosis problem.
I see the same pattern at home and in cafes. The cup tastes off, so the brewer changes everything at once. Finer grind, hotter water, more coffee, longer brew. The next cup tastes different, but you still do not know which change helped and which one made it worse.
Good troubleshooting starts with one question. Is the problem strength, or is it extraction?
Strength tells you how concentrated the cup is. Extraction tells you whether the coffee solids you pulled out taste balanced or harsh. Get those crossed, and people start chasing new beans when the fix was already sitting in the grinder and the brew ratio.
Start by naming the defect clearly
Use plain words. Sour. Bitter. Watery. Muddy. Drying.
That matters because each of those points to a different first move. In practice, grind is still the first adjustment I make for sourness or bitterness because it shifts extraction quickly without rewriting the whole recipe. If the cup tastes weak but otherwise pleasant, I leave the grind alone and fix strength first by tightening the ratio or adding a little more coffee.
Common black coffee taste problems and the one variable to adjust
| Taste Problem | What is probably going wrong | Adjust This Variable First |
|---|---|---|
| Sour, sharp, thin | Extraction is too low | Grind finer |
| Bitter, dry, ashy | Extraction is too high | Grind coarser |
| Hollow, watery | Strength is too low | Increase dose or use less water |
| Muddy, heavy, silty | Too many fines, too much agitation, or immersion pushed too far | Coarsen grind or reduce agitation |
That table looks simple because the first move should be simple.
The mistakes that waste the most coffee
Temperature gets blamed too early. Water temperature matters, but it is usually a second or third adjustment unless you are brewing unusually dark coffee or using water that is clearly too cool.
Dose gets misused too. A stronger cup is not automatically over-extracted. A weak cup is not automatically under-extracted. Those are separate axes. Strong and sour can happen together. Weak and bitter can happen together. Once you see that, troubleshooting gets much faster.
Shop-floor habit: Before changing anything, write the defect in one word and write the next adjustment beside it. That keeps you from drifting into random fixes.
A fast decision rule that holds up
Use this sequence when a cup misses:
- Sour or thin: grind finer
- Bitter or drying: grind coarser
- Watery but otherwise clean: increase dose slightly or reduce water
- Muddy or dull: reduce fines, reduce agitation, or clean up the pour
- Several problems at once: go back to your last drinkable recipe and rebuild from there
If bitterness is the issue you fight most often, this breakdown of what makes coffee taste bitter is useful because it separates roast character from brew mistakes.
One change per brew. That rule sounds slow until you realize it is the fastest way to get to a repeatable cup.
Building Your Personal Best Tasting Black Coffee Recipe
There isn't one universal best tasting black coffee recipe because people don't all want the same thing. Some drinkers want brightness and a dry finish. Others want body, smoothness, and less perceived bitterness. The useful target is not perfection in the abstract. It's a personal baseline you can repeat and improve.
Recent tasting coverage of black coffee products makes that point well. Different black coffees were praised for very different reasons, including being “bold, full-bodied,” “fruity,” or having bitterness that was “just right,” which reflects how much preference depends on the kind of balance a drinker wants in this tasting coverage. Bitterness itself is also more complicated than people think, shaped by roast chemistry and even differences in taste perception. That's why copying someone else's ideal cup only gets you so far.
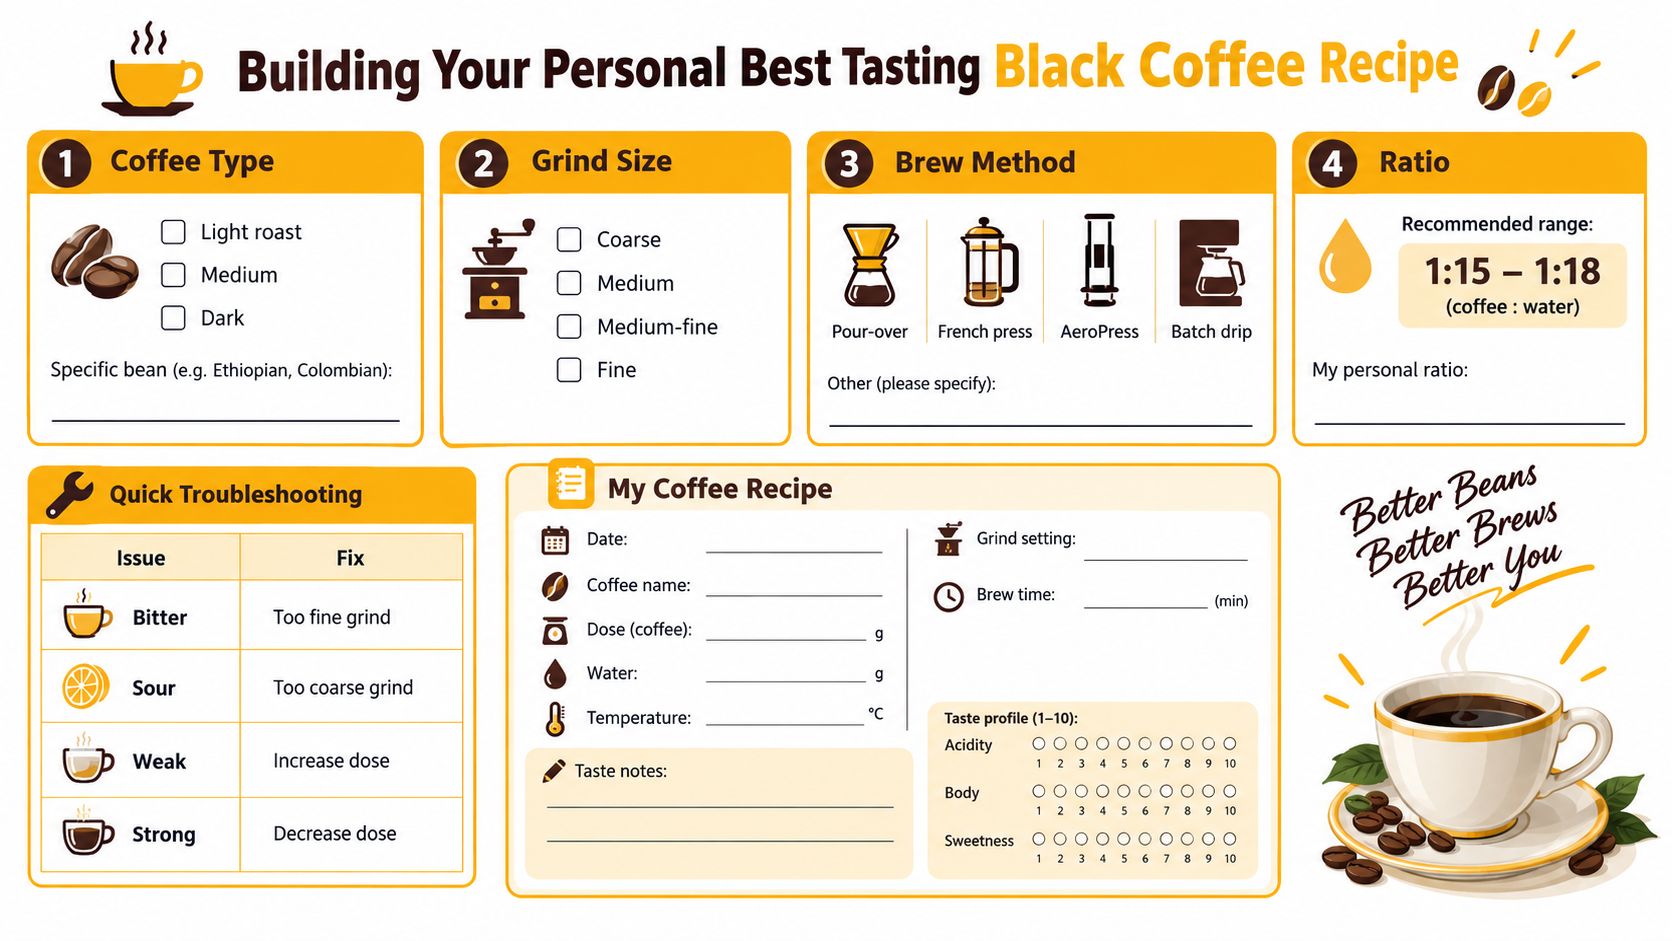
Use a recipe card, not memory
Record the same fields every time:
- Coffee: origin, blend, or roast name
- Method: V60, French press, AeroPress, or drip machine
- Dose and water: exact brew ratio
- Grind setting: whatever your grinder uses
- Temperature: your chosen hot-water setting
- Brew time: total contact or drawdown time
- Taste notes: simple, honest words
Keep the notes plain. “Slightly hollow, better as it cooled” is more useful than trying to sound like a tasting sheet.
Log tiny changes
Small changes teach you more than dramatic ones.
For example, if your baseline cup tastes a little sharp, adjust grind slightly finer on the next brew and log the result. If sweetness improves but the finish gets dry, you've learned where that coffee starts to overreach. That's how a personal recipe gets built. Not by guessing, but by collecting a trail of clear decisions.
Reset the baseline when the coffee changes
A new bag means a new dial-in. Even if the roast looks similar, solubility can shift enough that your old settings won't land the same cup.
Use a short reset checklist:
- Start from your standard ratio
- Keep your usual brew method
- Brew once before making big judgments
- Adjust one variable on the second cup
- Stop when the coffee tastes balanced, not when the process feels complete
If convenience matters and you still want a plain black cup with a simpler workflow, products like freeze-dried instant coffee can fit into this framework too. Cartograph Coffee, for example, offers organic instant coffee with no additives, which is useful for people dialing in black coffee at work, while traveling, or outdoors where full gear isn't practical.
Cartograph Coffee makes organic instant coffee for people who want a cleaner black cup without dragging out a full brew setup every time. If you care about strength, balance, and repeatability, especially at the office, on the road, or at camp, visit Cartograph Coffee and explore a simpler way to build your everyday black coffee routine.