You've finished brewing, poured the last cup, and now a brown ring is drying inside the carafe. A quick rinse seems harmless, but the stale coffee smell returns the next morning, usually from the lid, gasket, or narrow pour spout rather than the main chamber. If you've ever scrubbed harder only to make the surface look cloudier, the problem may not be your effort. It may be the cleaning method.
The right answer to how do you clean a coffee carafe depends on what you're cleaning. Glass, single-wall stainless steel, and vacuum-insulated thermal carafes respond differently to acids, abrasives, heat, and soaking. The practical approach is simple: clean loose coffee residue immediately, use gentle tools, and reserve deeper treatments for scale, staining, or trapped odors.
Why Your Carafe Material Changes Everything
A glass carafe can look hopeless after a few neglected brews. The coffee ring is obvious, mineral deposits create a cloudy veil, and the scrubber that works perfectly on a stainless travel mug can leave fine scratches across the glass. Stainless steel hides residue better, but its surface still needs careful treatment. Vacuum-insulated thermal models are even less forgiving because the liner, seals, lid, and insulation system can be damaged by the wrong soak.
Glass is generally the easiest material to deep-clean. Warm water, mild dish soap, a soft bottle brush, and a carefully controlled vinegar treatment are usually practical choices. It still deserves low-abrasion tools, because scratches can trap oils and make later staining harder to remove. Manufacturer guidance recommends avoiding scouring pads, steel wool, abrasives, and harsh cleansers on coffee carafes because they can damage glass and stainless surfaces. KitchenAid's carafe-care guidance supports the gentle approach.
Stainless steel needs a different balance. It resists breakage and often conceals marks, but bleach and chlorine can attack the finish and promote pitting. A vacuum thermal carafe also shouldn't be submerged beyond the level allowed by its manufacturer. Water can enter seams or interfere with insulation, while prolonged acid exposure can affect seals and finishes.
| Material | Safe Cleaners | Avoid | Scratch Risk |
|---|---|---|---|
| Glass | Mild dish soap, warm water, diluted vinegar, baking soda | Steel wool, harsh scouring powders, thermal shock | Moderate |
| Single-wall stainless steel | Mild soap, diluted descaler, baking soda | Bleach, chlorine, steel wool | Moderate |
| Vacuum-insulated thermal | Mild soap, warm water, soft descaler only when approved | Prolonged soaking, bleach, aggressive acids, metal brushes | High |
Practical rule: If the manufacturer's care guide conflicts with a general cleaning trick, follow the care guide.
A useful comparison of carafes and single-serve coffee makers can also help you identify what kind of vessel you have before choosing a cleaner. Material is the first decision. Frequency is the second.
The Daily Rinse and Wash Routine
The best deep-cleaning strategy starts before residue dries. Empty the carafe as soon as practical after brewing, rinse it under warm running water, and wash it with warm soapy water rather than letting coffee sit inside. The manufacturer baseline is to empty after every use, rinse, and periodically deep-clean with a soft-bristled brush. Breville's care guidance also warns against leaving brewed coffee standing overnight because it can stain the carafe surface.
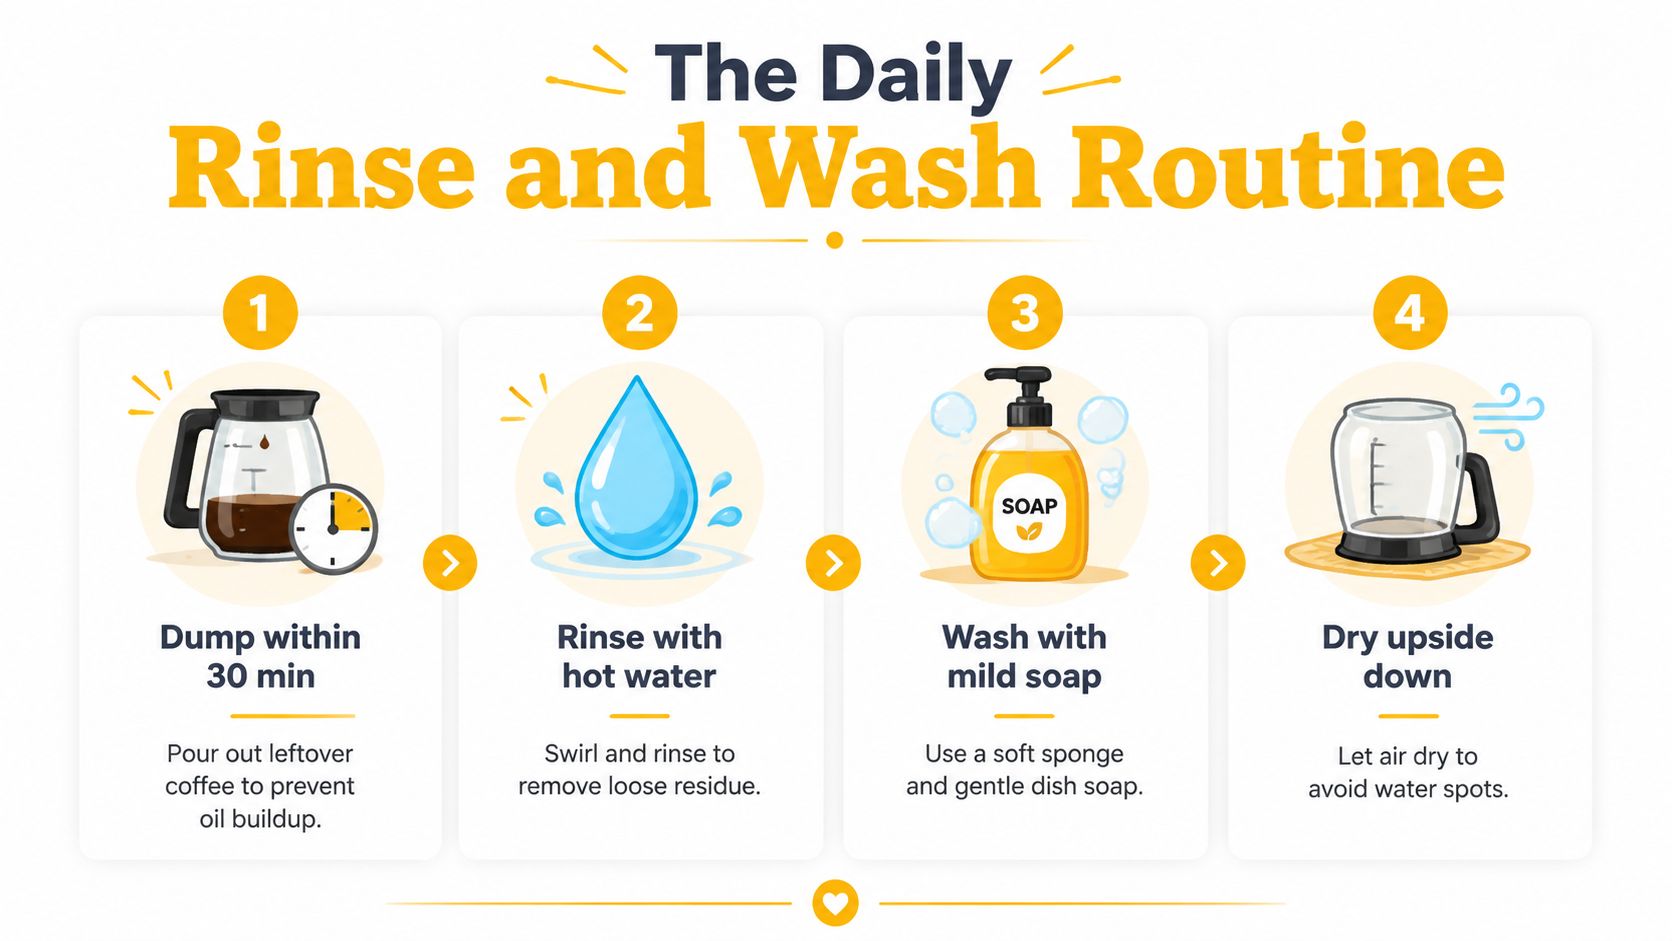
Use this routine after each brew:
- Empty the coffee. Don't leave the final mouthful in the bottom while you finish other kitchen tasks. Dried oils are harder to remove than fresh residue.
- Pre-rinse first. Swirl warm water around the base, shoulder, and spout. This loosens grounds and oils before detergent has to do the work.
- Wash with mild soap. Add a small amount of dish soap and use a soft sponge or long-handled bottle brush. A brush reaches the narrow base without forcing your hand through the opening.
- Clean the lid separately. Open or remove the lid if possible. Wash the silicone gasket, plastic rim, and underside where coffee splashes collect.
- Rinse until clear. Soap left in a spout or gasket can affect the next cup.
- Dry completely. Leave the carafe open or upside down on a rack. Trapped moisture creates the stale smell many people mistake for permanently dirty stainless steel.
Thermal carafes need extra caution. Some manufacturers restrict detergent or soaking, so check the model instructions before adding soap or immersing the body. In every case, a full rinse and open-air dry are safer than closing a damp lid.
Two minutes of after-use care is easier than trying to dissolve a baked-on film later.
Vinegar and Baking Soda Deep Cleans
A brown film, mineral scale, or sour smell needs a targeted cleaner. Vinegar handles mineral deposits, while baking soda works better on coffee oils and odor. The carafe's material and the manufacturer's instructions should decide how long either solution stays inside.
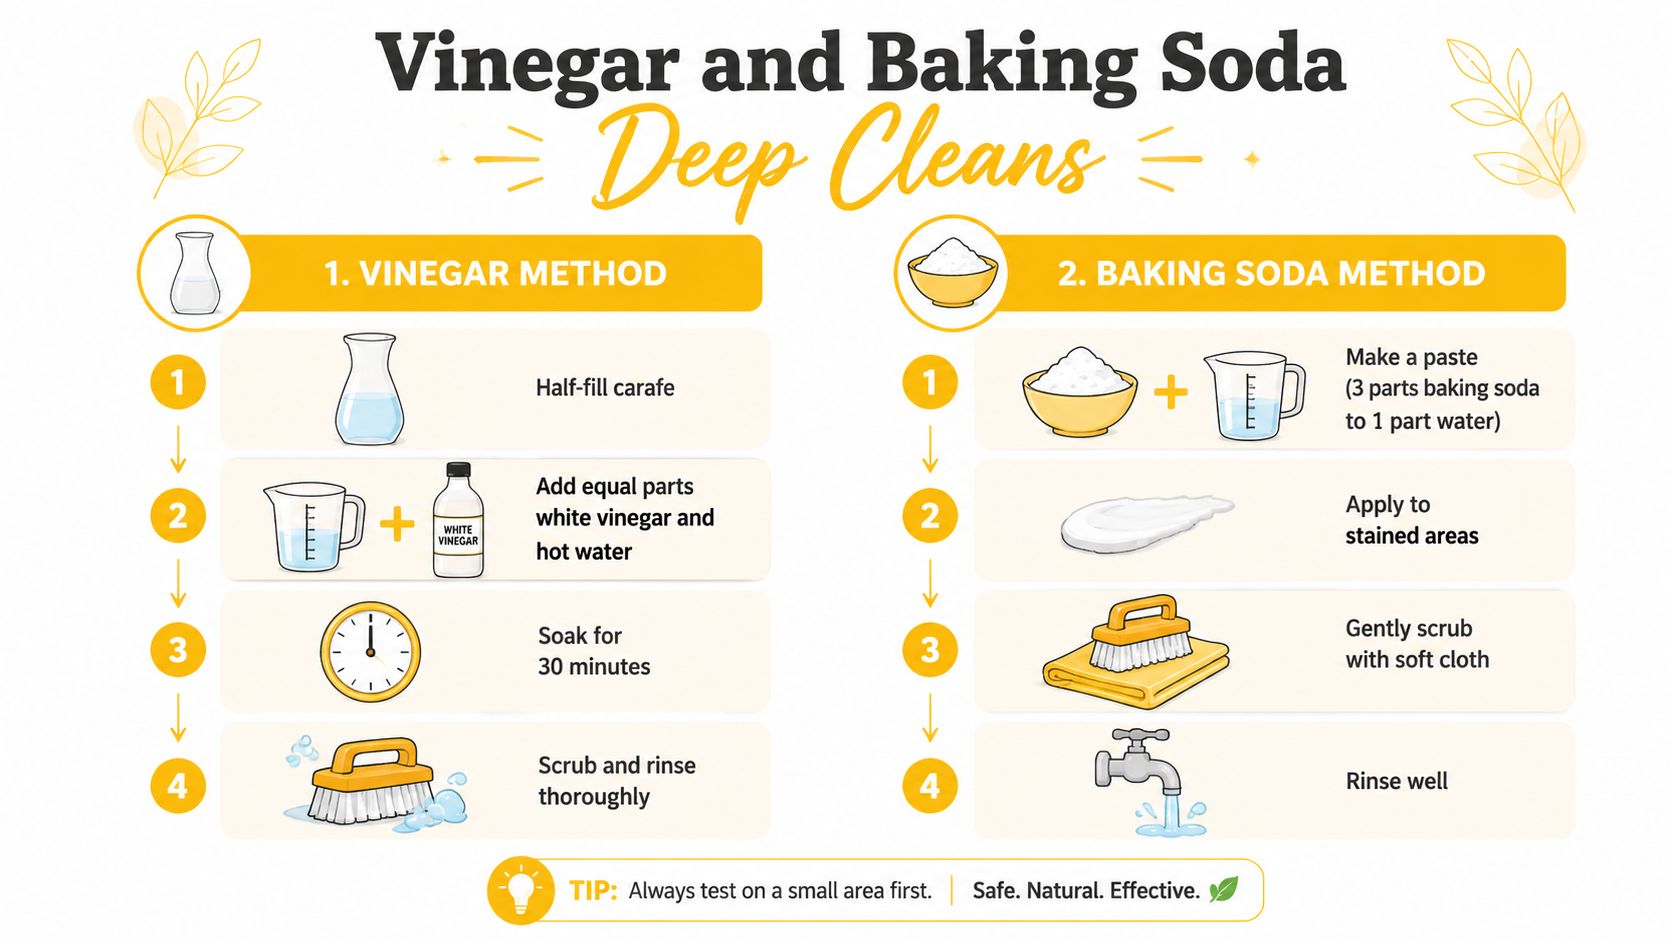
Never combine vinegar and baking soda in the carafe and expect a stronger cleaner. Their reaction mainly neutralizes the ingredients, so the fizz provides little cleaning benefit after it stops.
The vinegar method for mineral scale
Use equal parts white distilled vinegar and hot water. Fill the carafe halfway, covering the scaled or stained areas. Let the mixture sit for a limited time, then use a soft bottle brush rather than aggressive scrubbing.
Use this sequence:
- Mix: Combine equal parts vinegar and hot water.
- Soak: Leave the solution for roughly 15 minutes when deposits are light, or up to 30 minutes for heavier scale. Avoid extended acid exposure on thermal or plated parts unless the care instructions permit it.
- Brush: Clean the base, shoulder, spout, lid, and seams where residue gathers.
- Rinse: Empty the solution and rinse thoroughly. Follow with three plain-water rinse cycles after descaling a brewer or carafe. This removes the acidic smell and any loosened residue.
Glass usually tolerates this short treatment better than a vacuum thermal model. For thermal carafes, check the care instructions first and keep vinegar away from components that restrict acid exposure.
For a brewer, follow its specified descaling process. This manufacturer care document describes a 1:1 vinegar-water cycle followed by a plain-water rinse, while also emphasizing compatibility and careful rinsing. That pattern should not be applied automatically to every finish, seal, or thermal liner.
The baking soda method for odor and coffee film
Dissolve two tablespoons of baking soda in warm water, fill the carafe, and let it sit overnight only when the material and manufacturer instructions allow it. For a concentrated stain, make a loose paste, spread it over the film, and rub with a soft cloth or sponge. Do not scour a thermal liner with the paste.
Baking soda is a practical choice for odor-prone lids and many stainless interiors because it is milder than an acid soak. If a glass carafe has both scale and dark coffee residue, use vinegar first, rinse completely, then apply baking soda as a separate treatment. Each cleaner addresses a different problem.
For additional guidance on using vinegar on coffee stains, focus on the residue rather than chasing a perfectly polished appearance. The cleaning is finished when rinse water runs clear, the hot rinse no longer smells sour, and fresh coffee tastes free of stale or metallic notes.
Cleaning Glass Thermal and Stainless Carafes
Treating every carafe like a glass pot is how people damage lids, seals, and liners. Glass gives you visual feedback, while thermal and stainless models can hide residue in a narrow chamber or under a removable gasket. The tool should match the material and the shape.
Glass carafes
Warm water, mild dish soap, a soft sponge, and a bottle brush handle routine cleaning well. Baking soda can help with a brown film, while diluted vinegar is useful for mineral scale. Avoid sudden temperature changes, such as pouring very hot water into a cold carafe, because thermal shock can crack glass.
Abrasive pads may remove marks quickly, but they also create microscopic scratches. Those scratches catch coffee oils and mineral residue, so the apparent short-term win can make future cleaning worse. A dishwasher may be acceptable for a specific model, but hand washing is the safer default when the care instructions are unclear.
Vacuum thermal carafes
Use a long-handled brush that fits the opening without scraping the liner. Add warm water and mild soap only if the manufacturer permits it, then rinse with the lid removed and let the interior dry fully. Avoid bleach, chlorine, metal brushes, and prolonged vinegar exposure. Never assume a thermal carafe can be submerged just because its exterior looks sealed.
Stainless steel and travel carafes
Single-wall stainless steel can tolerate practical descaling when the product instructions allow it. A mild citric-acid solution may help with mineral deposits, while baking soda can loosen coffee film. Salt can provide gentle texture in a paste, but it should be used sparingly and rinsed away completely. Steel wool is a poor trade-off because it can leave scratches and metallic traces.
Remove silicone gaskets and lid parts regularly, wash them separately, and check the grooves before reassembly. Odor often survives because the gasket never receives direct cleaning.
| Carafe Type | Best Cleaners | Best Tools | Avoid |
|---|---|---|---|
| Glass | Mild soap, baking soda, diluted vinegar | Soft sponge, bottle brush | Steel wool, sudden temperature changes |
| Thermal | Warm water, approved mild cleaner | Soft long-handled brush | Submersion, bleach, prolonged acid soaks |
| Stainless steel | Mild soap, approved descaler, baking soda | Nylon brush, soft cloth | Chlorine, bleach, steel wool |
| Travel carafe | Mild soap, baking soda for odor | Narrow bottle brush, gasket brush | Closing while damp, harsh chemicals |
If coffee odor has become part of the wider kitchen problem, ventilation can help alongside cleaning. A resource on kitchen air purifiers is relevant for reducing lingering cooking and beverage odors in the room, but it won't replace washing the carafe's lid and seals.
How Often You Really Need to Deep Clean
A useful schedule depends on water hardness, brewing frequency, carafe material, and whether coffee sits between uses. Most cleaning guides treat every carafe alike, but thermal, glass, and stainless models do not show buildup in the same way or tolerate the same cleaners. Hard water leaves scale sooner, while frequent brewing adds oil and gives residue more chances to dry.
Use the schedule as a decision guide, not a fixed rule:
- Soft or filtered water: Rinse after every use and inspect the carafe monthly. Deep-clean when film, odor, or scale appears.
- Moderately hard water: Schedule periodic descaling and check the lid, seal, and narrow passages more often.
- Hard water: Shorten the interval between deep cleans, particularly if the carafe is used repeatedly throughout the day.
- Frequent brewing: Rinse after each emptied pot. A second or third brew adds residue even when the first pot looked clean.
Glass usually makes the decision for you. Stains and scale are visible, so you can respond before the buildup becomes stubborn. Thermal carafes hide their interiors, making odor, cloudy rinse water, or a flavor change better warning signs. Stainless steel can hide an oily coating too, especially around the opening and lid, so inspect those areas rather than judging the body alone.
Material and use frequency should set the workload. A lightly used glass carafe may need deep cleaning only when visible residue appears. A frequently used thermal or stainless carafe deserves a regular inspection because concealed film can persist between washes. If the daily rinse no longer removes odor or leaves the rinse water clear, the carafe is overdue for a deeper clean.
Mistakes That Make Stains and Odors Worse
Leaving brewed coffee in the carafe overnight creates the hardest cleanup. Coffee oils dry onto glass and steel, while the lid and gasket trap odor. Empty and rinse the carafe after brewing instead of allowing residue to sit.
Skipping the lid is nearly as bad. The chamber may look clean while the underside, pour mechanism, and silicone seal hold the sour film that returns with the next brew. Remove the parts the design allows, wash each with mild soap, and dry them separately before reassembly.
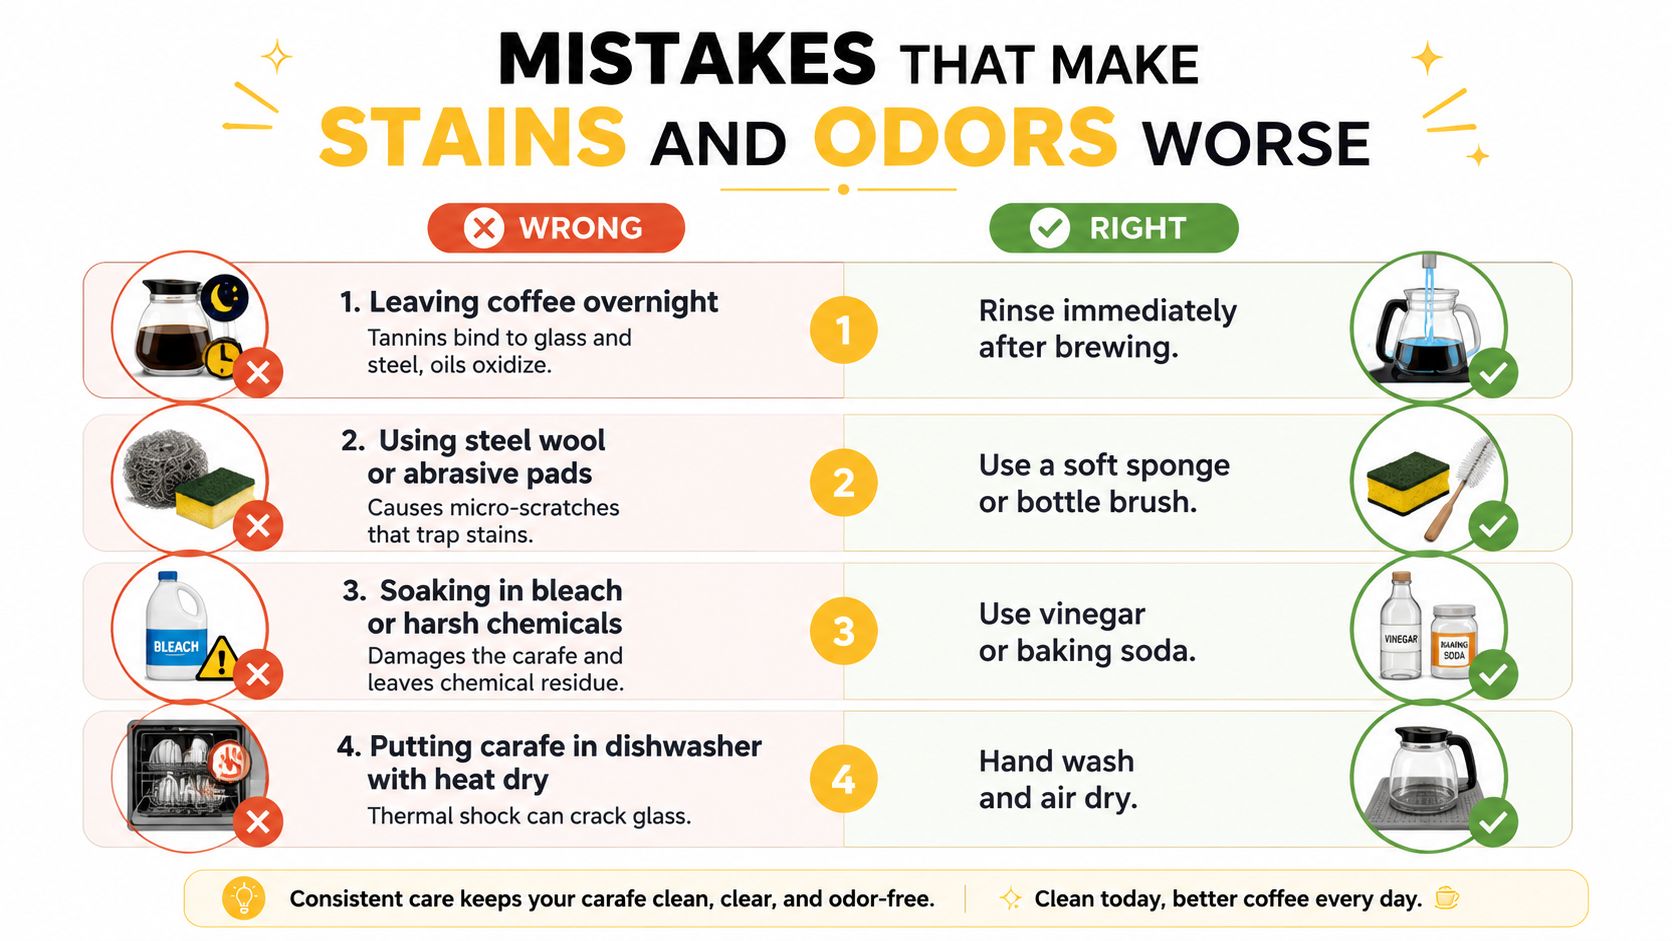
Avoid these common overcorrections:
- Using bleach or chlorine on stainless steel: Harsh chlorine chemistry can damage finishes and cause pitting. Do not trade a stain for a surface defect.
- Mixing vinegar and baking soda: The bubbling looks active, but the reaction neutralizes much of their cleaning action. Use one cleaner at a time.
- Scrubbing thermal interiors with metal: Metal tools can scratch the liner and leave new places for residue to collect. Choose a soft brush instead.
- Under-rinsing after descaling: Vinegar or cleaner left behind can affect aroma and taste. Rinse until the odor disappears.
- Using a hot plate as a storage area: Heat dries coffee oils into a tougher film. Empty the carafe rather than leaving residue on the hot plate.
Dishwashers require the same caution. If the manufacturer permits dishwasher cleaning, follow those instructions. Heat-dry cycles may still be unsuitable for a particular glass carafe, lid, gasket, or thermal assembly, so check every component rather than assuming the whole set is dishwasher-safe.
A Simple Cleaning Schedule You Can Stick To
A workable routine has three anchors: after-use rinsing, a regular wash, and a material-appropriate deep clean. The schedule succeeds because it removes decisions. You don't have to wait until the carafe looks alarming.
After every brew
Empty the carafe, rinse it with warm water, wash the interior if residue remains, and leave the lid open while it dries. “One brew” means every completed pot or batch, including the second pot made shortly after the first. If you use a stainless travel mug, rinse it the same day rather than closing it with coffee residue inside.
During the week
Give the carafe and lid a proper warm soapy wash with a soft sponge or bottle brush. Check the pour spout and gasket instead of cleaning only the visible chamber. If odor returns after washing, remove the seal if the design permits and wash the groove separately.
At the deep-clean trigger
Deep-clean when you see a scale ring, cloudy film, persistent odor, or a change in coffee taste. If none of those signs appears, a periodic monthly check is a sensible household habit, with more frequent descaling in hard-water conditions. Use vinegar for approved glass or compatible components when scale is the issue, and baking soda when coffee film or odor is the problem.
A compact checklist can live inside the cabinet:
- Empty after every brew
- Warm-water rinse
- Wash lid and gasket
- Air-dry with lid open
- Inspect weekly
- Deep-clean at the first visible film, odor, or scale
- Check manufacturer instructions before treating thermal parts
For equipment-care ideas that fit a busy morning routine, see this guide to an easy-to-clean coffee machine. A clean carafe takes less effort when the routine happens before oils dry and deposits harden.
If you want better coffee without adding a complicated ritual, visit Cartograph Coffee for organic instant coffee made for busy mornings, travel, camping, and easy brewing at home. Keep the carafe clean, keep the coffee convenient, and choose the format that fits the way you drink it.