Here’s the thing about making truly great iced coffee at home: it has almost nothing to do with fancy equipment. The real secret is in the technique. If you’ve ever just poured hot coffee over a glass of ice, you already know the most common mistake—and the watery, acidic result it produces.
But by rethinking your approach with methods like cold brew or Japanese-style flash chilling, you can easily craft a balanced, flavorful iced coffee that’s every bit as good as what you’d get at your favorite cafe.
Why Your Homemade Iced Coffee Tastes Wrong
Ever get that sinking feeling when your homemade iced coffee just doesn't hit the mark? It’s bitter, or weak, or just… off. You used your best beans and followed the directions, but it’s still a pale imitation of the smooth, rich drink you were craving.
Nine times out of ten, the problem isn't your coffee maker or a lack of expensive gadgets. It’s the method itself.
Of course, starting with the right foundation helps. Using quality coffee making products will always give you a better starting point, but even the best gear can't save a flawed brewing process.
The Problem with Pouring Hot Coffee Over Ice
The most common mistake people make is brewing a standard pot of hot coffee and immediately pouring it over a glass packed with ice. It seems logical, but this approach pretty much guarantees a bad cup.
Here’s what goes wrong:
- Massive Dilution: All that hot liquid melts the ice almost instantly. Before you even take a sip, your coffee is watered down, and all those nuanced flavors you paid for are gone.
- Acidity Overload: When you shock hot coffee with ice, it can actually accentuate the acidic and bitter notes, creating a harsh, unpleasant flavor. If you find most coffee too acidic, check out our guide on how to reduce the acidity of coffee.
You’re essentially setting yourself up for a weak, unbalanced drink from the start. To get delicious iced coffee, you have to ditch this habit and adopt a technique built for cold brewing.
The secret to exceptional iced coffee lies in controlling dilution and temperature from the very beginning. Instead of fighting against melting ice, the best methods make it part of the process or eliminate it entirely until serving.
This shift in thinking is bigger than just a home-brewing trick. The global iced coffee market is booming, and it’s projected to hit USD 10.08 billion by 2032. This isn't just a trend; it's a fundamental change in how people, especially younger generations, enjoy their daily coffee. For us at home, it means better access to beans and tools specifically designed for making fantastic cold coffee.
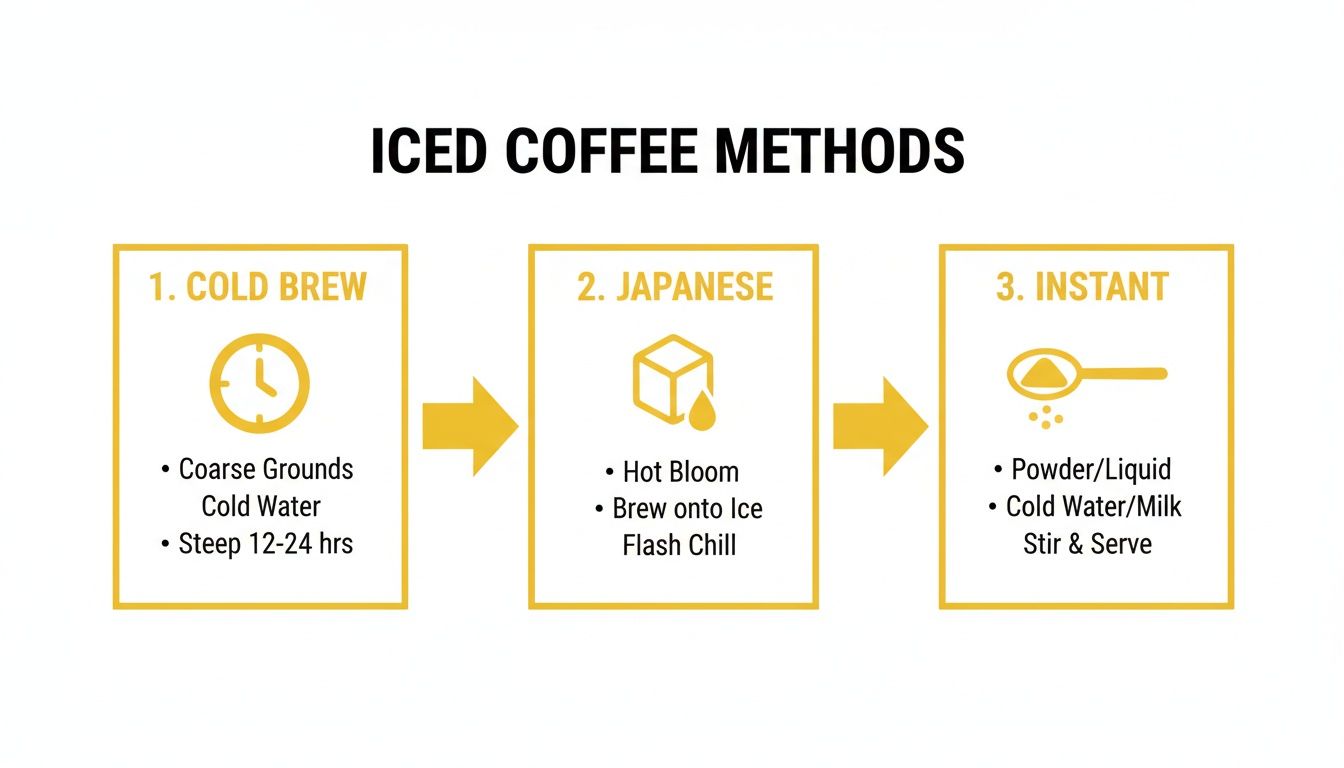
Which Iced Coffee Method Fits Your Life
So, what's the right way to do it? The best method for you really depends on your schedule, taste preferences, and how much effort you want to put in. Here’s a quick rundown to help you decide.
| Method | Time Required | Flavor Profile | Best For |
|---|---|---|---|
| Cold Brew | 12-24 hours (hands-off) | Smooth, low-acid, chocolatey | The patient planner who loves a mellow brew. |
| Japanese Flash-Chill | Under 5 minutes | Bright, aromatic, nuanced | Those who want pour-over quality, fast. |
| Modern Instant | Under 1 minute | Clean, balanced, versatile | The "I need it now" person who won't sacrifice taste. |
Each of these methods solves the dilution and acidity problem in its own way. Ready to find your new go-to? In this guide, we'll walk through exactly how to master three proven techniques for consistently amazing results:
- Cold Brew: For the smoothest, lowest-acid coffee imaginable.
- Japanese-Style Flash Chill: Perfect for pulling out bright, aromatic notes in minutes.
- Modern Instant Iced Coffee: The quickest way to a genuinely delicious cold drink.
Mastering Smooth and Simple Cold Brew
If you're chasing that impossibly smooth, rich, and never-bitter iced coffee, cold brew is where you want to be. Unlike methods that blast coffee with hot water, cold brew takes its time, slowly pulling flavor from the grounds over many hours. This gentle approach creates a brew that's noticeably less acidic, with a naturally sweet, almost chocolatey character.
Making great cold brew is more about patience than anything else. What you get in the end is a super versatile coffee concentrate that you can keep in the fridge for up to two weeks, ready to go whenever you are. And it's not just a niche thing—cold brew is a huge part of coffee culture now.
The global demand for iced coffee is massive, hitting over 1.4 billion liters in 2023. Here in the United States, cold brew accounts for a whopping 24% of all iced coffee sales, which just goes to show how much people love its smooth profile. It’s a rewarding skill to master at home, and it’s easier than you think.
The Foundation: Your Ratio and Grind
Getting cold brew right comes down to two things: the coffee-to-water ratio and the grind size. Nail these, and you're already 90% of the way to a perfect batch.
A solid starting point for your ratio is 1:8. That means one part coffee to eight parts water, by weight. So, if you use 100 grams of coffee, you'll want 800 grams (which is the same as 800 milliliters) of water. This creates a potent concentrate that's perfect for diluting later.
The grind is just as critical. You absolutely need a coarse grind—think of the texture of rough sea salt. If you use a fine grind, like for an espresso machine, you'll end up with a muddy, bitter brew that's a nightmare to filter.
Pro Tip: Don't have a grinder? No problem. Just ask your local coffee shop to grind the beans for you. Make sure to tell them you need a "coarse grind for cold brew or a French press."
This infographic gives you a quick visual on how cold brew stacks up against a couple of other popular methods.
As you can see, each technique has its own balance of time investment and flavor profile. Cold brew is definitely the go-to for brewers who value ultimate smoothness and are willing to wait for it.
The Steeping and Filtering Process
Once your coffee is ground and your water is measured, the rest is pretty straightforward. You don't need any fancy equipment; a big Mason jar or a French press will do the job perfectly. In fact, a good double-walled French press can make the filtering stage incredibly simple.
Here’s the basic game plan:
- Combine and Stir: Dump your coarse grounds into your container. Pour the cold, filtered water over them and give it a gentle stir. You just want to make sure all the grounds are wet.
- Steep Patiently: Cover it up and let it sit at room temperature for 12 to 18 hours. Any less, and your brew might be weak; any more, and you risk pulling out some bitter flavors. I find the 14-hour mark is often the sweet spot.
- Filter Thoroughly: This is key for a clean, grit-free cup. If you're using a French press, just slowly press the plunger down. With a jar, you'll want to pour the mixture through a fine-mesh sieve that's been lined with cheesecloth or even a paper coffee filter.
Serving and Storing Your Creation
All that waiting has paid off, and now you have a beautiful cold brew concentrate. It’s pretty potent, so you'll definitely want to dilute it before drinking.
A standard starting point for dilution is a 1:1 ratio—that means equal parts concentrate and water. But the best part about making it yourself is that you get to call the shots.
- For a classic iced coffee, fill a glass with ice, then add one part concentrate and one part cold water.
- If you're in the mood for a creamy latte, just swap the water for milk.
- Don't be afraid to play with the ratio until you find the exact strength you love.
Keep your undiluted concentrate in a sealed jar or bottle in the fridge. It will stay fresh and delicious for up to two weeks, giving you instant access to cafe-quality iced coffee anytime you want.
The Japanese Method for Instant Gratification
Sometimes you crave a vibrant, complex iced coffee but just don't have the 12 hours to spare for a cold brew. When that happens, the Japanese flash-chill method is your secret weapon. It delivers a stunningly aromatic and crisp cup in the same amount of time it takes to brew a normal pour-over.
The genius of this technique is all in the approach: you brew hot coffee directly over a measured amount of ice. This isn't just pouring hot coffee into a glass of ice, which often leads to a diluted mess. Here, the ice is a critical part of the brewing water from the start. This rapid chilling process instantly locks in all those delicate, volatile aromatic compounds that usually escape as coffee cools slowly. The result is a cup that's remarkably bright and full of life.
I find this method is absolutely unbeatable for showcasing the unique character of single-origin beans, especially ones with prominent fruity or floral notes. It’s like capturing the coffee's entire personality and serving it chilled.
Calculating Your Ratios for a Perfect Brew
Getting your ratios right is everything with the Japanese method. It’s the difference between a perfect brew and a watery, underwhelming drink. The trick is to think of the ice as part of your total water volume. A solid starting point that I always recommend is to substitute about one-third of your total water weight with ice.
Let's walk through a simple recipe using a standard 1:16 coffee-to-water ratio:
- Coffee: 25 grams, ground medium-fine (just a touch finer than you would for a regular V60).
- Total Water: 400 grams (which is 25g of coffee x 16).
- Ice: 133 grams (this is one-third of our 400g total).
- Hot Water: 267 grams (this is the remaining two-thirds).
By calculating it this way, you guarantee that as the hot coffee melts the ice, the final drink hits that ideal strength without ever tasting weak.
The fundamental shift here is treating the ice as a core ingredient, not an afterthought. This gives you precise control over strength and flavor, elevating what you're making from just "iced coffee" into a true craft beverage.
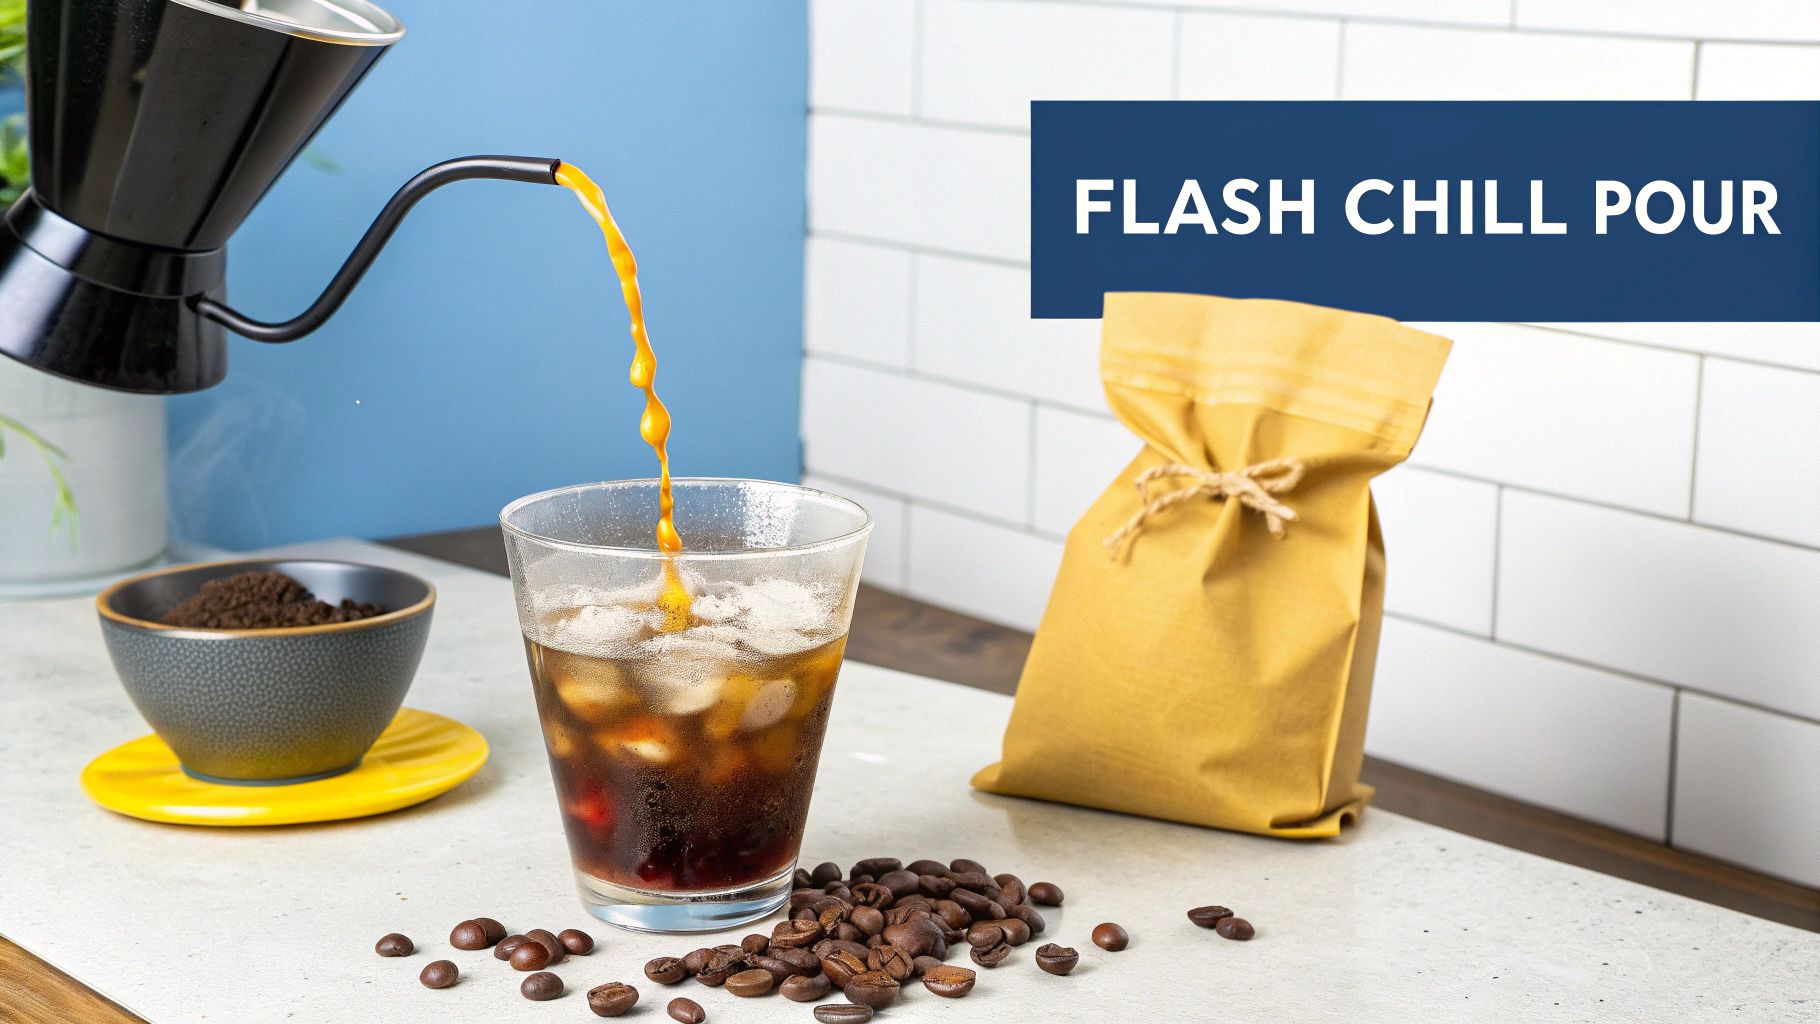
The Flash-Chilling Process Step-by-Step
Making Japanese-style iced coffee feels a lot like a standard pour-over, just with one key adjustment at the beginning. You'll need your usual pour-over dripper (like a Hario V60 or Kalita Wave), a server or a sturdy glass that can handle temperature change, a digital scale, and a kettle.
First up, place your server on the scale and add your calculated weight of ice. Pop the dripper on top, add a paper filter, and give it a quick rinse with hot water (don't forget to toss out that rinse water!). Now, add your coffee grounds to the filter and tare the scale back to zero.
Time to brew. Start your pour with just enough hot water to saturate the grounds—about 50 grams should do it. Let this "bloom" for 30-45 seconds. You’ll see the coffee bed expand as it releases trapped CO2, which is exactly what you want for an even extraction.
After the bloom, continue pouring the rest of your hot water in slow, steady circles. I aim to have all the water in by the 2 to 2.5-minute mark. As the freshly brewed coffee drips down, it hits the ice and chills instantly, locking in all that incredible flavor.
Fine-Tuning Your Technique for Best Results
Once you've got the basic process down, a few small tweaks can really take your coffee to the next level.
- Grind Size Matters: Since you're using less hot water, a slightly finer grind is needed to extract enough flavor in a shorter amount of time. If your coffee tastes weak or sour, try grinding a little finer next time. If it tastes bitter, you've gone too far—coarsen it up a bit.
- Agitate the Ice: When the last drop has fallen, give the server a good swirl. This helps any remaining ice melt and ensures the whole drink is perfectly chilled and consistent.
- Choose Your Beans Wisely: This method truly sings with light to medium roasts. Coffees from Ethiopia, Kenya, or Colombia often have that bright acidity and those fruity notes that are so beautifully preserved with flash-chilling.
Mastering this technique means you're only ever a few minutes away from a complex, refreshing, and genuinely high-quality iced coffee. It’s proof that instant gratification doesn't have to mean compromising on taste.
The Ultimate Shortcut to Delicious Iced Coffee
Let's be real—sometimes you just need great iced coffee without the wait. When you're craving a refreshing boost right now, the idea of waiting 18 hours for cold brew or fussing with a pour-over can feel completely out of reach.
This is where modern specialty instant coffee comes in. It’s the ultimate ace up your sleeve.
Forget the chalky, bitter stuff you might remember from your grandparents' pantry. Brands like Cartograph have completely changed the game. We're talking about crystallized coffee that dissolves instantly, even in cold water, and tastes genuinely clean, balanced, and delicious. This is your ticket to amazing iced coffee when time is of the essence.
It’s the perfect fix for a hectic morning, an afternoon slump at the office, or even when you’re out camping and don't want to lug around a bunch of gear.
The Classic 30-Second Iced Latte
This might just be the fastest way to make a genuinely good iced latte. Since high-quality instant coffee dissolves so easily, you can skip the brewing step altogether and build the drink right in your glass.
First, create your coffee base. Add one or two teaspoons of Cartograph instant coffee to a glass with about two tablespoons of cool water. Give it a good stir for 10-15 seconds until it’s a smooth, fully dissolved liquid concentrate.
Next, just fill the glass with ice and pour in your milk of choice—dairy, oat, almond, whatever you like.
If you want it a little sweet, add a pump of vanilla or a drizzle of simple syrup. Stir it all together, and you're done. Seriously. You just made a creamy, delicious iced latte in less time than it takes to find your keys.
The secret to a perfectly smooth, grit-free latte is dissolving the coffee in that small amount of water first. If you just dump the granules into a full glass of cold milk, they can clump up. This little pre-mixing step guarantees a silky texture every time.
The Effortlessly Creamy Whipped Coffee
You’ve probably seen this gorgeous drink—also known as Dalgona coffee—all over social media. It looks incredibly fancy, but it's surprisingly easy to whip up at home, and the result is a rich, velvety treat.
The magic is all in the ratio: equal parts of three simple ingredients.
- 2 tablespoons instant coffee
- 2 tablespoons sugar
- 2 tablespoons hot water
Toss all three into a mixing bowl. Using a hand mixer or a milk frother, whip them on high speed for about 2 to 3 minutes. You'll watch it transform from a dark liquid into a thick, glossy, light-brown foam that holds stiff peaks.
Once the whip is ready, grab a glass, fill it with ice and milk, and spoon that beautiful, fluffy coffee foam right on top. The contrast between the cold milk and the airy, sweet coffee is just fantastic. For more ideas and variations, you can check out our deep dive into making iced coffee with instant coffee.
Whether you're making a lightning-fast latte or a decadent whipped coffee, it’s clear that modern instant coffee has proven you don't have to sacrifice quality for convenience.
Customizing Your Perfect Iced Coffee
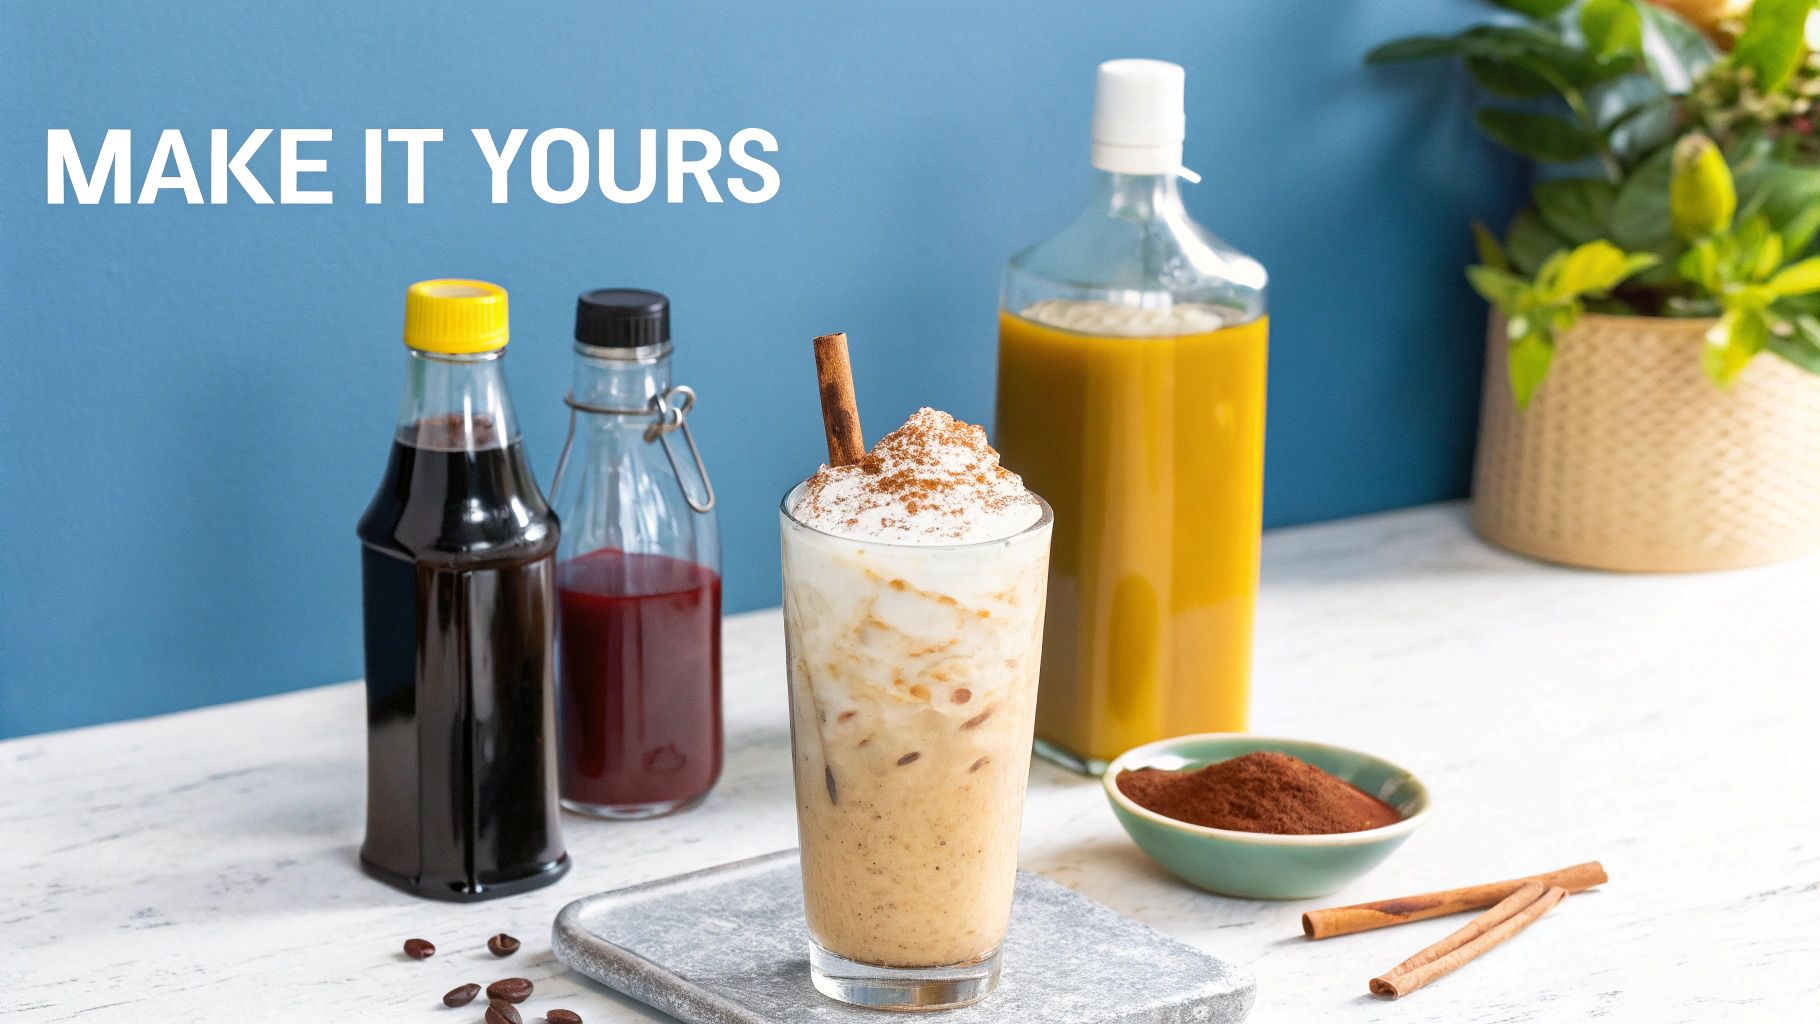
Alright, you've nailed down your brewing method and you've got a fantastic base. This is where the real fun starts. Now we get to transform that simple, perfectly brewed iced coffee into your signature drink—the kind you’d gladly pay six bucks for at a café, but get to enjoy in your own kitchen.
Customizing your drink is all about layering flavors and textures. Sure, it starts with milks and sweeteners, but we can go so much further. Think of this as your personal playbook for building a coffee that’s perfectly tuned to your taste.
Crafting Homemade Syrups for Unbeatable Flavor
Let’s be honest, store-bought syrups are convenient, but they can’t touch the clean, pure flavor of a homemade version. The good news? They're ridiculously easy to make and give you total control over the sweetness and ingredients, letting you skip the artificial aftertaste that can ruin a perfectly good brew.
A basic simple syrup is your foundation. It’s just a 1:1 ratio of sugar and water, heated gently until the sugar disappears. That’s it. From there, the possibilities are endless.
Classic Vanilla Bean Syrup
- In a small saucepan, combine 1 cup of water and 1 cup of granulated sugar.
- Take a whole vanilla bean, split it down the middle, and scrape all those amazing seeds into the pan. Toss the pod in too—it's packed with flavor.
- Heat it over a medium flame, stirring just until the sugar dissolves. You don't want it to boil.
- Kill the heat and let it steep for about 30 minutes. Strain it into a clean glass bottle, and it'll last in the fridge for up to a month.
Rich Caramel Syrup
If you're after something with a deeper, toastier flavor, caramel is the answer. Start by melting 1 cup of sugar over medium heat until it turns into a beautiful amber liquid. Carefully whisk in 6 tablespoons of butter, then slowly pour in ½ cup of heavy cream. Let it bubble for just one minute before taking it off the heat and stirring in a teaspoon of vanilla extract.
Homemade syrups aren’t just for sweetness; they’re for adding authentic flavor. A real vanilla bean or properly caramelized sugar provides a depth that you just can’t get from a plastic bottle.
Choosing the Right Milk and Creamy Alternatives
The milk you add does more than just lighten your coffee; it fundamentally changes the texture and taste. And with all the amazing non-dairy options out there, we've got a huge playground to explore.
- Oat Milk: This is the current champion for a reason. It’s naturally creamy with a subtle sweetness that just works with coffee. Look for the "barista-style" blends; they’re designed to create a silky mouthfeel without separating in the cold.
- Almond Milk: A lighter-bodied choice with a hint of nuttiness. It’s less creamy than oat milk, making it a great pick when you want the coffee’s origin notes to really shine through.
- Soy Milk: If you want richness and a distinct flavor, soy milk is a fantastic choice. It delivers a creamy consistency and froths up beautifully for lattes or cold foam.
- Coconut Milk: For a tropical twist, a little full-fat canned coconut milk (thinned with a splash of water) adds an unmistakable richness and flavor that's incredible with certain coffee profiles.
The Perfect Finishing Touches
A final flourish can take a great iced coffee and make it unforgettable. These little additions bring texture, aroma, and a bit of visual flair, making your home brew feel like a true café experience.
Silky Cold Foam
You don't need a fancy espresso machine to make amazing cold foam. All it takes is a simple handheld milk frother.
- Pour about ¼ cup of cold skim milk (or a barista-blend non-dairy milk) into a tall glass. Skim milk actually froths best!
- Add a tiny splash of your favorite syrup to sweeten and flavor it.
- Submerge the frother and whip for 20-30 seconds. You'll see it double in volume and turn into a thick, spoonable foam.
- Gently pour or spoon it right over the top of your iced coffee.
Beyond foam, think about other simple touches. A light dusting of cinnamon or cocoa powder adds a lovely aromatic note before the first sip. For something more decadent, grab a vegetable peeler and a good-quality dark chocolate bar to make delicate chocolate shavings. It's these small details that make your coffee feel truly special.
Your Iced Coffee Questions, Answered
Even with the best recipes, you're bound to run into a few questions when you start making iced coffee at home. It's just part of the process. Think of this as your go-to troubleshooting guide for those little issues that pop up, from a watery brew to picking the right beans.
We'll tackle the most common problems and curiosities so you can get back to making—and enjoying—your perfect cup.
Why Does My Iced Coffee Taste So Watery or Bitter?
This is, hands down, the number one issue people run into. A sad, disappointing cup of iced coffee is usually caused by a couple of simple missteps, but the good news is they're incredibly easy to fix.
If your coffee tastes watery, the culprit is almost always pouring hot coffee directly over ice. That sudden heat shock melts the ice way too fast, diluting your drink before you even take a sip. The best way around this is to use a method that accounts for the ice, like the Japanese flash-chill technique, or to start with a pre-chilled concentrate like cold brew.
Bitterness, on the other hand, is a dead giveaway of over-extraction. This just means the water pulled too much of the bitter stuff from the coffee grounds.
- Hot Brews: Your grind might be too fine, or you simply brewed it for too long.
- Cold Brew: The most common mistake is steeping the concentrate for over 24 hours. Keep it in that 12-18 hour sweet spot with a coarse grind, and you'll get a smooth, balanced result every time.
Can I Make a Big Batch of Iced Coffee for the Week?
Absolutely! This is a fantastic way to make your mornings run a little smoother. For batching, cold brew is definitely the way to go.
After you've steeped and filtered your cold brew concentrate, just pour it into an airtight container and pop it in the fridge. It'll stay fresh and tasty for up to two weeks. When you're ready for a cup, just pour some over ice and add water or milk to your liking.
The Japanese flash-chill method is a different beast entirely. It’s all about capturing those delicate, fresh aromatics that disappear quickly. It’s really designed to be enjoyed right away. While you can store it, that vibrant character that makes it so special will start to fade within a few hours.
And of course, instant iced coffee is made on demand by its very nature, so there’s no need to batch it.
What Are the Best Coffee Beans for Iced Coffee?
The "best" bean really comes down to what you like and which method you're using. Different brewing techniques are great at highlighting different characteristics in the coffee.
- For Cold Brew: Since this method produces a super smooth, low-acid coffee, medium to dark roasts are a fantastic choice. The slow steeping process perfectly complements their natural notes of chocolate, nuts, and caramel.
- For Japanese Flash-Chill: This is where you can really showcase complexity. Light to medium roasts, especially single-origins from places like Ethiopia or Colombia, are a dream. The rapid chilling locks in all their bright, fruity, and floral notes.
- For Instant Methods: When convenience is the goal, you need a high-quality instant coffee. Something like Cartograph Coffee is made to dissolve easily in cold water and gives you a consistently clean, balanced flavor that’s a perfect base for a simple iced black coffee or a fancy latte.
Do I Need Any Special Equipment to Get Started?
Not at all. It's easy to get lost in the world of coffee gadgets, but you can make amazing iced coffee with simple tools you probably already have in your kitchen. Fancy gear is fun, but it’s not required.
You can easily get started with just the basics:
- For Cold Brew: A big Mason jar and a fine-mesh sieve lined with cheesecloth will do the job perfectly.
- For Japanese-Style: An inexpensive plastic pour-over cone, like a Hario V60, is all you need to get fantastic results.
- For Instant Iced Coffee: All you need is a glass and something to stir with. Seriously.
Focus on getting your technique down first. You can always decide to upgrade your setup later as you figure out what you like.
Ready to skip the guesswork and get straight to a perfect glass? Cartograph Coffee makes crafting a delicious iced coffee as simple as scooping and stirring. Our organic instant coffee is designed for exceptional flavor and ultimate convenience, so you can enjoy a café-quality drink anywhere, anytime.
Explore Cartograph Coffee and elevate your daily ritual today.