You open the fridge on a humid morning, pour a glass of dark coffee over ice, and get cocoa, caramel, and a clean finish instead of the ashiness that can show up in a rushed hot brew. That's the appeal of cold brew. It rewards a little planning, but the work itself is mostly measuring, steeping, and filtering.
The best way to make cold brew coffee depends on what you value. A slow immersion batch gives you the most control and requires almost no active time. A faster hot-chill method can rescue a busy morning, while instant coffee offers a practical fallback for hotel rooms, camping trips, and parents making coffee between other tasks. The method matters, but so do grind size, ratio, water, temperature, and patience.
Why Cold Brew Tastes So Smooth
You can steep coffee overnight and still get a harsh cup if the grind is too fine or the batch is too strong. Smooth cold brew comes from controlled immersion, not from cold water alone. Grounds remain surrounded by water while soluble compounds move gradually into the brew, creating a profile that often feels rounder and less sharp than hot-brewed coffee.
Cool water changes the pace and balance of extraction. Cold brew still draws caffeine, oils, and aromatic compounds from the coffee, but the slower process can highlight chocolate, nuts, sweetness, and body without the immediate intensity of hot extraction. The result depends on how temperature, time, grind, and ratio interact.
Roaster's rule: Cold brew is not automatically better because it uses cold water. It improves when you control the variables instead of treating a long steep as permission to ignore them.
A jar of coarse grounds and cool water remains the simplest reliable setup. After hours of steeping, separate the liquid from the grounds before serving. A peer-reviewed study describes cold brew as a process where temperature, grind size, coffee-to-water ratio, and extraction time all influence the result, rather than a recipe with one permanent definition. It also connects brew-ratio changes with extraction yield and titratable acidity. The study on cold brew extraction variables provides the technical detail behind those findings.
Cold brew and iced coffee use different starting points. Iced coffee is generally brewed hot and chilled, while cold brew extracts coffee in cool water for longer. Cumbre Coffee explains the distinction in its guide to cold brew versus iced coffee.
Choose the method around the morning you have. Slow immersion gives the best control and repeatability. Hot-chill brewing gets coffee ready sooner, while instant coffee works when travel, childcare, or a missing grinder makes a full setup impractical.
The Core Variables Behind Every Cold Brew Recipe
A reliable cold brew comes from controlling five variables. Change one at a time, and you can identify what your coffee needs instead of adding grounds or extending the steep at random.
| Variable | Recommended Range | Effect on Flavor |
|---|---|---|
| Coffee-to-water ratio | 1:8 for concentrate, 1:16 for ready-to-drink coffee | More coffee creates a denser, stronger brew. More water produces a lighter cup. |
| Grind size | Coarse, similar to sea salt or raw sugar | Coarse particles extract gradually and filter cleanly. Fine particles can taste harsh and muddy. |
| Water | Filtered water with balanced mineral content | Clean water lets the coffee's sweetness and aroma show through. |
| Steep time | Commonly 8 to 24 hours, depending on method | More time deepens extraction, but too much can increase roughness. |
| Temperature | Cool or room-temperature water | Colder brewing slows extraction. Warmer brewing moves faster but changes the flavor profile. |
Ratio controls strength before you pour
For a concentrate, start at 1:8, meaning one part coffee by weight to eight parts water. Dilute it later with water, milk, or ice. A ready-to-drink batch can begin closer to 1:16, which avoids adjusting every glass.
Sensory testing has shown that ratio affects body, aftertaste, overall acceptance, and pH. That makes ratio a core brewing decision, not merely a serving preference. The peer-reviewed cold brew optimization paper provides the research detail behind this choice.
A concentrate gives you flexibility, but it also adds a dilution step. If mornings are rushed, brew closer to drinking strength. If you serve different people or change the amount of ice and milk, concentrate is easier to adjust.
Grind and temperature decide how quickly coffee moves
Use a burr grinder and aim for particles resembling coarse sea salt. Espresso-fine coffee extracts too aggressively at the surface and leaves more sediment. Blade grinders create a mix of dust and oversized pieces, so some coffee can become harsh while other particles remain under-extracted.
Water temperature sets the pace. Refrigerated water extracts slowly, while room-temperature water moves faster. Neither option is automatically correct. Match the temperature to the steep time, and shorten the process if you use warmer water rather than following an overnight schedule without tasting.
Time is the final lever. Home methods commonly sit in the 8 to 24-hour range, but a longer steep does not guarantee a sweeter cup. Once extraction has gone far enough, extra time can add roughness instead of useful depth.
Keep a simple log of the bean, ratio, grind, temperature, and finish time. That record makes small adjustments repeatable, whether you are dialing in a careful batch or adapting the method to a busy morning.
The Slow Immersion Method From Start to Finish
For a practical concentrate, weigh 100 grams of freshly roasted coffee and grind it coarse. A burr grinder will give you a more even bed than a blade grinder, which matters because uneven particles create both dusty bitterness and hollow under-extraction in the same jar.
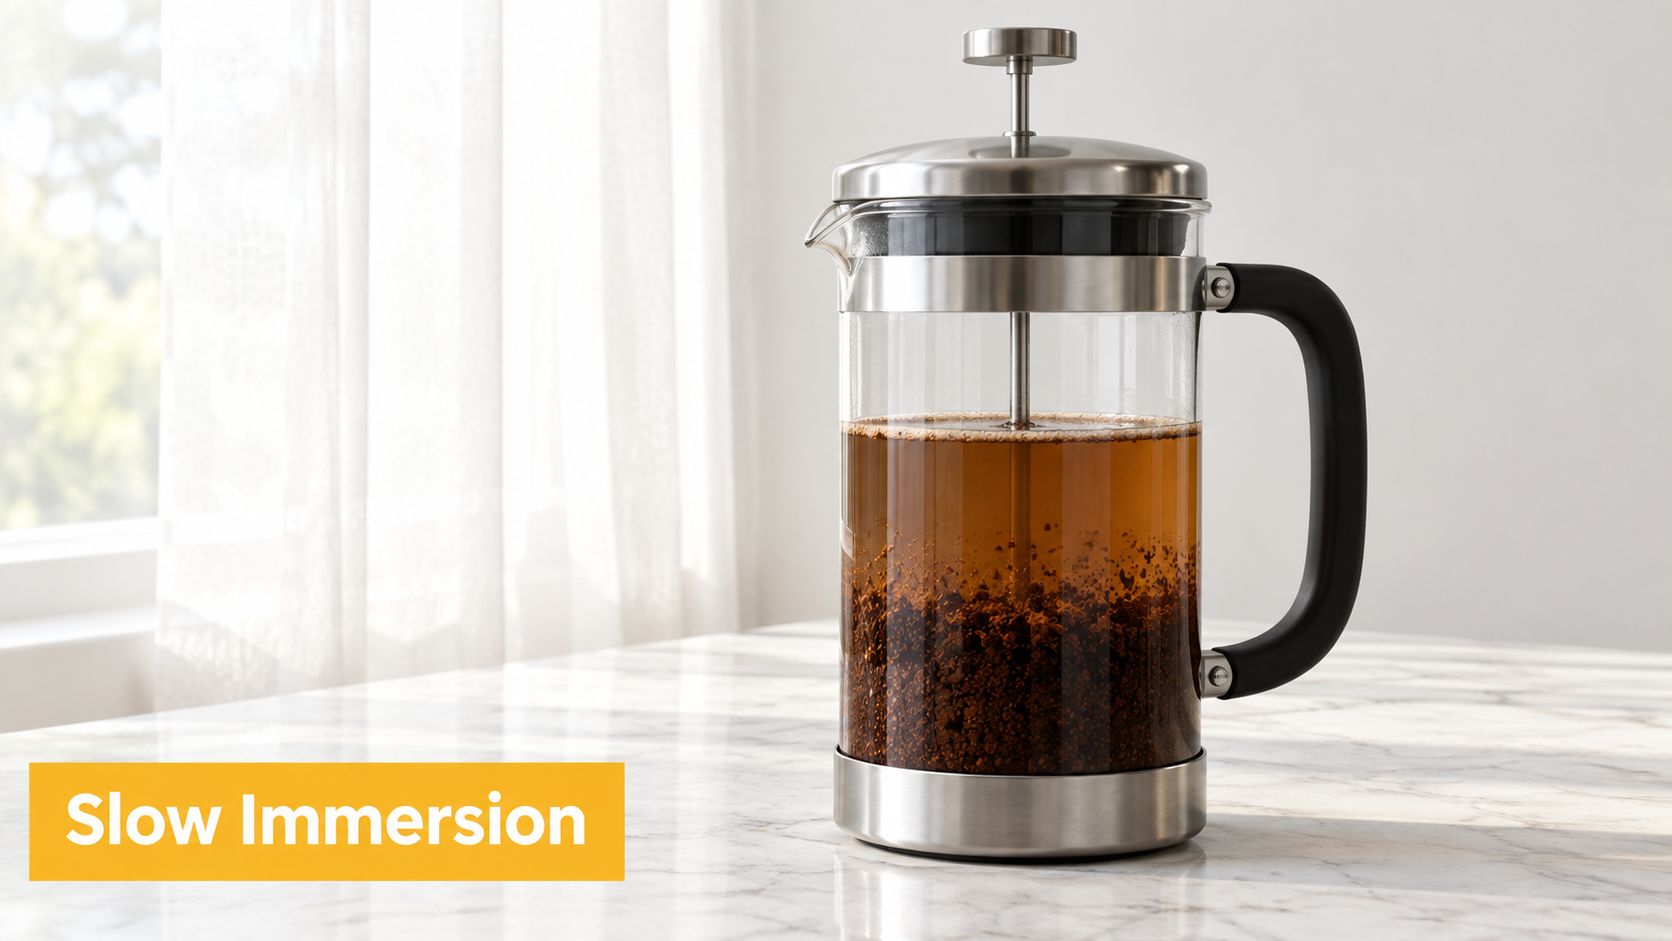
Add the grounds to a 1.5-liter glass jar or French press. Pour 800 milliliters of filtered water in a slow circular motion, aiming to wet all the coffee rather than flooding one area and leaving dry pockets elsewhere. Give the mixture one gentle stir to break up the floating crust, then cap the container loosely. A loose cap prevents spills while allowing you to avoid building pressure in a sealed container.
Place the jar in the refrigerator for 14 hours. This cool immersion approach is a useful starting point for medium and darker roasts because it gives the brew time to develop body without asking you to guess when a fast extraction has finished. If your refrigerator is crowded or the jar is difficult to handle, a French press is often easier to plunge and pour.
Filtering determines whether the final drink feels polished or gritty. Decant slowly through a paper-lined fine-mesh sieve into a clean bottle, keeping the stream gentle so the settled grounds stay behind. A paper filter takes longer, but it removes more sediment than a metal screen. With a French press, lower the plunger slowly and pour the concentrate away from the compacted grounds.
For more guidance on adjusting the steep to your schedule, use this cold brew steep-time guide alongside your tasting notes.
The concentrate should be deep brown, aromatic, and free from a thick layer of sludge at the bottom. The exact yield will be lower than the starting water because coffee grounds retain liquid, so don't worry if the bottle isn't filled to the original volume.
Let the filtered coffee speak before you dilute it. A successful batch smells sweet and roasty, often with cocoa or toasted-nut notes, and tastes concentrated without a dry, burnt finish.
Choosing Between Slow Steeping and Fast Hot-Chill Brewing
Slow immersion and hot-chill brewing solve different problems. The overnight method is forgiving and low effort. The hot-chill method is useful when you need a cold coffee drink on the same day and have a kettle, a heatproof brewer, and an ice bath.
| Variable | Slow Overnight | Fast Hot-Chill |
|---|---|---|
| Coffee-to-water ratio | 1:8 concentrate | 1:5 concentrate |
| Water | Cool or room-temperature | Near-boiling |
| Brew time | About 14 to 18 hours | About 4 minutes, followed by immediate chilling |
| Active work | Minimal | More hands-on |
| Flavor direction | Rounded, sweet, low bitterness | Brighter, more aromatic, potentially sharper |
| Equipment | Jar or French press, filter | Brewer, kettle, ice bath, scale |
| Best use | Planned batches | Same-day coffee or unexpected guests |
For slow brewing, combine coffee and water at the 1:8 ratio, steep at room temperature or in the refrigerator, and filter when the flavor tastes developed but not woody. The method suits anyone who can prepare coffee before bed. It also gives you a repeatable base for several drinks without standing over a kettle.
The fast method uses a stronger 1:5 ratio. Brew with near-boiling water for 4 minutes, then move the concentrate immediately into an ice bath containing ice equal to 40% of the brewed volume. The rapid cooling stops the brew from continuing to extract and gets the coffee cold in under an hour.
Hot-chill coffee can preserve more of the aroma associated with hot brewing, but it usually needs closer attention. It may taste brighter and less mellow, and it requires more equipment and timing. Slow cold brew generally offers a softer profile and less active work, but you need to plan ahead.
Choose slow immersion when taste is the priority and you have time before the next drink. Choose hot-chill when guests arrive soon, your fridge is full, or you forgot to start the overnight jar.
A No-Equipment Cold-Brew-Style Recipe With Instant Coffee
When a grinder and a long steep aren't realistic, instant coffee can make a convincing cold-brew-style drink with almost no equipment. The key is to rehydrate it carefully rather than dumping dry crystals into water and drinking immediately.
Add 2 tablespoons of Cartograph Coffee instant single-origin coffee to 12 ounces of cold filtered water. Stir briefly until the coffee dissolves, then leave the drink uncovered in the refrigerator for 10 minutes. Pour slowly through a paper towel or fine-mesh strainer into a clean glass or bottle.
The short rest gives tiny undissolved particles time to settle. Skipping it is the usual reason this preparation tastes chalky or sharp, not proof that instant coffee can't work cold. Instant coffee has already been brewed and dehydrated, so you're rehydrating an existing coffee rather than extracting new compounds from ground beans.
For a deeper explanation of the technique, see this instant cold brew preparation guide.
Serve it over ice with a splash of milk or oat milk. If the drink tastes too intense, add more water before adding sweetener, because dilution changes body and strength together while sugar only masks the balance.
The method scales easily for a travel mug, hotel room, office kitchen, or camping cooler. You need a spoon, a cup, cold water, and a basic filter. A paper towel works in a pinch, though a fine-mesh strainer is cleaner and easier to control.
This isn't identical to a long immersion batch. It won't reproduce the same texture or aromatic development from freshly ground beans, but it succeeds at the more important practical task: making a smooth cold coffee when the ideal setup isn't available.
Troubleshooting Bitter, Weak, or Sour Cold Brew
Cold brew problems usually come from one variable drifting too far. Don't change the ratio, grind, water, and time all at once. If you do, you won't know which adjustment fixed the cup.
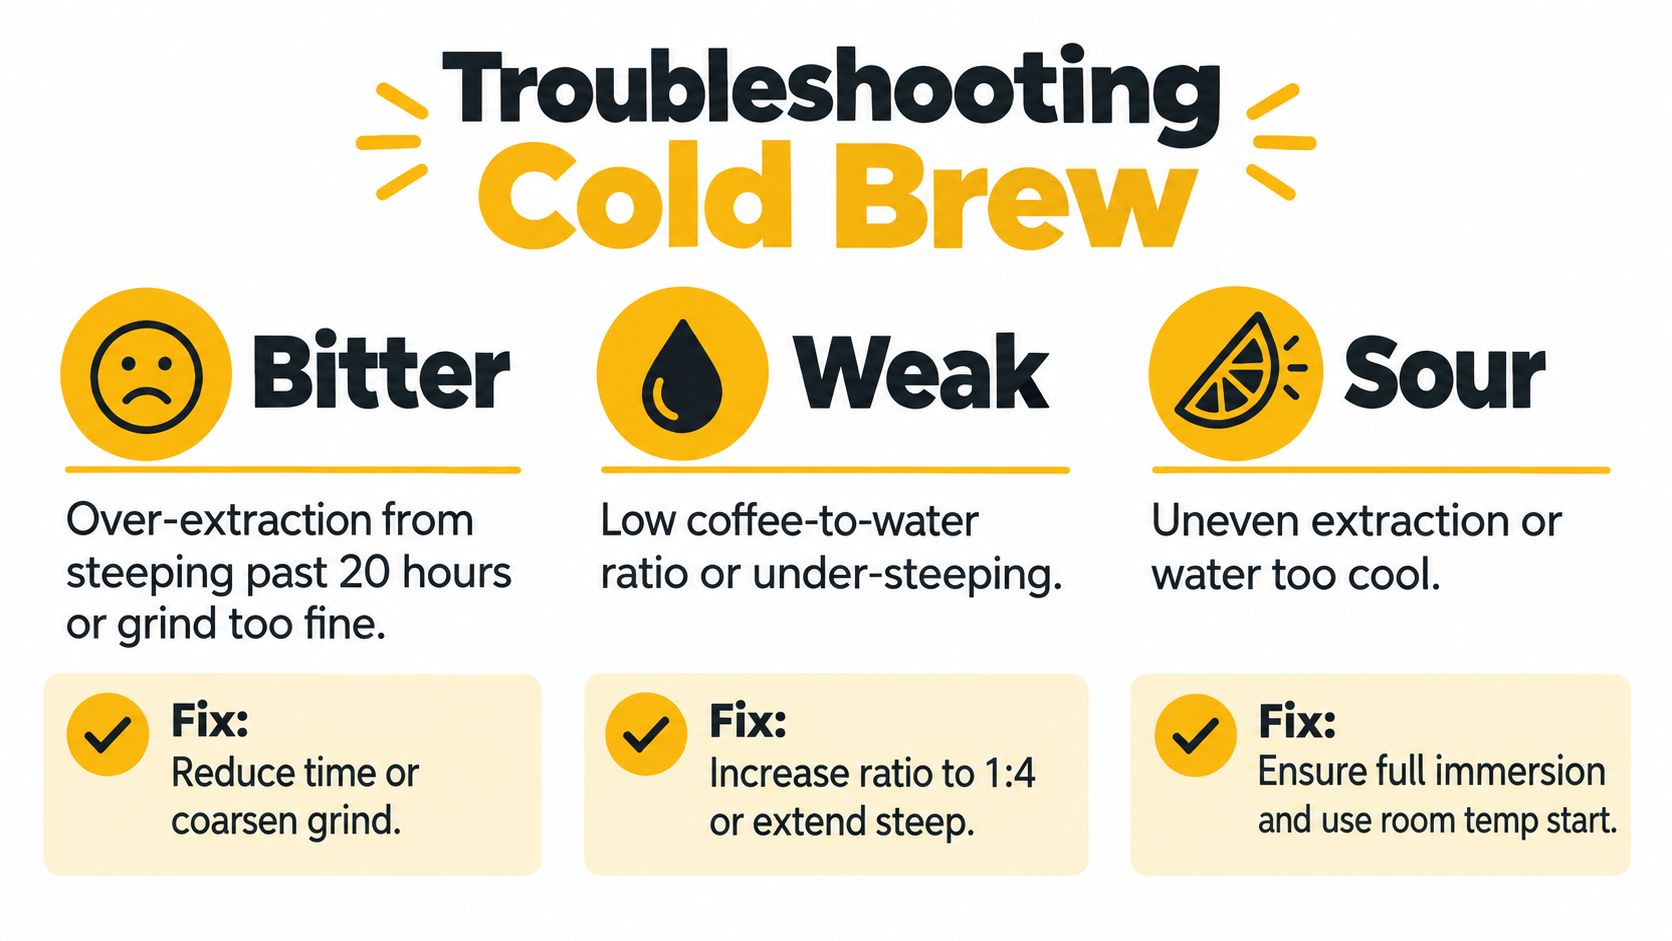
Bitter means the extraction went too far
A bitter, dry, or woody batch is often over-extracted. The likely causes are a steep beyond 20 hours, water above 72°F, or a grind that became too fine because the grinder shifted or the coffee came pre-ground.
Start with the least disruptive correction. Shorten the steep, or move the grind coarser. Don't immediately add milk and sugar to hide the problem, especially if you're trying to establish a reliable house recipe.
Weak means the brew needs more contact or density
Weak cold brew can result from too little coffee, insufficient steep time, or uneven particle size. A blade grinder often creates this problem because its fine dust extracts quickly while larger fragments contribute very little.
Try a coarser, more consistent grind and extend the steep before increasing the amount of coffee. If you want a denser concentrate, a 1:4 ratio is a possible adjustment, but use it deliberately because the resulting drink will need more dilution.
Sour or chalky points to a different failure
Sour, sharp acidity usually indicates a short extraction, uneven immersion, or a light roast that needs more contact time. Coffee stored as grounds before brewing can also lose some of its liveliness and produce a flatter, less integrated cup.
For the instant version, chalkiness most often comes from skipping the 10-minute settling period. Let the drink rest, then filter slowly. That simple pause removes the fine particles that create the powdery sensation.
One-batch discipline: Change one variable per batch and write down the result. Cold brew improves faster when you keep evidence instead of relying on memory.
Storing, Serving, and Flavoring Your Cold Brew
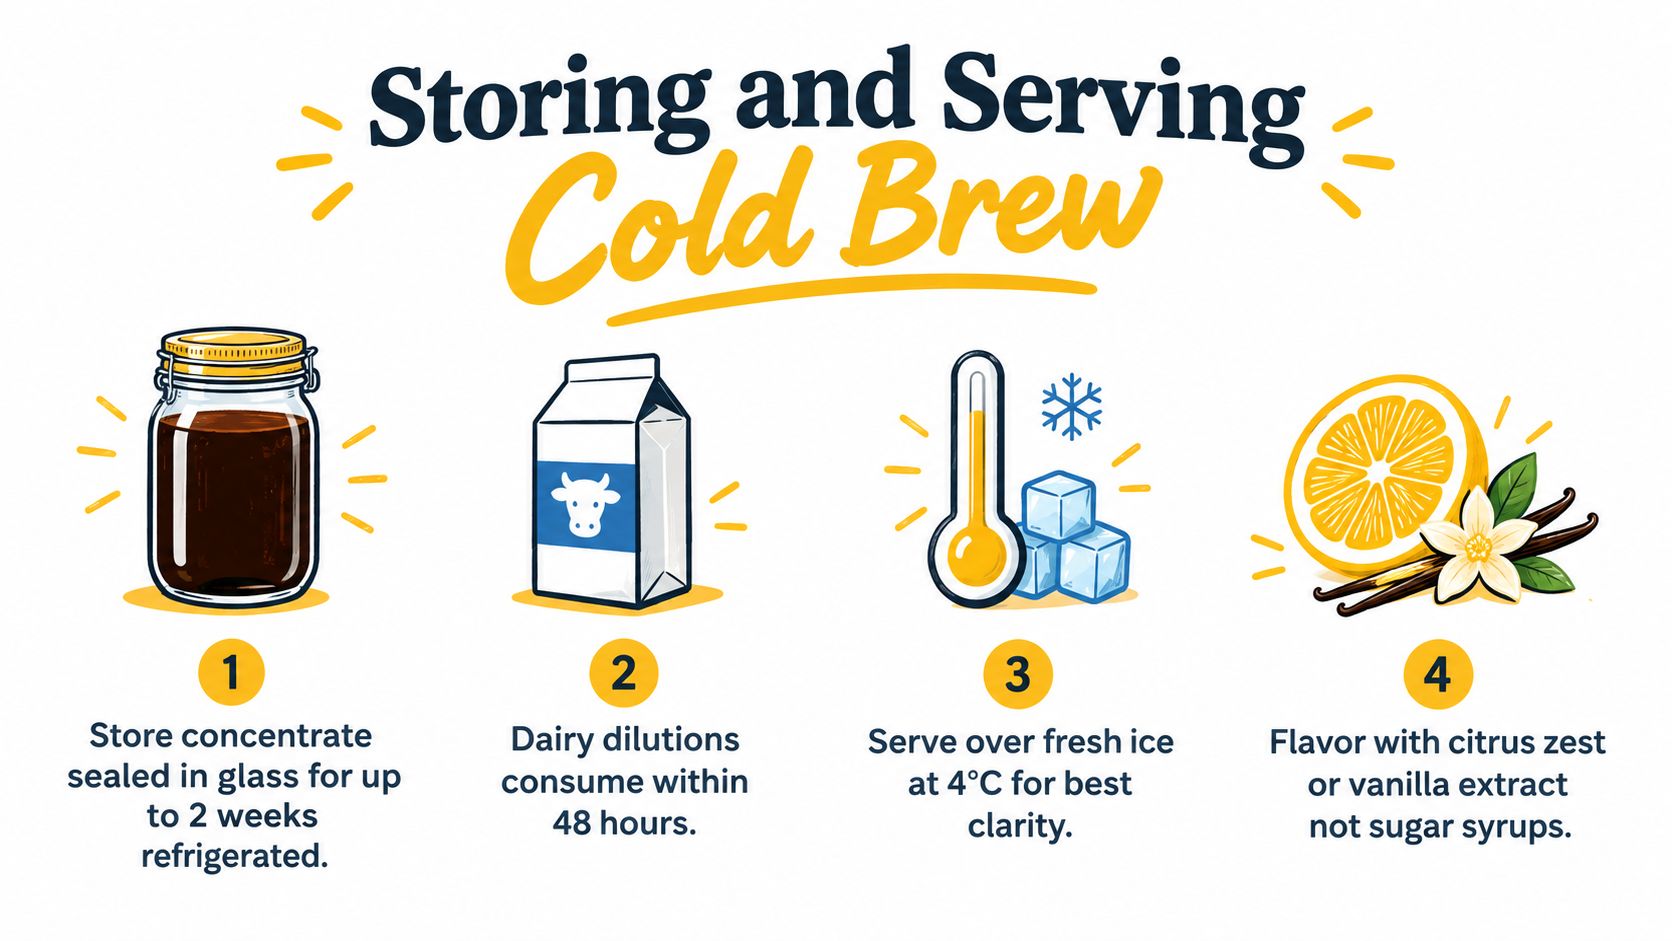
Filter the concentrate into a clean glass bottle or mason jar and keep it sealed in the refrigerator. A plain concentrate can remain refrigerated for up to two weeks, while a dairy-based dilution should be consumed within 48 hours. Use clean equipment at every stage, and discard the batch if it develops an unpleasant smell or visible spoilage.
A one-to-one dilution is a useful serving starting point. Combine equal parts concentrate and water or milk over ice, then adjust from there. Use less diluent for a stronger morning drink and more for a lighter afternoon glass. Ice contributes water as it melts, so taste the coffee after a few minutes rather than judging it immediately.
Match the serving style to the coffee
Cold brew doesn't have to stay over ice. Try these formats:
- Over fresh ice: The simplest option, with water added to taste.
- With milk or cream: Dairy, oat milk, and other alternatives soften the concentrate and add texture. This guide to milk in cold brew covers the practical pairing.
- With tonic water: Use a lighter dilution and pour the coffee gently over the tonic for a bitter, sparkling drink.
- Gently warmed: Warm the diluted coffee carefully rather than boiling it. You'll keep a smoother profile while getting a hot cup.
Flavorings work best when you add them to a small serving first. For vanilla sweet cream, stir vanilla bean paste into a splash of half-and-half before adding it to the coffee. For a spiced version, mix cinnamon and nutmeg directly into the concentrate so the flavor distributes evenly. For mocha, dissolve dark cocoa powder in a small amount of warm water before stirring it into the cold brew, which avoids dry cocoa clumps.
The most reliable routine is simple. Brew Sunday evening, filter Monday morning, decant into a 1.5-liter bottle, and dilute each glass through the week. Keep the concentrate plain until serving, and you'll have more control over strength, milk, ice, and flavor than you would with one large pre-mixed batch.
For a reliable everyday setup, explore Cartograph Coffee for organic instant coffee suited to home routines, work, travel, and camping. Keep freshly ground coffee for the slow immersion batches, and use the instant format when convenience matters more than a long steep.